
BEXO ERP — Illustrated User Tutorial
Version: 1.0 | Audience: All Users | Last Updated: May 2026
Welcome to the BEXO ERP illustrated tutorial. This guide walks you through every major module of the system with annotated screenshots, step-by-step instructions, tips, and warnings. Whether you are logging in for the first time or mastering advanced features like payroll processing and manufacturing orders, this tutorial will serve as your comprehensive reference.
BEXO ERP is a full-featured enterprise resource planning platform built on .NET 8. It covers sales, purchasing, inventory, manufacturing, finance, human resources, CRM, property management, and system administration — all from a single, unified desktop application.
Note: This tutorial assumes you have been given a user account by your system administrator. If you do not yet have credentials, contact your BEXO administrator before proceeding.
Table of Contents
- Part 1: Getting Started
- Part 2: Sales & Customers
- Part 3: Purchasing & Supply Chain
- Part 4: Inventory & Stock
- Part 5: Production & Manufacturing
- Part 6: Finance & Accounting
- Part 7: Human Resources & Payroll
- Part 8: CRM & Sales Pipeline
- Part 9: Property & Rental Management
- Part 10: Reports & Analytics
- Part 11: Administration
Part 1: Getting Started
1.1 Launching BEXO
When you first open the BEXO ERP application, the login screen is the gateway to the entire system. The interface is clean and minimal by design — there is nothing to configure before signing in. BEXO runs as a Windows desktop application, so you will find it in your Start Menu or as a shortcut on the desktop, typically labeled BEXO ERP.
The login screen presents two primary input fields: Username and Password. Below these fields you will find a Company dropdown, which is especially important in multi-entity deployments where your organization operates more than one registered company. Each company maintains its own separate ledger, employee records, and inventory, so always confirm you are logging into the correct entity before proceeding.
Tip: If your organization uses Active Directory or single sign-on, your administrator may have configured BEXO to pre-populate your username. In that case, you only need to type your password.
The bottom of the login screen also displays the current application version number. If you ever need to report a bug or request support, always include this version number in your message. The login page is also where you will land automatically if your session expires due to inactivity — BEXO enforces a configurable idle timeout for security compliance.
1.2 Logging In
To log in, type your username in the first field and your password in the second. Passwords are masked by default (displayed as dots). Once both fields are filled, select the correct company from the Company dropdown list. If you belong to only one company, this will default automatically. Click the Login button or press Enter to proceed.
If you enter incorrect credentials, BEXO will display an error message beneath the form. After a configurable number of failed attempts (typically five), the account will be temporarily locked for security reasons. Contact your administrator to unlock it. Never share your credentials with colleagues — each user should have their own account to ensure accurate audit logging.
Warning: BEXO logs every login attempt, including failed ones. Unauthorized access attempts are tracked in the Audit Logs module and can be reviewed by administrators at any time.
Once authentication succeeds, BEXO validates your role and permissions and then redirects you to the main dashboard. The transition takes a second or two as the application loads your profile, company context, and any pending notifications.
1.3 The Dashboard
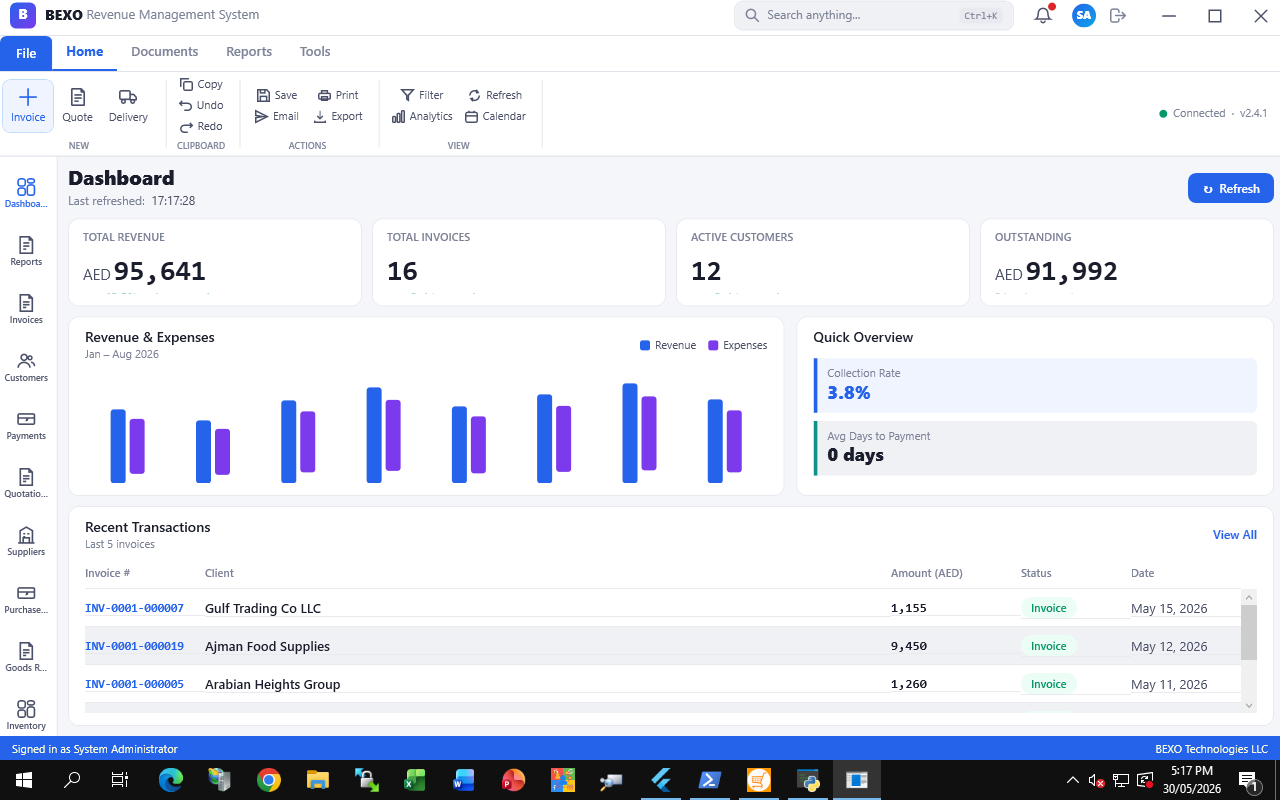
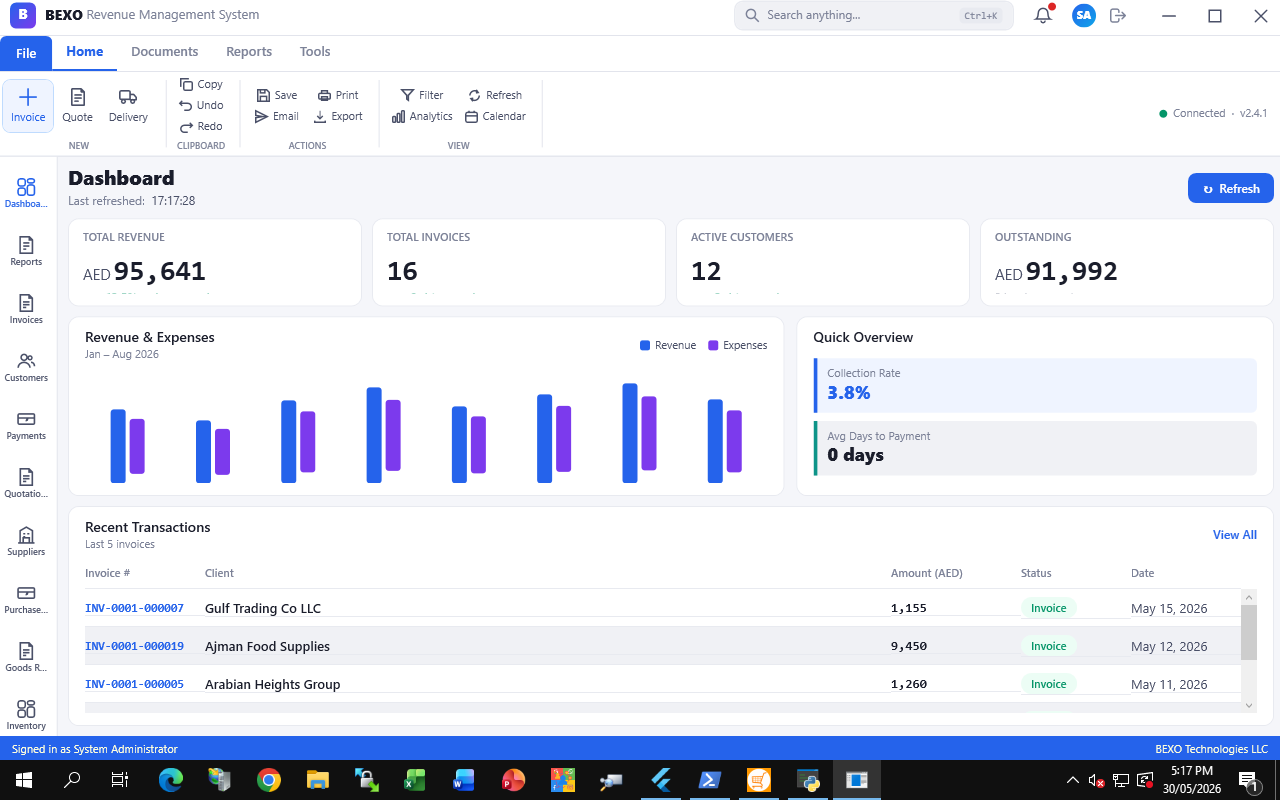
The BEXO Dashboard is your command center. After a successful login you land here automatically. The dashboard is divided into several distinct regions: the navigation sidebar on the left, the summary cards across the top of the content area, and the widget panels in the center and right.
The navigation sidebar lists every module available to your user role. Modules you do not have permission to access are hidden or grayed out. The sidebar is organized into logical groups — Sales, Purchasing, Inventory, Finance, HR, CRM, Property, and Administration. You can expand or collapse groups by clicking their headers. The currently active module is highlighted.
The summary cards at the top of the dashboard display high-level KPIs at a glance: total open invoices, unpaid bills, current bank balance, low-stock alerts, pending approvals, and today's sales. These numbers refresh automatically each time you navigate to the dashboard. Clicking any card takes you directly to the corresponding module pre-filtered to show only the relevant records.
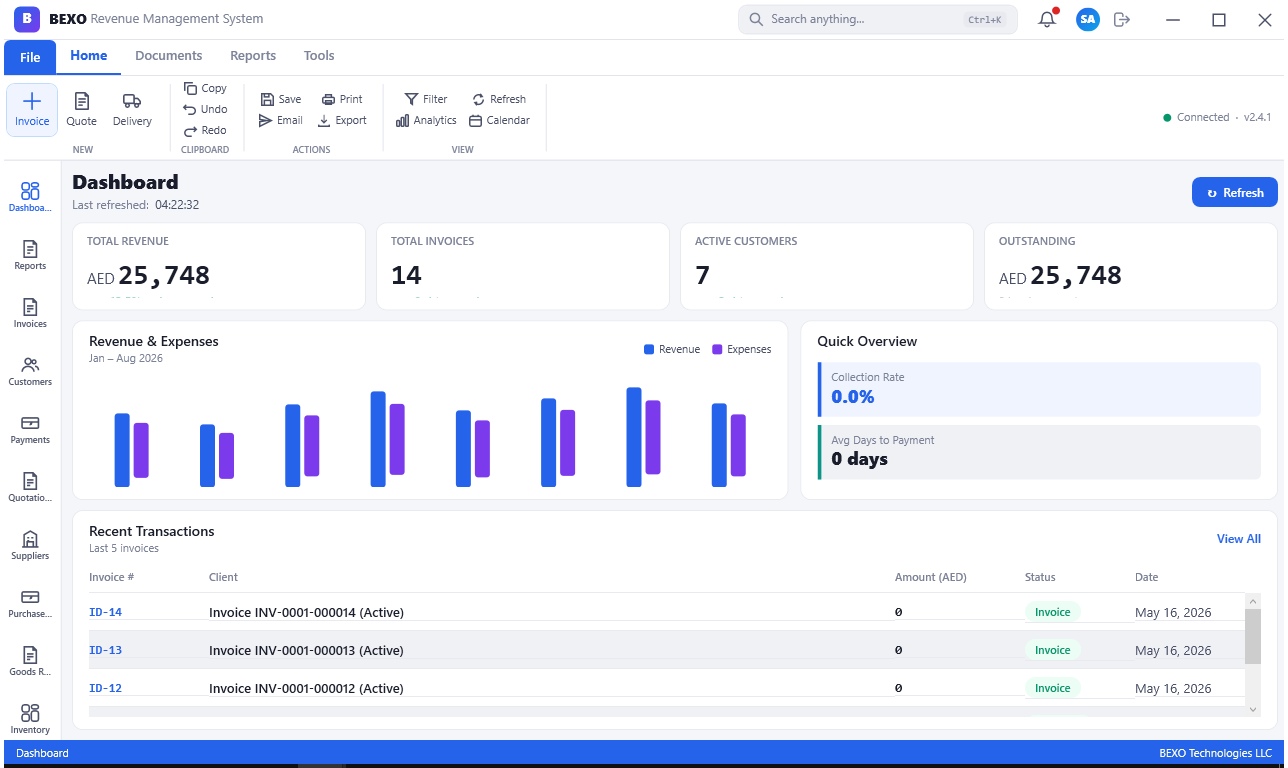
The widget panels in the central area include a sales trend chart (typically showing the last 30 or 90 days), a cash flow summary, upcoming payment dues, and a task/notification feed. The notification feed highlights items that require your attention — for example, purchase orders awaiting approval, invoices that are overdue, or payroll runs that need processing.
Tip: Use the dashboard as your daily starting point. Review the summary cards each morning to catch overdue invoices, low-stock alerts, and pending approvals before your workday begins.
The top-right corner of the application window contains the user menu, where you can access your profile settings, change your password, switch companies (if you have access to multiple entities), and log out. The breadcrumb trail just below the top bar always shows your current location within the application.
Part 2: Sales & Customers
2.1 Customer Management
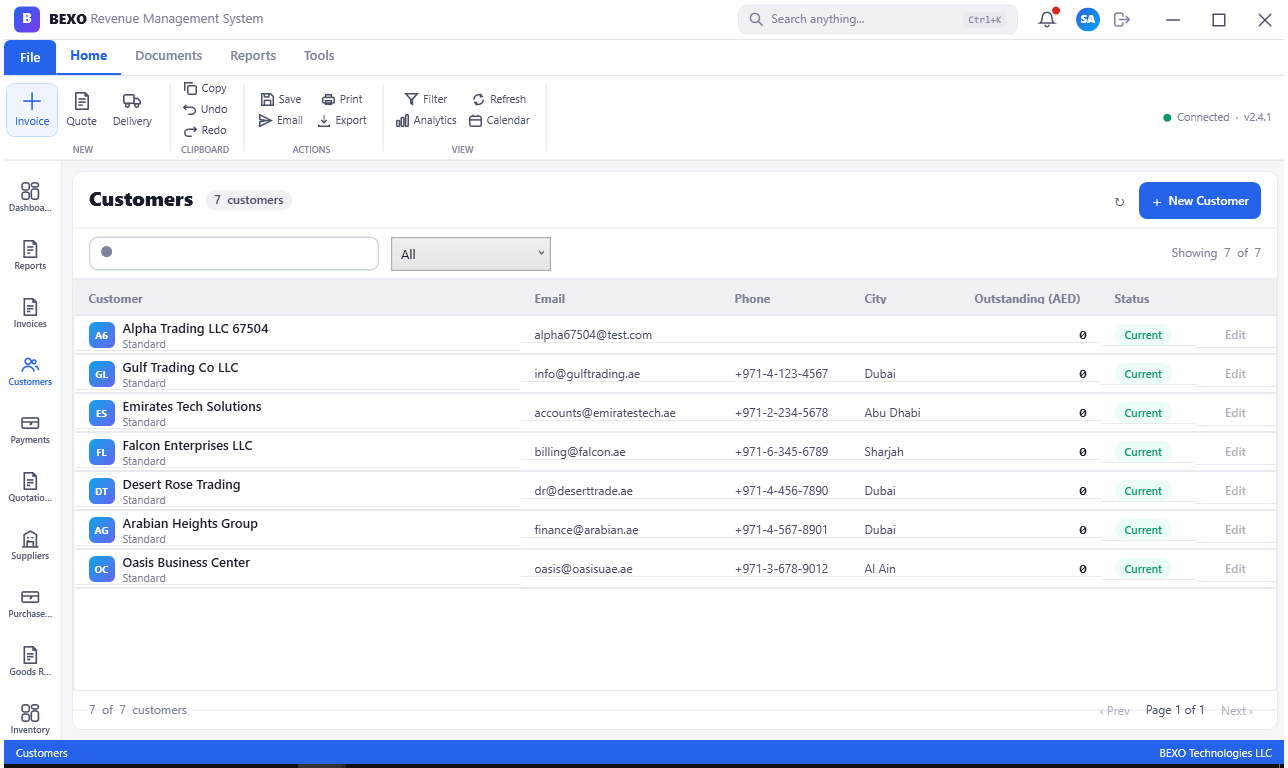
The Customers module is the central repository for all your customer accounts. Every sales invoice, quotation, and payment is linked to a customer record, so maintaining clean, accurate customer data is fundamental to the health of your BEXO system.
To access customers, click Sales > Customers in the left sidebar. The customer list view displays all active customer accounts in a searchable, sortable grid. Columns typically include the customer code, customer name, contact person, phone number, email, outstanding balance, and credit limit. You can sort by any column by clicking its header, and you can search by name, code, or contact details using the search bar at the top of the grid.
To create a new customer, click the New Customer (or + Add) button in the toolbar. The customer form opens with several tabs: General (name, code, tax registration number, customer type), Contact (address, phone, email, website), Financial (payment terms, credit limit, currency, default account), and Notes. Fill in at least the name and contact details before saving.
Tip: Use the Customer Code field consistently. A well-structured code scheme (e.g., CUST-00001) makes it much easier to search and cross-reference customers across modules. Many organizations use the first few letters of the customer's name plus a sequence number.
To edit an existing customer, double-click the row in the grid or select it and click Edit. To deactivate a customer (without deleting their history), uncheck the Active flag in the General tab. Deactivated customers will not appear in dropdown lists when creating new transactions but their historical records remain fully intact and auditable.
Warning: Do not delete customer records that have associated transactions. Deletion is blocked if any invoices, payments, or quotations reference that customer. Use the deactivation flag instead.
2.2 Quotations
Quotations (also known as sales quotes or proposals) represent the first formal step in the sales workflow. Before issuing an invoice, you typically send a quotation to the customer for approval. BEXO's Quotations module tracks the full lifecycle from draft to acceptance.
To access quotations, navigate to Sales > Quotations. The list view shows all quotations with their current status: Draft, Sent, Accepted, Rejected, or Expired. You can filter by status using the tabs or dropdown at the top of the grid. Click New Quotation to create a new quote.
On the quotation form, first select the Customer from the dropdown — the customer's default currency and payment terms will auto-populate. Set the Quotation Date and Valid Until date (the expiry date after which the quote is no longer binding). Then add line items in the Lines tab: select a product, enter the quantity, unit price, and discount percentage. BEXO calculates the line total and the overall subtotal, VAT amount, and grand total automatically.
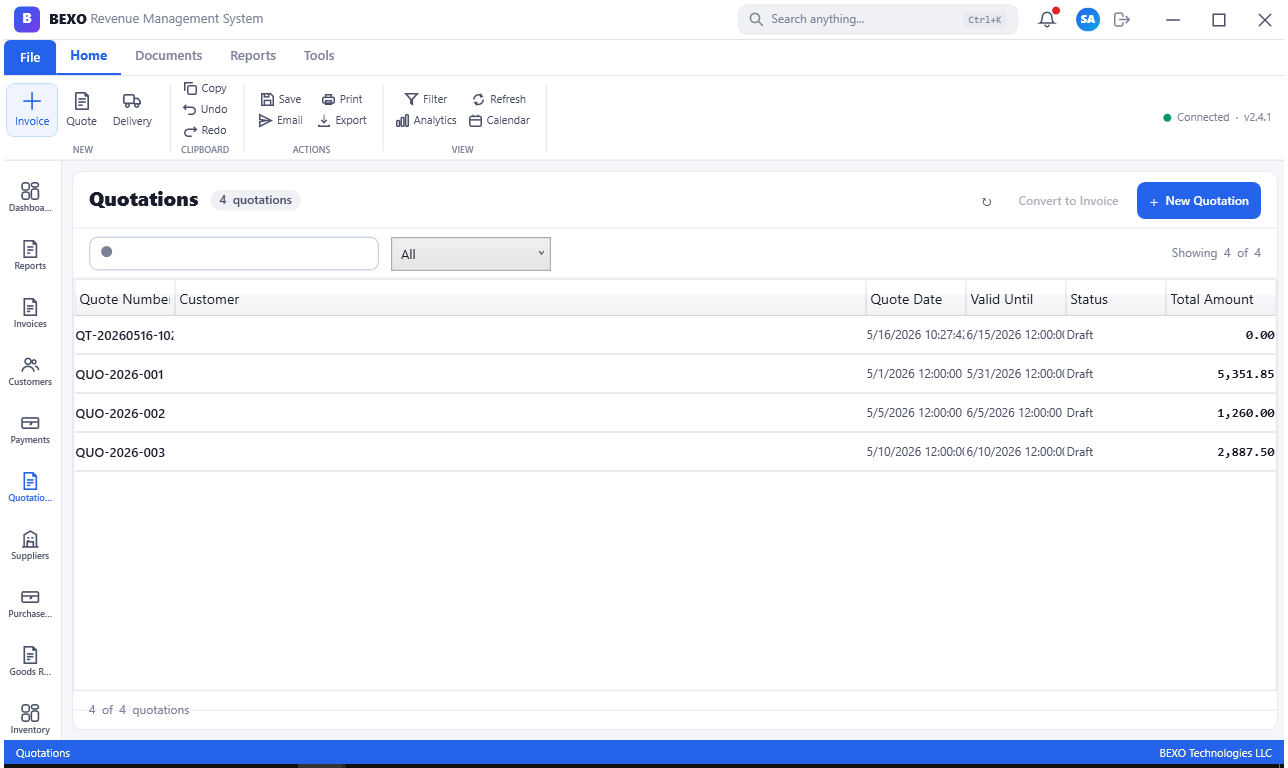
Once the quotation is complete, click Save to save it as a draft. To send it to the customer, click Send — this marks the status as Sent and, if email is configured, can dispatch a PDF copy directly from BEXO. When the customer accepts, open the quotation and click Convert to Invoice or Accept. BEXO will carry all line items, prices, and customer details across to a new invoice automatically, saving you from re-keying data.
Tip: Set realistic Valid Until dates. Quotations with no expiry or very long windows can cause pricing disputes if product costs change between the quote date and the customer's eventual order.
Note: Rejected quotations are retained in the system for reference. You can clone a rejected quote (using the Copy button) and adjust it for resubmission without starting from scratch.
2.3 Sales Invoices
The Invoices module is one of the most heavily used areas of BEXO. Sales invoices are formal demands for payment from customers, and every invoice posted in BEXO creates a corresponding accounting entry that updates your accounts receivable and revenue accounts automatically.
Navigate to Sales > Invoices to open the invoice list. The list shows all invoices with columns for invoice number, customer name, invoice date, due date, total amount (including VAT), amount paid, and balance due. Color coding or status badges help you distinguish between Draft, Posted, Partially Paid, Paid, and Overdue invoices.
To create a new invoice, click New Invoice. Select the customer, set the invoice date and due date (payment terms from the customer profile will suggest a due date automatically), and then add line items. Each line item requires a product or service, quantity, unit price, VAT rate, and optionally a discount. You can also add a free-text description for custom line items. BEXO calculates all totals, VAT breakdowns, and the final amount due in real time as you type.
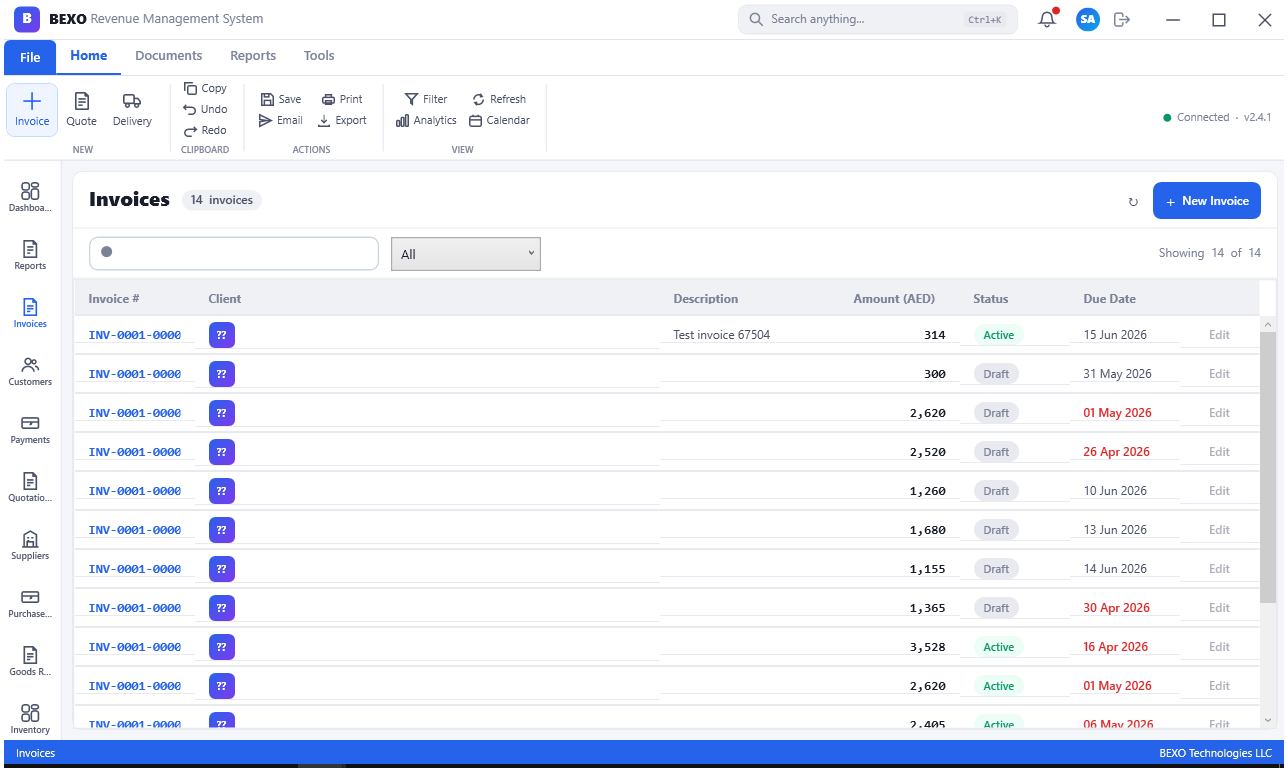
When you are satisfied with the invoice, click Save to keep it as a draft, or Post to finalize and commit it to the ledger. Once posted, an invoice cannot be edited — if you need to make a correction, you must issue a credit note. This is standard accounting practice and ensures the integrity of your financial records.
Warning: Always review an invoice carefully before clicking Post. Posted invoices are locked, and reversing them requires issuing a credit note, which creates additional bookkeeping work. Take a moment to verify the customer, amounts, VAT, and due date before committing.
Tip: You can print or export any invoice to PDF directly from the invoice form using the Print or Export button in the toolbar. PDFs are formatted professionally with your company logo and bank details and can be emailed directly to the customer.
2.4 Collecting Payments
Once an invoice has been sent and the customer settles their account, you must record the payment in BEXO to mark the invoice as paid and update your bank balance and accounts receivable. Navigate to Sales > Payments (or access payments directly from within an invoice by clicking Record Payment).
The Payments list shows all recorded customer payments with columns for payment number, customer, date, amount, payment method, reference number, and the invoice(s) it has been applied to. Multiple invoices can be paid with a single payment transaction — useful when a customer settles several outstanding invoices in one remittance.
To record a new payment, click New Payment. Select the customer, choose the payment date, and enter the amount received. Select the payment method from the dropdown: Cash, Bank Transfer, Cheque, Credit Card, Online Payment, or any custom method your administrator has configured. Enter the reference number (the bank transfer reference, cheque number, or transaction ID) in the Reference field — this is important for bank reconciliation later.
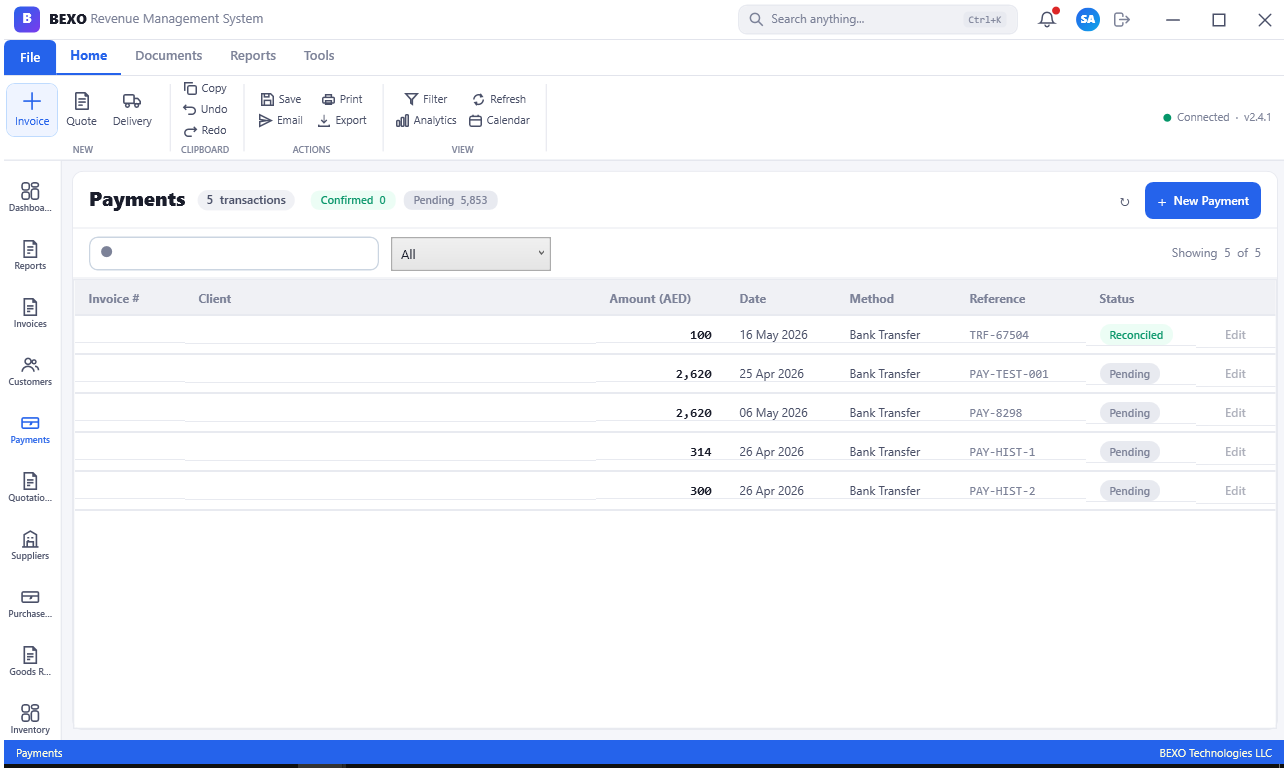
In the Apply to Invoices section at the bottom of the payment form, BEXO lists all open invoices for that customer. Check the invoices this payment covers and adjust the applied amounts if the payment is partial. BEXO will automatically calculate any remaining unapplied balance (shown as advance or credit on account).
Tip: Always enter the bank reference number when recording bank transfer payments. Without it, reconciling your bank statement later becomes a manual matching exercise that is time-consuming and error-prone.
Note: If a customer overpays, the excess amount is held as a credit on their account. You can apply this credit to future invoices using the Apply Credit option on the invoice form.
Part 3: Purchasing & Supply Chain
3.1 Supplier Management
The Suppliers module mirrors the Customers module but for your vendor relationships. Every purchase order, bill, and supplier payment flows through a supplier record, making accurate supplier data essential for procurement efficiency.
Navigate to Purchasing > Suppliers to open the supplier list. The grid shows supplier code, name, contact, phone, email, outstanding payables, and payment terms. The workflow for creating and editing suppliers is identical to customers: click New Supplier, fill in the General, Contact, Financial, and Notes tabs, and save. Key financial fields include the default payment terms, currency, and the supplier's bank account details (needed for payment runs).
You can also record a supplier's tax registration number (TRN) in the General tab — this is required for VAT compliance in many jurisdictions including the UAE, where suppliers must issue VAT-compliant invoices bearing their TRN.
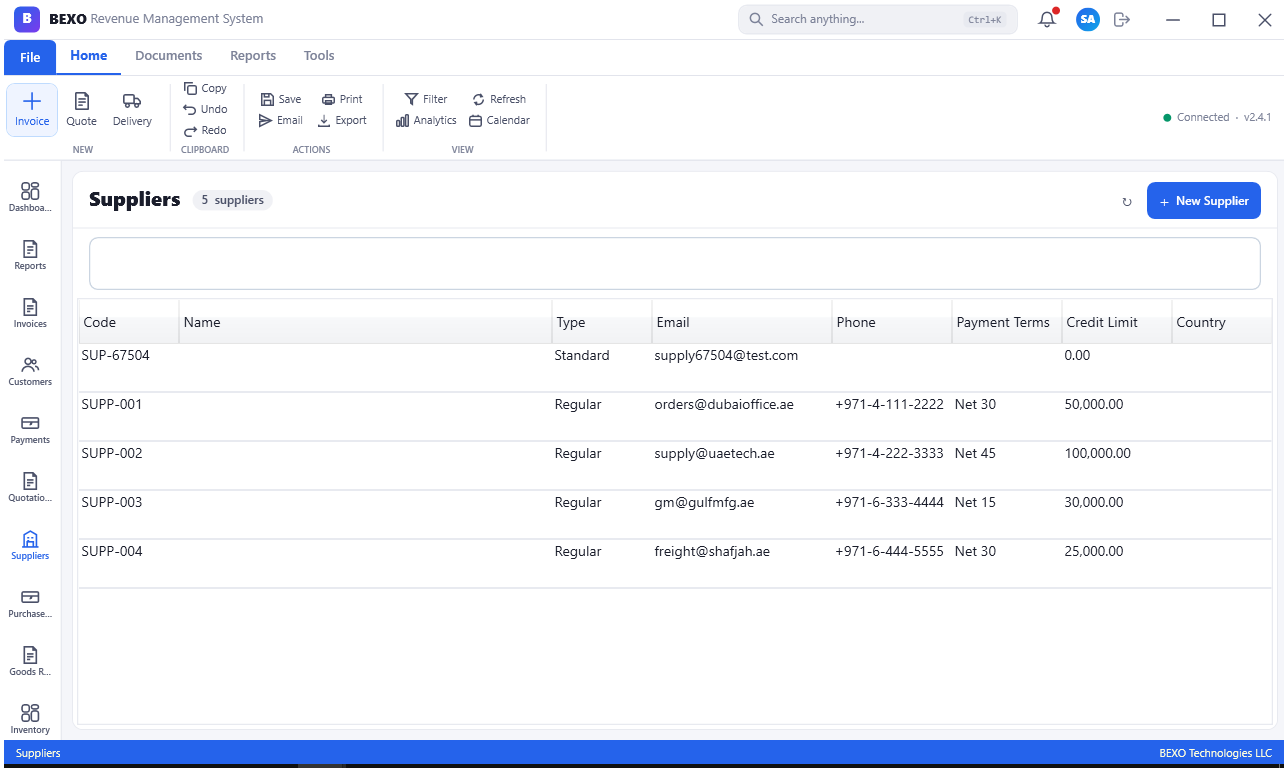
Tip: Assign a consistent supplier code scheme just as you would for customers. Many organizations prefix supplier codes with "SUPP-" to distinguish them at a glance when reading reports. This also helps avoid confusion if a business entity is both a customer and a supplier.
Supplier records include a Purchase History tab that shows all purchase orders, goods received notes, and bills linked to that supplier. This is invaluable when negotiating renewals or investigating a pricing discrepancy — you can see exactly what you ordered, received, and paid at a glance without leaving the supplier record.
3.2 Purchase Orders
Purchase Orders (POs) are formal documents sent to suppliers authorizing them to deliver goods or services at agreed terms. In BEXO, every purchase order feeds into the goods receiving and accounts payable workflow, creating a clean three-way match: PO → GRN → Bill.
Navigate to Purchasing > Purchase Orders to view existing orders. The list shows PO number, supplier, date, expected delivery date, total value, and status (Draft, Sent, Partial, Received, Cancelled). Click New Purchase Order to create a new PO.
On the PO form, select the supplier and set the PO date and expected delivery date. Then add line items: select the product, enter quantity and agreed unit price. BEXO will check current stock levels and may display a suggestion if stock is already sufficient. Add any delivery notes or terms in the Notes field. When the PO is ready, click Save and then Send (or Confirm) to change the status to Sent and lock the PO for editing.
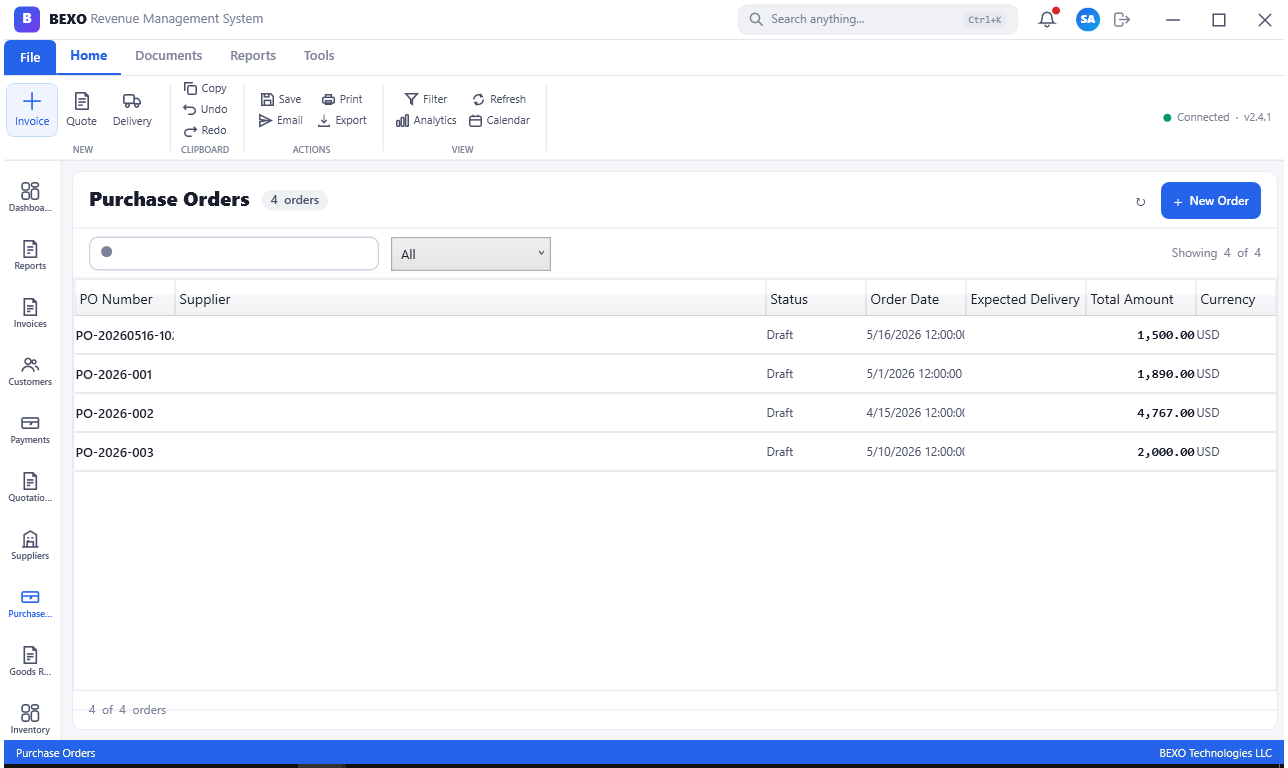
Tip: You can generate Purchase Orders automatically from low-stock alerts or from a Material Requirements Planning (MRP) run if your administrator has configured the reorder point fields on product records. This dramatically reduces the manual effort of procurement for high-volume operations.
Warning: Once a Purchase Order has an associated Goods Received Note (GRN), its line items cannot be reduced below the received quantity. Always verify quantities with the supplier before confirming a PO to avoid over-ordering situations.
3.3 Goods Received Notes
A Goods Received Note (GRN) is created when physical goods arrive at your warehouse from a supplier. Recording a GRN in BEXO triggers two things: the stock levels for the received products are immediately updated, and a bill (supplier invoice) is created or linked for the accounts payable workflow.
Navigate to Purchasing > GRN (or Goods Received Notes). The list shows all GRNs with their linked PO number, supplier, receipt date, and status. To create a new GRN, click New GRN and select the related Purchase Order. BEXO will pre-populate the supplier name and all line items from the PO. For each line, enter the Received Quantity — this may differ from the ordered quantity if there was a short shipment.
After entering received quantities, click Save and then Post to commit the GRN. At the moment of posting, BEXO increases stock levels for all received items across the appropriate warehouse or storage location. A journal entry is also created that debits inventory and credits accounts payable (or a GRN accrual account, depending on your configuration).
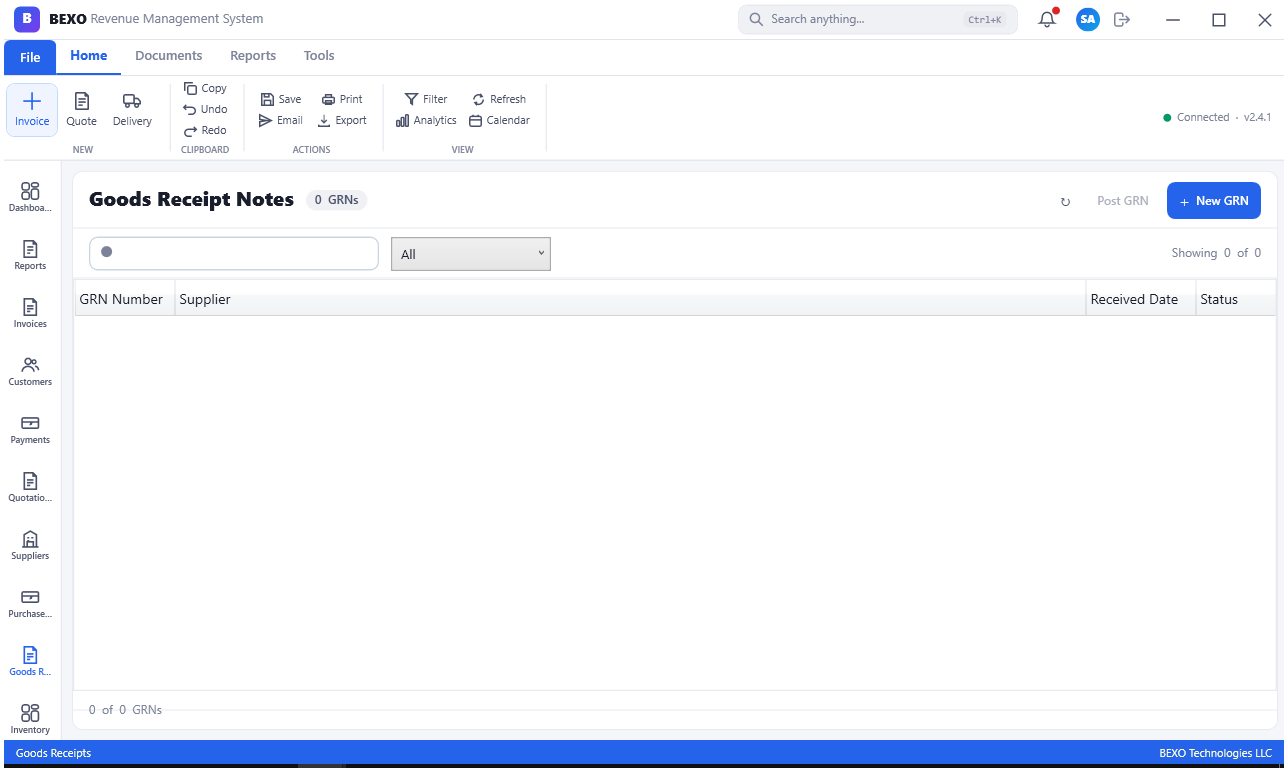
Note: If you receive fewer items than ordered, the Purchase Order status changes to Partial. The remaining undelivered quantity stays open on the PO and can be fulfilled by a subsequent GRN when the rest of the goods arrive.
Warning: Do not post a GRN for goods you have not physically inspected and counted. Once posted, reversing a GRN requires creating a stock adjustment or return transaction, which adds complexity to your audit trail. Count first, post after.
Part 4: Inventory & Stock
4.1 Products Catalog
The Products Catalog is the master list of every item your business buys, sells, or manufactures. Each product record holds the information needed across all other modules — description, pricing, tax classification, unit of measure, reorder levels, and links to suppliers and Bill of Materials.
Navigate to Inventory > Products to open the catalog. The grid shows product code, name, category, unit of measure, sale price, purchase price, and current stock quantity. Use the search bar to find products by code, name, or barcode. You can also filter by category using the category tree on the left panel.
To create a new product, click New Product. The product form has several tabs: General (name, code, description, category, barcode), Pricing (sale price, purchase price, VAT rate, currency), Stock (unit of measure, minimum stock, reorder point, reorder quantity), Suppliers (preferred supplier and supplier product code), and Accounting (revenue account, cost of goods account, inventory account). Fill in all relevant tabs before saving.
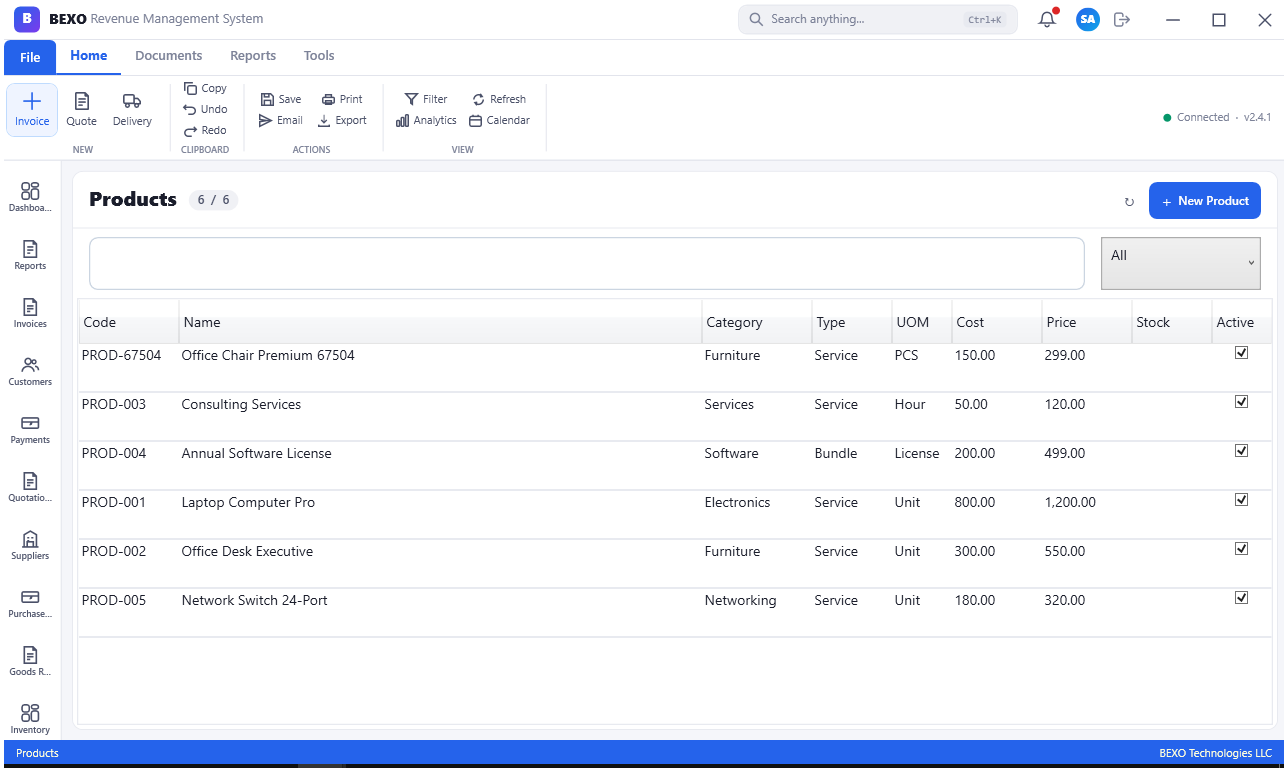
Tip: The Barcode field on the product record is used by the point-of-sale and stock-taking modules. If your operation uses barcode scanners, populate this field from the outset — retrofitting barcodes to an existing catalog is tedious but necessary for scan-based workflows.
Note: Product records are never truly deleted if they have transaction history. Use the Active/Inactive flag to retire discontinued products. Inactive products will not appear in dropdown lists when creating new transactions but remain searchable in reports.
4.2 Inventory Overview
The Inventory Overview module gives you a real-time snapshot of your stock levels across all warehouses and storage locations. This is the primary screen for stock monitoring, low-stock identification, and warehouse performance tracking.
Navigate to Inventory > Inventory (or Stock Overview). The grid displays each product with its current stock on hand, the quantity reserved for unfulfilled sales orders, the quantity on order (from open POs), and the available-to-promise quantity. Color indicators flag items that have fallen below their minimum stock level (typically highlighted in orange or red).
Use the Warehouse filter at the top of the screen to view stock levels for a specific warehouse or across all locations simultaneously. You can also filter by product category to focus on a particular segment of your catalog. The Export button lets you download the current stock snapshot to Excel or CSV for offline analysis or physical stock-take preparation.
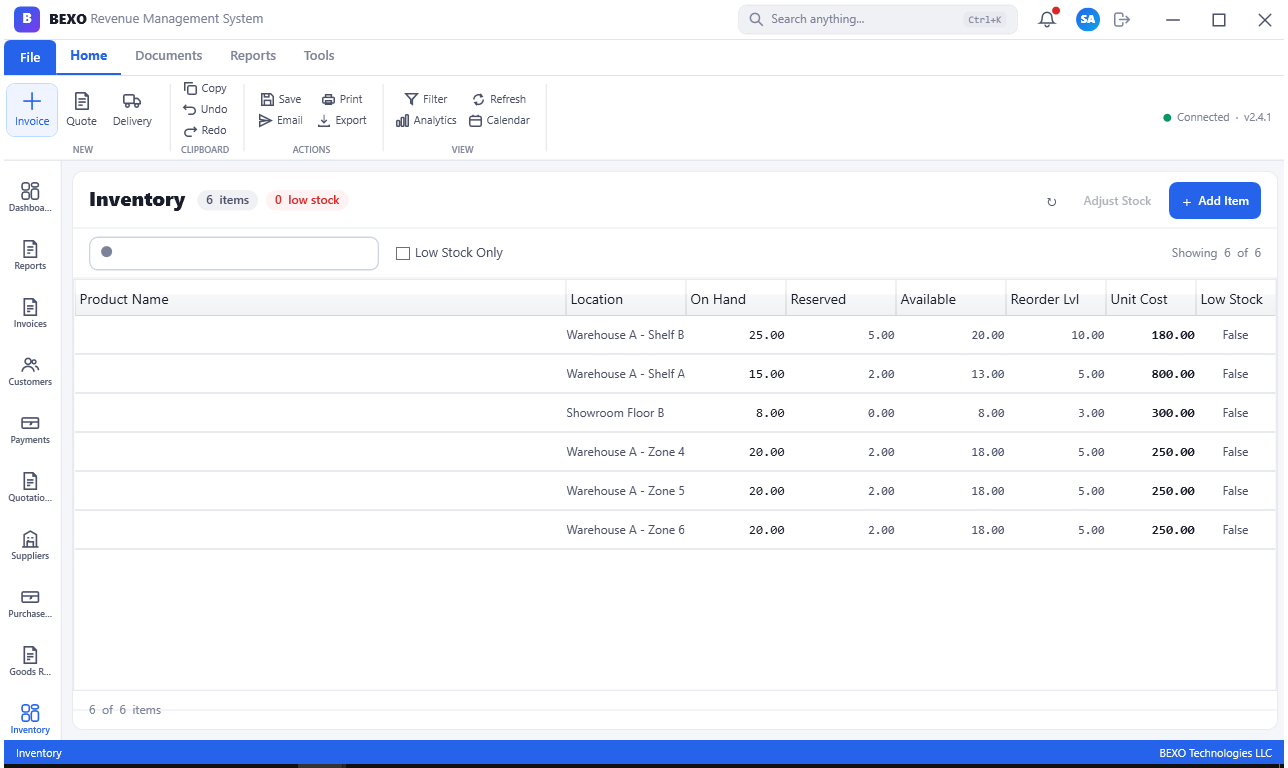
Tip: Schedule a weekly review of the inventory overview, filtering for items below their reorder point. This is the fastest way to catch potential stockouts before they disrupt your operations or your customers' orders.
Warning: The stock quantities shown are only as accurate as the transactions entered in BEXO. If team members receive goods, make deliveries, or perform adjustments outside the system, the figures will be incorrect. Discipline in recording all movements is essential.
4.3 Stock Movements
Every time stock enters or leaves your inventory — whether through a sale, purchase, manufacturing, transfer, or manual adjustment — BEXO records a Stock Movement. The Stock Movements screen is the complete ledger of every quantity change, giving you full traceability.
Navigate to Inventory > Stock Movements to view the movement log. Each row shows the movement date, product, movement type (Receipt, Issue, Transfer, Adjustment, Manufacturing), quantity moved (positive for in, negative for out), the resulting balance, the reference document (e.g., GRN number, invoice number, or work order), and the user who triggered the movement.
You can filter movements by date range, product, warehouse, or movement type. The combination of filters makes it easy to answer questions like "How much of Product X did we sell last month?" or "Who adjusted the stock of Product Y on the 15th and why?" This traceability is critical for both operational management and audit compliance.
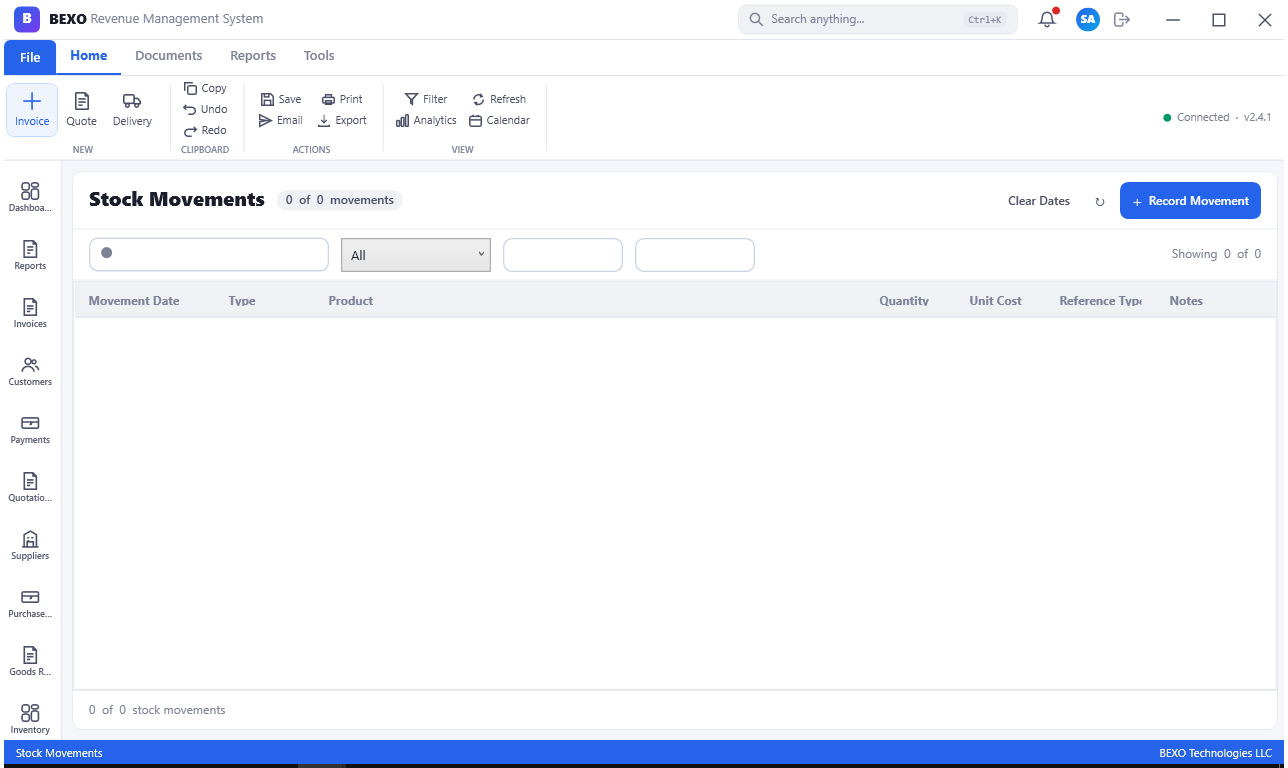
Note: You cannot manually create a stock movement record directly in this view. Stock movements are always the by-product of posting a GRN, sales delivery, manufacturing order, stock adjustment, or warehouse transfer. This design ensures that every movement is linked to an authorizing document.
Tip: If you discover an unexplained discrepancy during a stock-take, use the Stock Movements log to trace back to the exact transaction that caused it. Filter by product and narrow the date range to isolate the anomaly. The reference document column will point you directly to the source.
4.4 Product Variants: Batches, Serial Numbers, Units of Measure, Kits & Substitutes
BEXO provides rich tools for managing product variants and tracking. This section covers five sub-features that handle specialized inventory requirements.
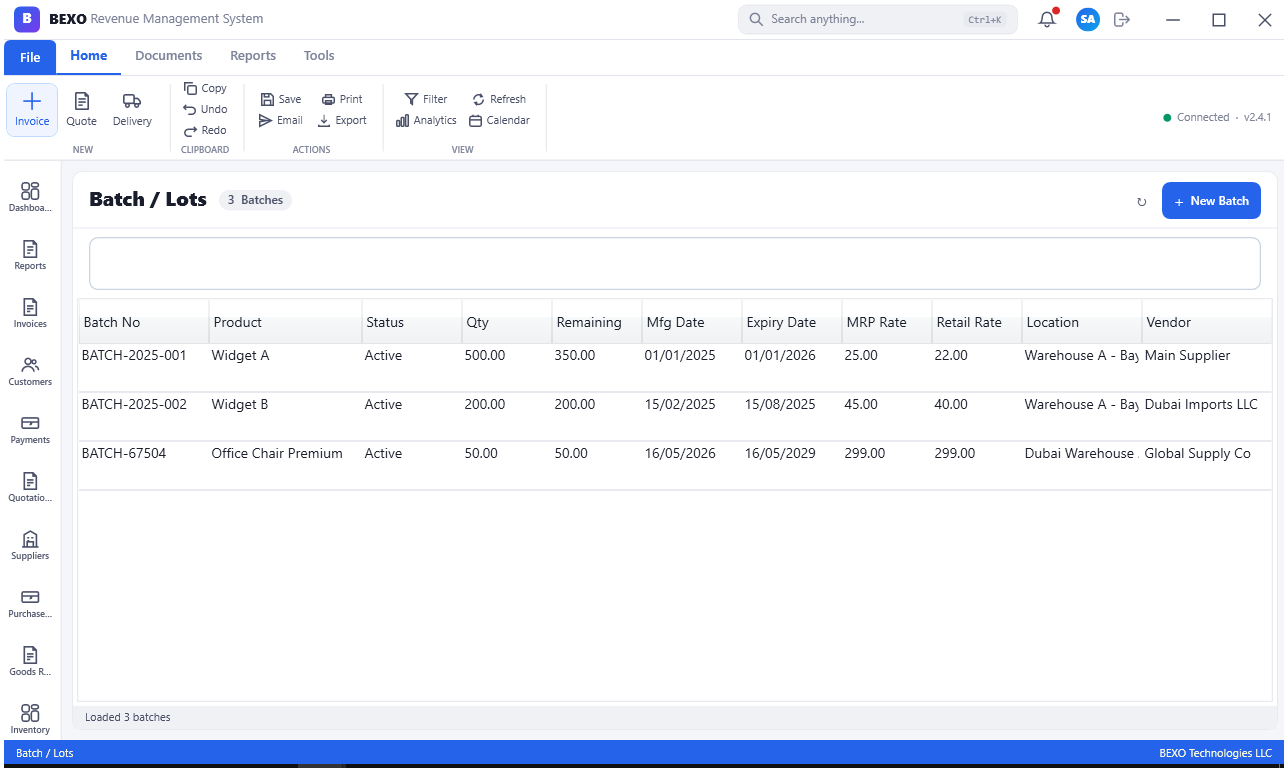
Batches allow you to group products by manufacturing batch, expiry date, or lot number. This is essential for industries like food, pharmaceuticals, or chemicals where traceability to a specific production run is legally required. In the Batches screen, you can see all active batch numbers, their associated products, creation dates, expiry dates, and remaining quantities.
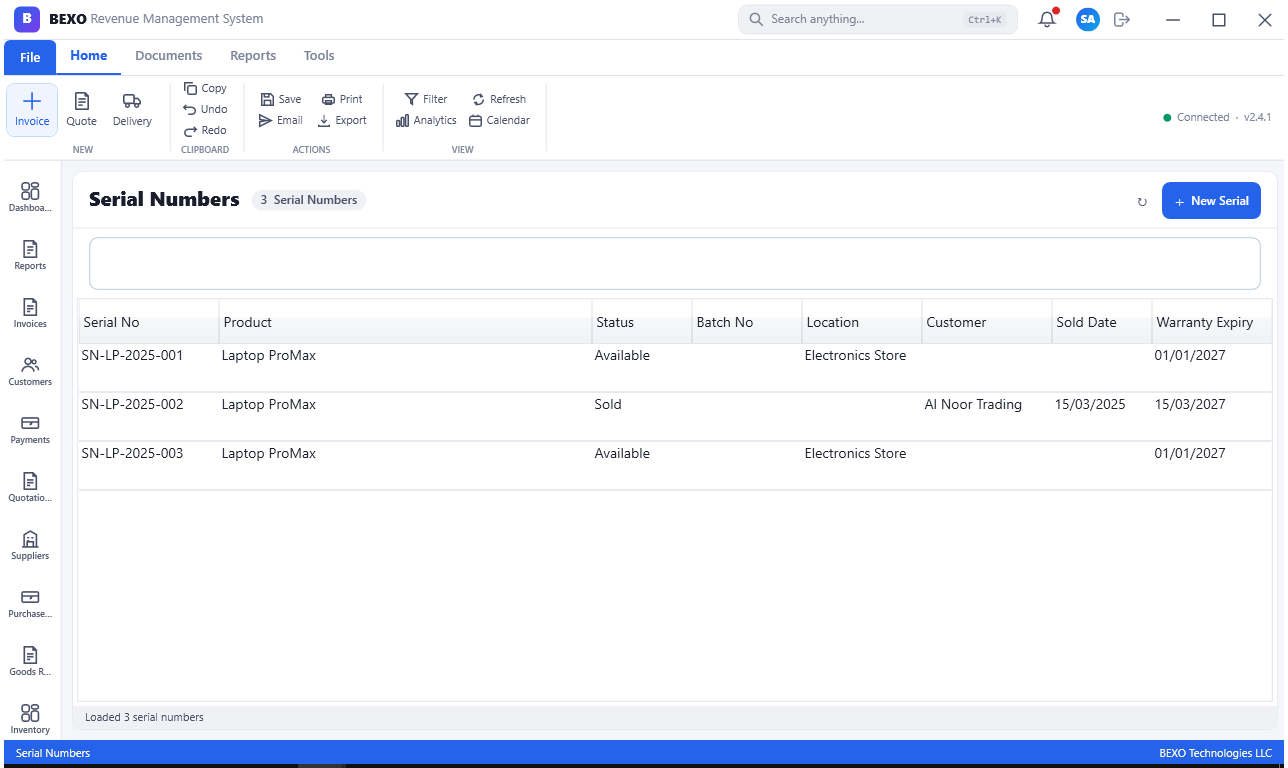
Serial Numbers take tracking one step further by assigning a unique identifier to each individual unit of a product. This is critical for electronics, machinery, warranties, and any asset that needs to be tracked individually throughout its lifecycle. The Serial Numbers screen shows every serial number in the system, its current status (In Stock, Sold, In Repair, Written Off), and the full transaction history for that specific unit.
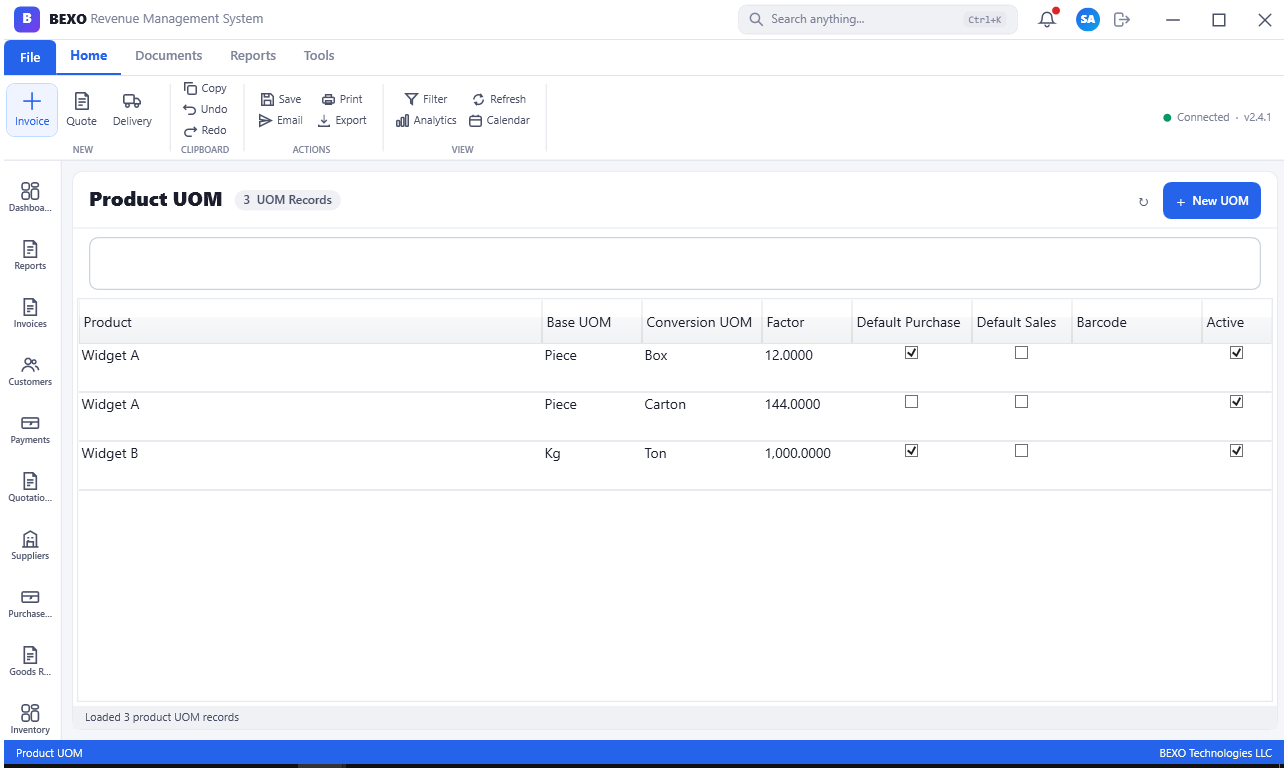
Units of Measure (UOM) allow you to define the measurement unit for each product and support multiple UOMs with conversion factors. For example, a product might be purchased in pallets but sold in individual units. BEXO handles the conversion automatically when transactions are entered, as long as the conversion factor is defined in the UOM configuration.
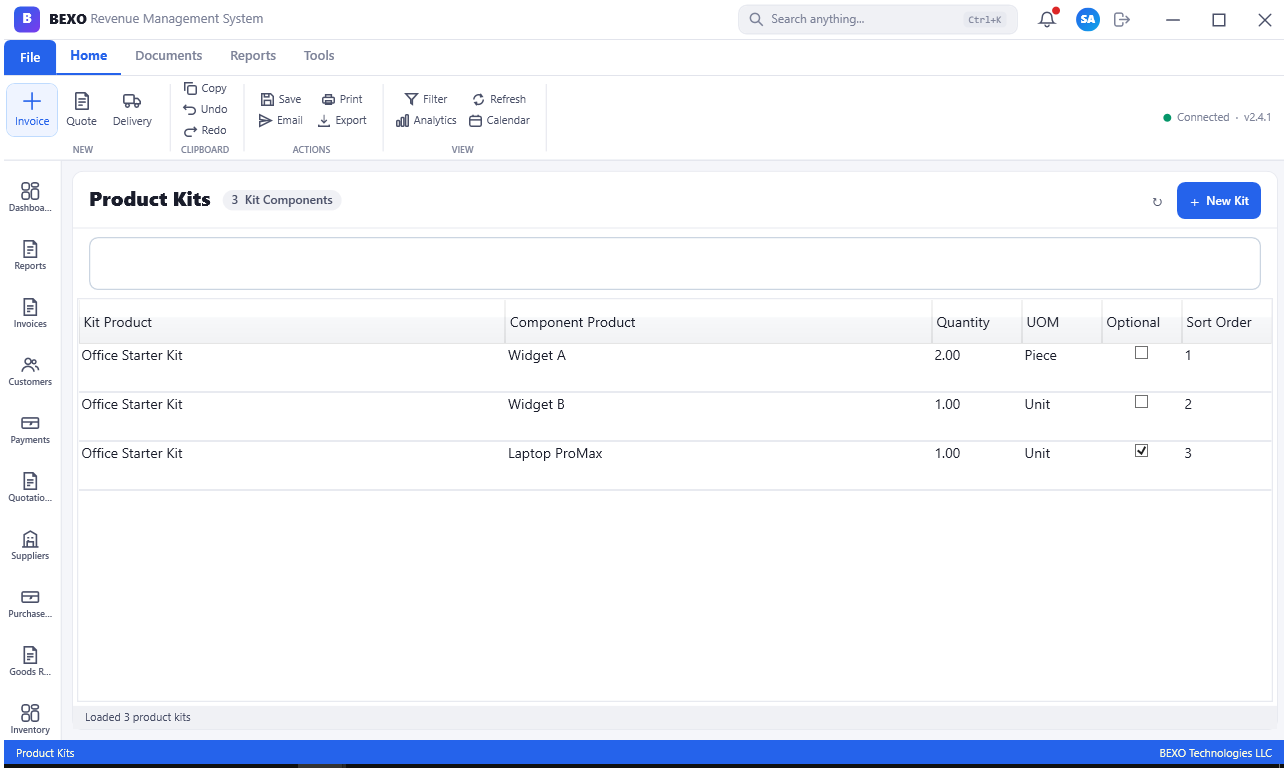
Product Kits enable you to bundle multiple products together and sell them as a single SKU. When a kit is sold or shipped, BEXO automatically deducts the individual component quantities from stock. The Product Kits screen lets you define kit compositions with product codes and quantities for each component.
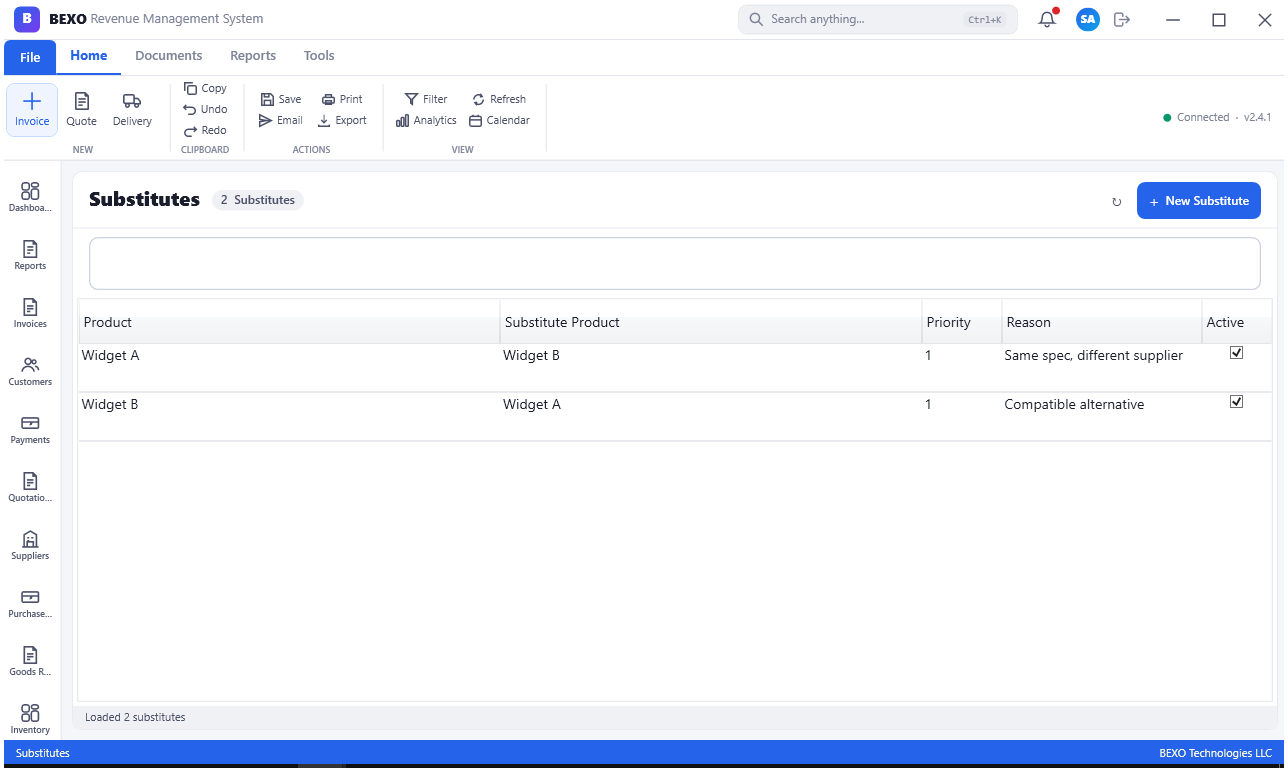
Substitutes define acceptable replacement products for situations where the primary product is out of stock. When a salesperson creates an order for an out-of-stock item, BEXO can suggest the configured substitute, preventing a lost sale. The Substitutes screen lets you link products to their substitutes and define whether substitution is automatic or requires manual confirmation.
Tip: Invest time in configuring batch expiry dates if you deal in perishable goods. BEXO can be configured to use FEFO (First Expired, First Out) picking logic, ensuring older stock is always dispatched first — reducing waste and compliance risk.
Part 5: Production & Manufacturing
5.1 Bill of Materials
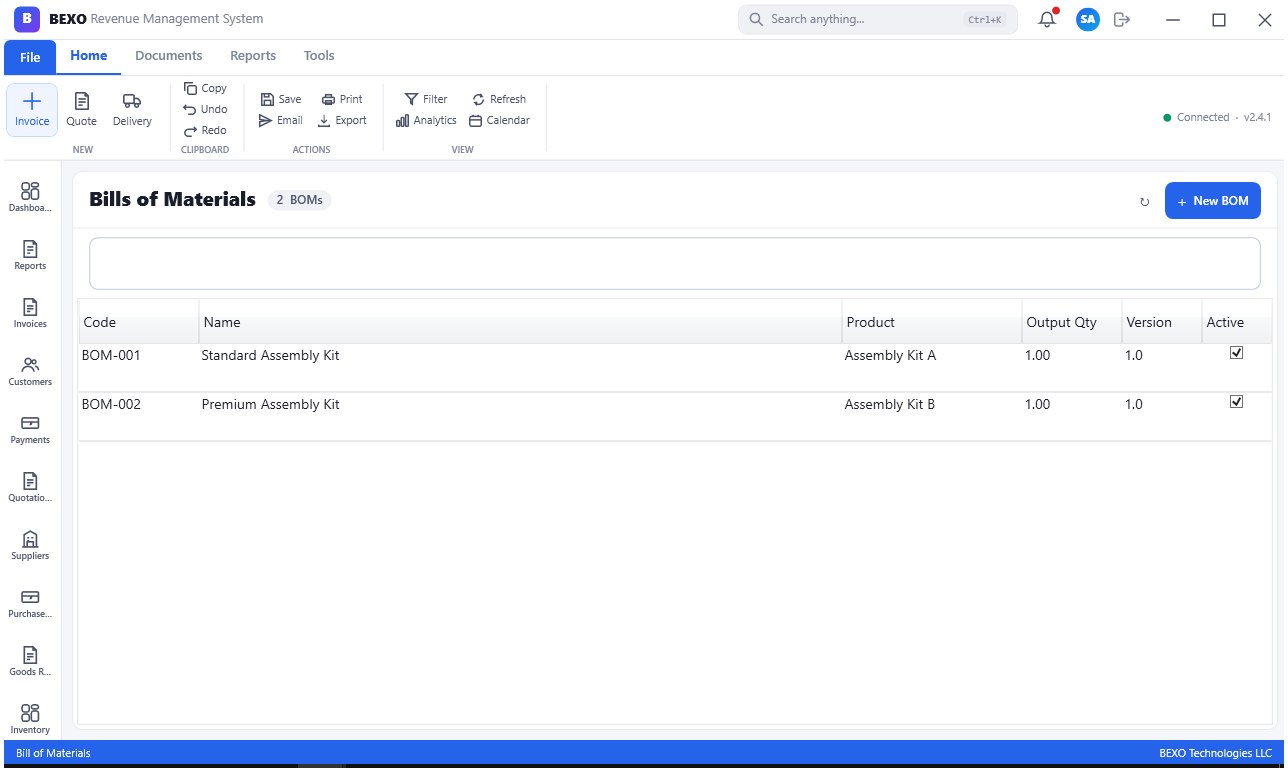
A Bill of Materials (BOM) defines the recipe for manufactured products — it lists every raw material, component, and sub-assembly required to produce one unit of a finished good, along with the quantity of each. BOMs are the foundation of the manufacturing module.
Navigate to Manufacturing > BOM (or Bill of Materials) to view and manage your BOMs. Each BOM is linked to a finished product and includes a version number (allowing you to track design revisions). The BOM list shows the finished product, BOM version, effective date, and whether it is the current active version.
To create a new BOM, click New BOM, select the finished product, assign a version number, and then add components. For each component, select the product code, enter the required quantity per unit of output, and specify the unit of measure. You can also indicate which components are optional or can be substituted. Add manufacturing notes or assembly instructions in the Notes tab.
Tip: Always version your BOMs rather than editing them in place. When a product formulation changes — whether due to a design improvement, a supplier change, or a cost reduction initiative — create a new version with an effective date. This preserves the historical BOM for any in-progress manufacturing orders and gives you a clear audit trail of product evolution.
Warning: If you activate a new BOM version while manufacturing orders are in progress using the old version, BEXO may flag a conflict. Coordinate BOM version changes with your production team to avoid mid-run disruptions.
5.2 Manufacturing Orders
A Manufacturing Order (MO) is the instruction to produce a specific quantity of a finished good. When you create and release an MO in BEXO, the system will plan the required raw materials based on the BOM and optionally reserve them in inventory.
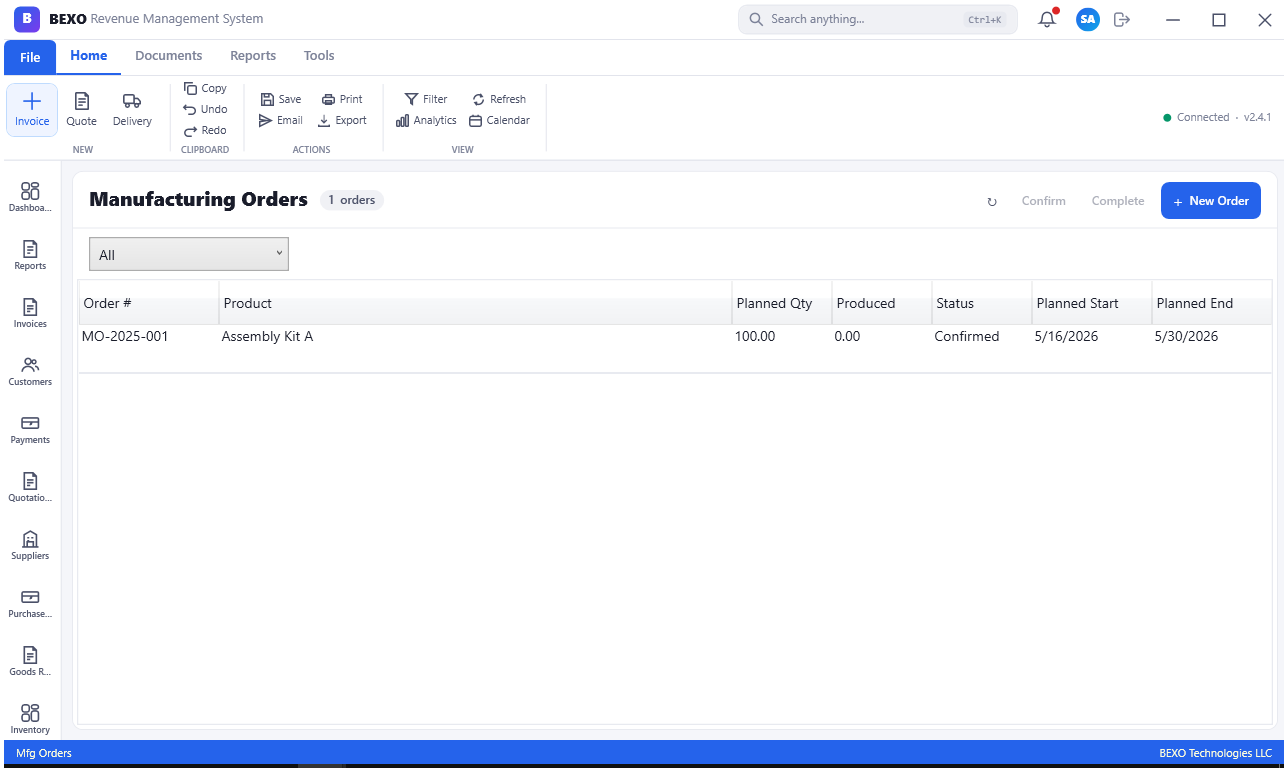
Navigate to Manufacturing > Manufacturing Orders to view all MOs. The list shows the MO number, finished product, planned quantity, start date, expected completion date, and status (Draft, Planned, In Progress, Completed, Cancelled). Click New Manufacturing Order to create one.
On the MO form, select the finished product and the BOM version to use. Enter the planned quantity (how many units you want to produce). Set the planned start and end dates. BEXO will auto-populate the required components based on the BOM. Review the component list — if any components have insufficient stock, warnings will appear in red. You can proceed anyway (if you expect stock to arrive before production starts) or adjust the planned quantity.
When production begins, change the MO status to In Progress. As components are consumed, BEXO records stock issues against the MO. When production completes, click Complete and enter the actual quantity produced (which may differ from the planned quantity due to scrap or yield loss). BEXO will post the finished goods into inventory and record the cost of production.
Note: BEXO supports both make-to-stock and make-to-order manufacturing modes. In make-to-order mode, an MO can be directly linked to a customer sales order, ensuring the produced goods are reserved for that specific customer upon completion.
Tip: Use the Material Availability check (available on the MO form before releasing) to instantly see which components are available, reserved, and short. This helps you avoid releasing production orders you cannot fulfill.
5.3 Work Orders
Work Orders are the granular execution layer below Manufacturing Orders. Where an MO defines what to produce and how many, Work Orders define who does the work, on which machine, at what time, and for how long. In complex manufacturing environments, a single MO may generate multiple work orders for different workstations.
Navigate to Manufacturing > Work Orders to view the work order queue. Each work order shows the parent MO number, the operation name (e.g., Cutting, Assembly, Painting, Quality Check), the assigned machine or workstation, the assigned operator, the planned hours, and the actual hours recorded.
To create a work order manually, click New Work Order and link it to a parent MO. Select the operation, machine, and operator. Set the scheduled start and end time. When work begins, the operator can clock on to the work order (recording actual start time), and clock off when complete (recording actual hours). This data feeds into production costing and efficiency analysis.
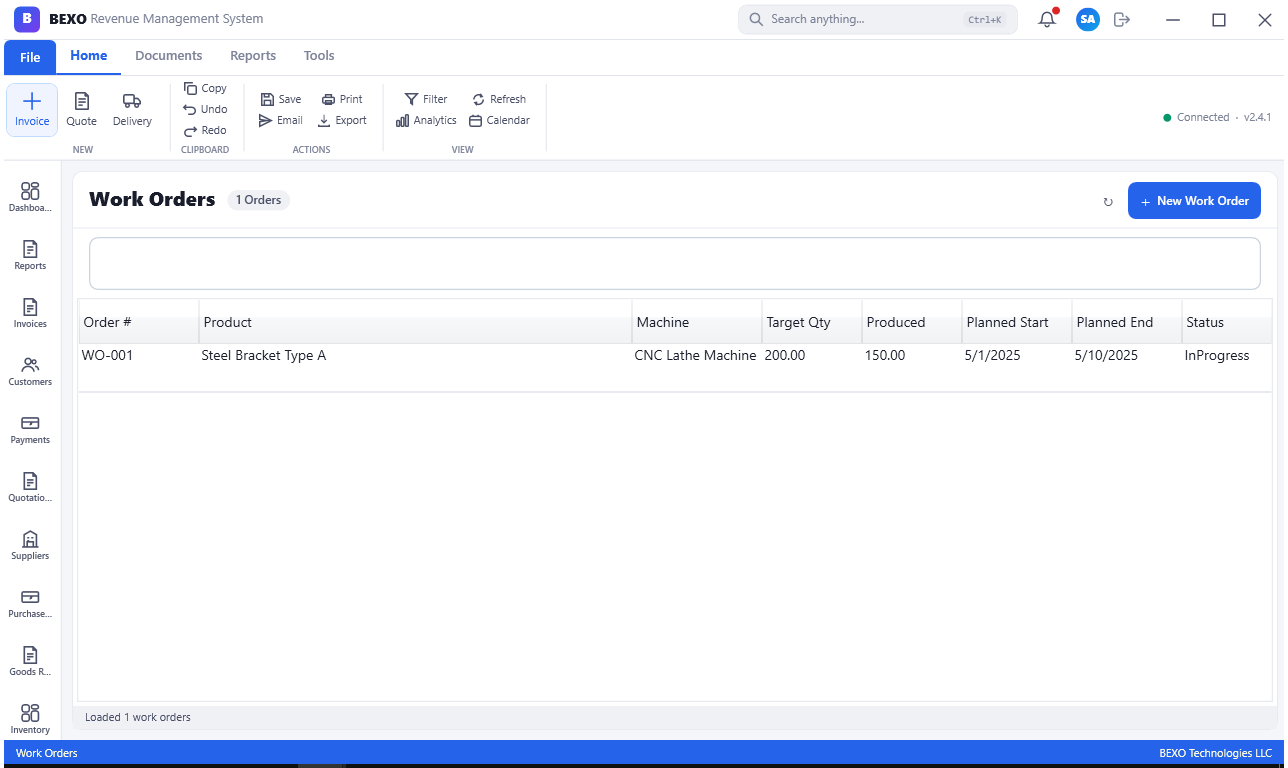
Tip: If your production floor uses tablets or terminals, BEXO's work order screen is the key interface for operators to record progress, report scrap, and flag issues. Encourage operators to update work orders in real time rather than at the end of a shift — this improves the accuracy of your live production dashboards.
Note: Work orders generate the labor and overhead cost entries that feed into manufacturing order costing. Without accurate work order time recording, your finished goods cost of production will be based on estimates only. For precise margin analysis, work order completion data is essential.
5.4 Machines & Equipment
The Machines & Equipment register tracks all production machinery and equipment assets used in your manufacturing operations. Each machine record stores technical specifications, maintenance history, and links to work orders that use that machine.
Navigate to Manufacturing > Machines to view the equipment list. Each record shows the machine code, name, machine type, current status (Available, In Use, Under Maintenance, Retired), and the last maintenance date. You can add new machines using the New Machine button.
The machine record includes a Specifications tab for capacity, speed, power requirements, and notes; a Maintenance tab showing the history of scheduled and unscheduled maintenance events; and a Work Orders tab listing all work orders assigned to that machine, allowing you to see its utilization and schedule.
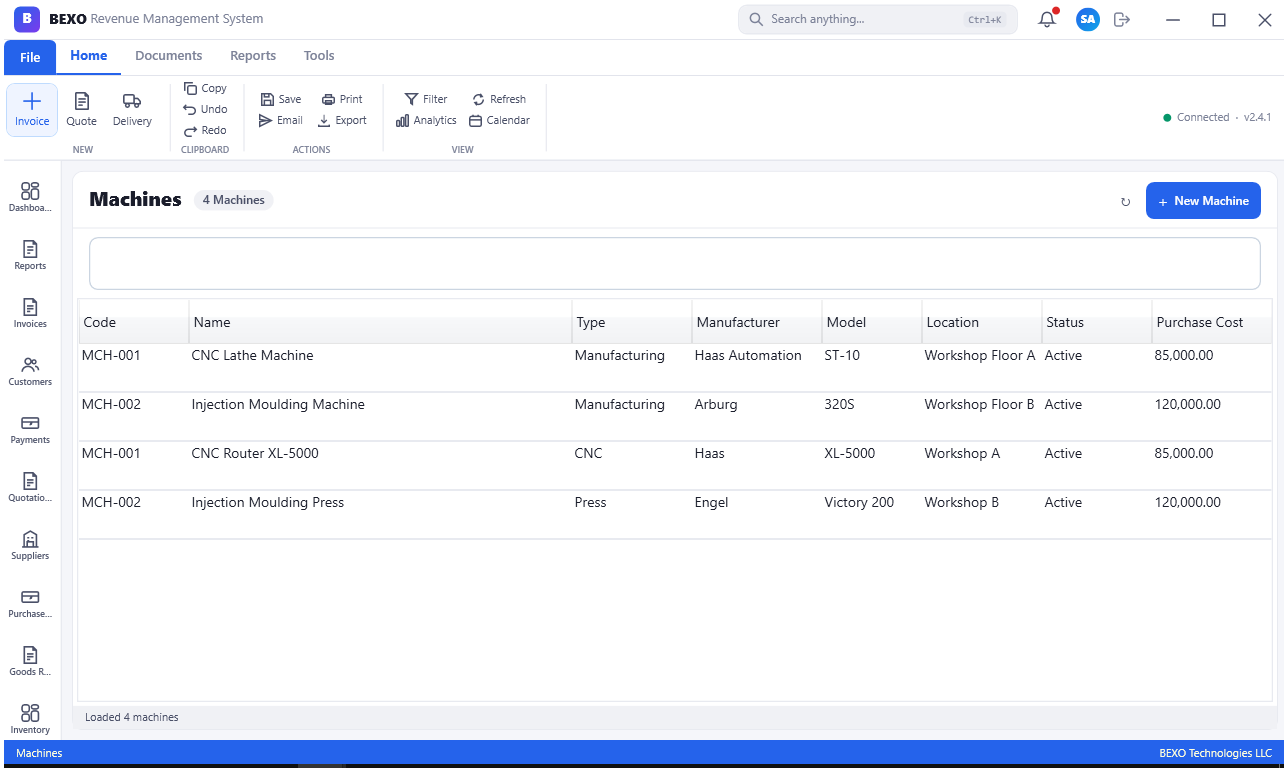
Tip: Link machines to their maintenance schedules in the Maintenance module (covered in Part 9). Proactive maintenance scheduling prevents unexpected breakdowns that halt production and incur emergency repair costs. BEXO can remind you when a machine is due for service based on calendar intervals or operating hours.
Warning: When a machine is marked as Under Maintenance, BEXO will prevent new work orders from being scheduled against it. Make sure to update machine status promptly when maintenance begins and ends to keep the production schedule accurate.
Part 6: Finance & Accounting
6.1 Chart of Accounts
The Chart of Accounts (COA) is the backbone of your entire financial system. It defines every account used in BEXO's double-entry bookkeeping — assets, liabilities, equity, revenue, and expenses. Before using any financial module, your accountant should review and configure the COA to match your organization's reporting structure.
Navigate to Finance > Chart of Accounts (or Accounts). The accounts are displayed in a hierarchical tree grouped by account type. Each account shows its code, name, type (Asset, Liability, Equity, Revenue, Expense), whether it is a parent (header) or detail (posting) account, and the current balance.
To add a new account, click New Account. Assign a code (follow your existing numbering convention), name, type, and parent account. Only detail accounts can have transactions posted to them — header accounts are for grouping and reporting only. To edit an existing account, double-click it. You can rename accounts or change their parent, but changing the type of an account that already has transactions is restricted.
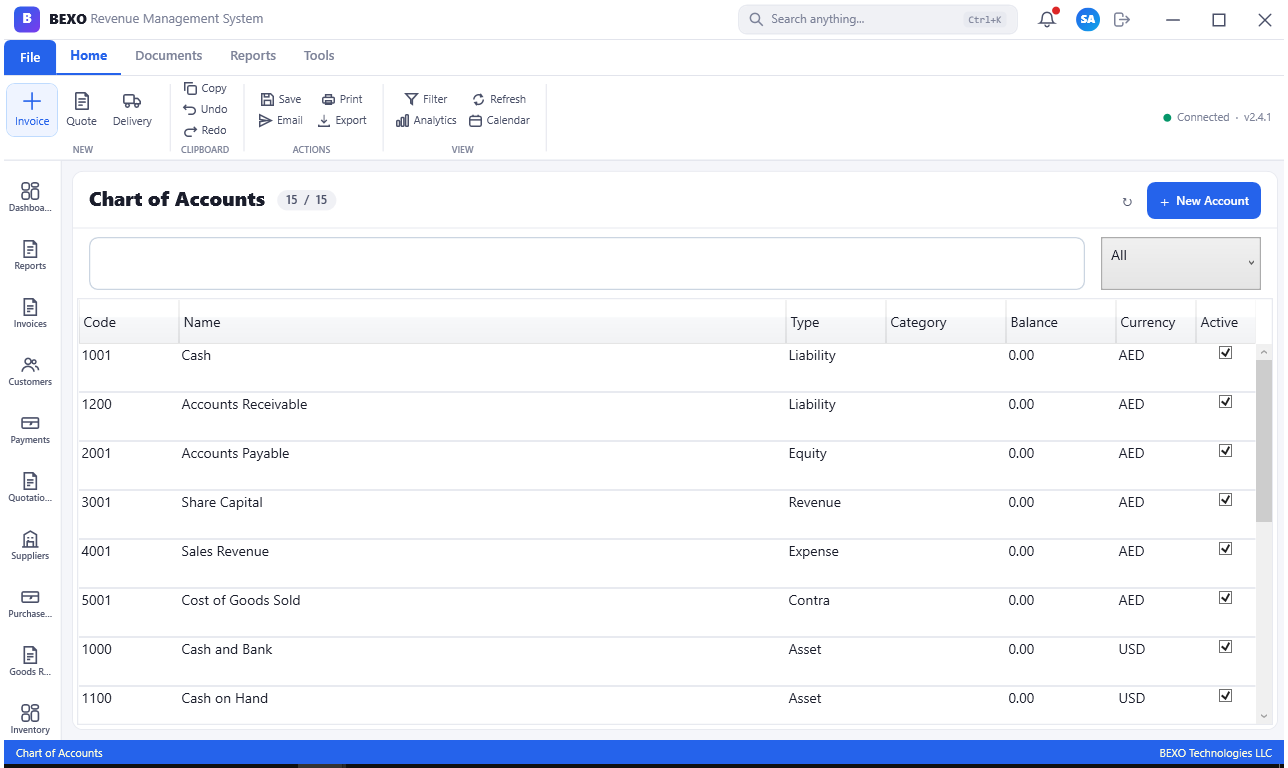
Warning: Treat the Chart of Accounts as a controlled structure. Unnecessary accounts clutter your reports and make reconciliation harder. Discuss any new account additions with your accountant before creating them. Deleting or renaming accounts that already have transactions posted can corrupt historical reports.
Tip: BEXO ships with a default COA based on IFRS/standard accounting principles. For most SMEs this is a reasonable starting point. However, if your business has specialized reporting requirements (e.g., UAE VAT, WPS payroll compliance), your accountant should review and extend the default COA before going live.
6.2 Journal Entries
Journal Entries are the fundamental building blocks of double-entry accounting. While BEXO creates most journal entries automatically (when you post invoices, payments, or payroll runs), there are times when you need to record a manual adjustment — for example, a depreciation entry, a prepayment accrual, or a correcting entry.
Navigate to Finance > Journals (or Journal Entries). The list shows all entries, including both system-generated and manual ones. Each entry has a journal number, date, description, reference, debit total, credit total, and status (Draft or Posted). BEXO always enforces balanced entries — the debit total must exactly equal the credit total before you can post.
To create a manual journal entry, click New Journal Entry. Enter the date, description, and reference. Then add lines: for each line, select the account from the COA, enter either a debit or a credit amount (not both), and add a line description. Add as many lines as needed. BEXO displays the running debit and credit totals at the bottom of the entry; the Post button only becomes active when these are equal.
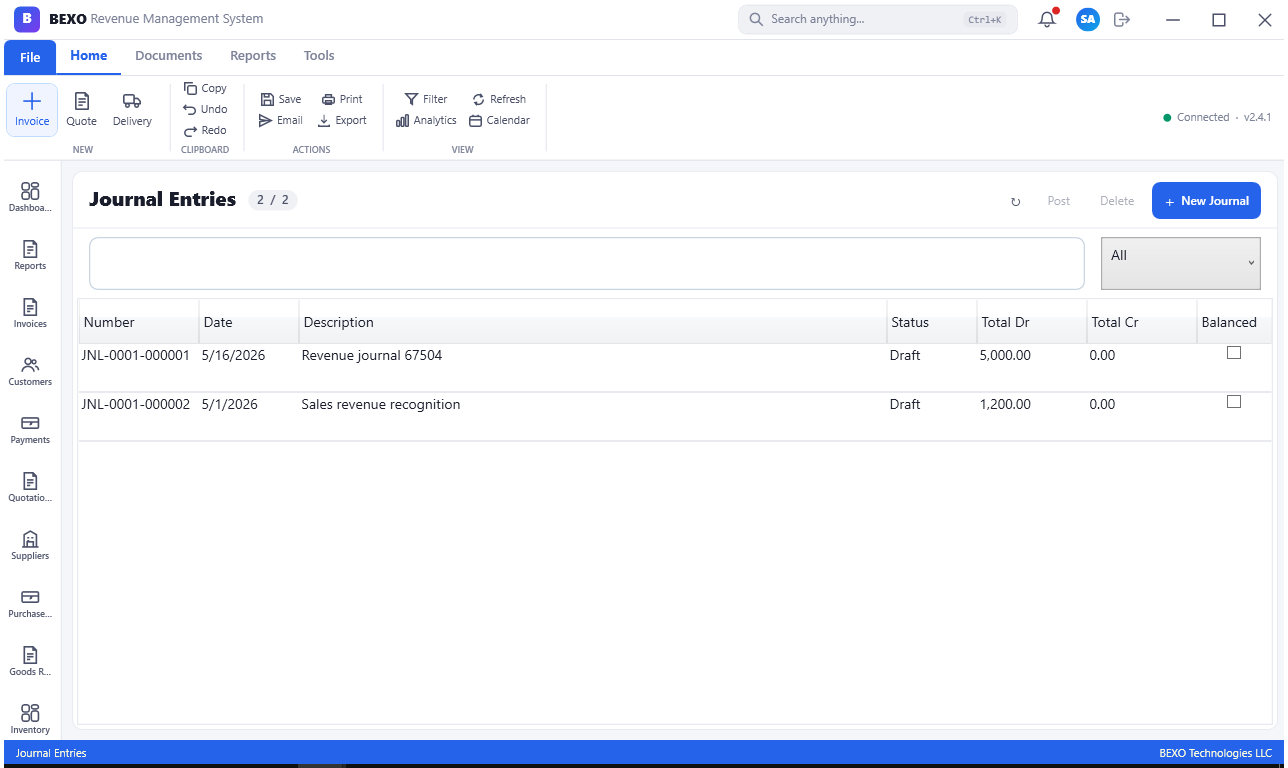
Warning: Manual journal entries bypass all the module-level validation that automatic entries benefit from. A wrong manual entry can silently distort your trial balance or financial statements. Always have manual journal entries reviewed by a second person (your accountant or finance manager) before posting. BEXO's approval workflow can be configured to require dual authorization for manual journals.
Tip: Use meaningful descriptions and reference numbers on manual journal entries. Six months from now, an entry labeled "Correction" with no reference number is nearly impossible to investigate. Include the period, the nature of the adjustment, and any supporting document reference in the description.
6.3 Financial Statements
BEXO generates the three core financial statements on demand: Profit & Loss (Income Statement), Balance Sheet, and Cash Flow Statement. These are the primary outputs of the accounting module and the documents your management, board, bank, and auditors will request.
Navigate to Finance > Financial Statements (or Financials). The screen presents a control panel where you select the report type, the reporting period (or a date range), the comparison period (for year-on-year or month-on-month comparisons), and the level of detail (summary or full account breakdown). Click Generate to build the report.
The generated statement is displayed directly in BEXO with all figures formatted by account group. Subtotals and totals are calculated automatically. The Export button lets you download the report to PDF, Excel, or CSV. You can also print it directly from the application.
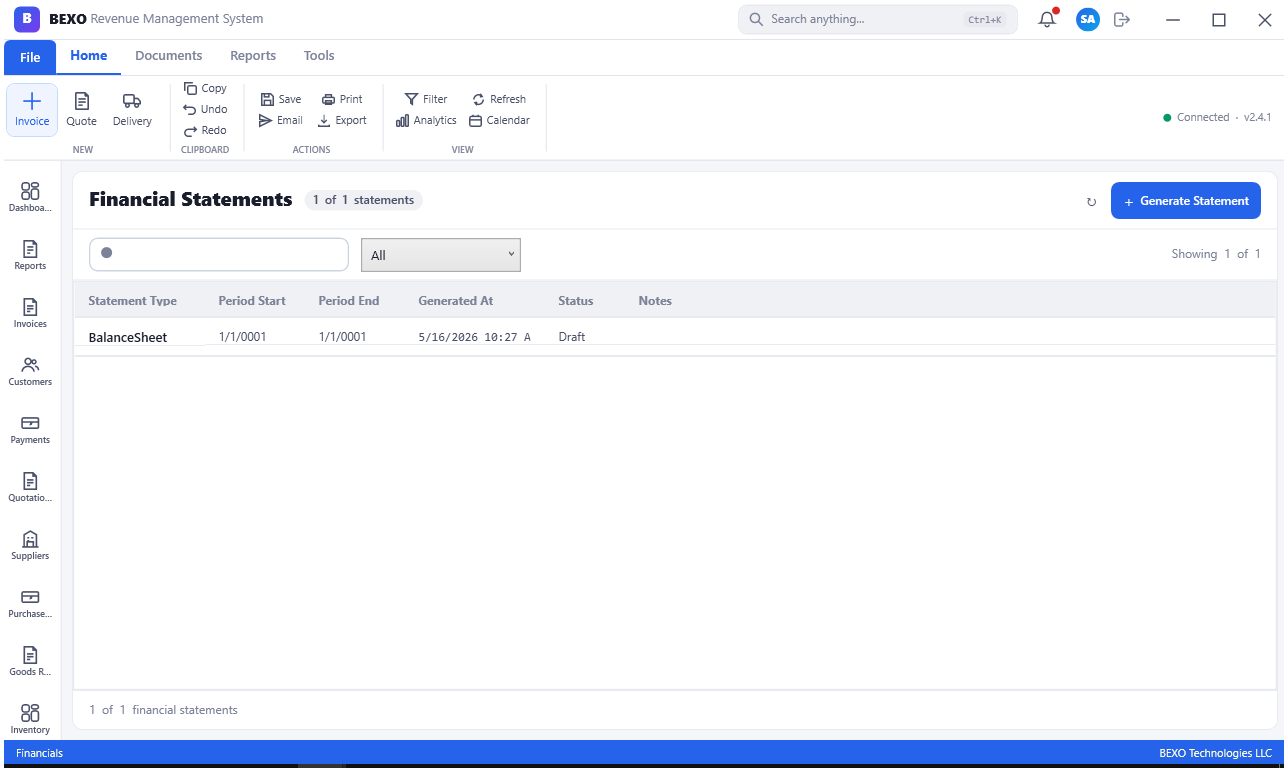
Note: Financial statements in BEXO are live — they reflect all posted transactions up to the moment you generate them. If a late invoice is posted after you have produced your month-end P&L, re-generate the statement to include it. For a locked period-end report, your accountant should close the accounting period, which prevents further postings and freezes the numbers.
Tip: Generate comparative statements (current month vs. prior month, or current year vs. prior year) to surface trends and anomalies quickly. Significant variances in expense lines often indicate either data entry errors or genuine cost changes that need management attention.
6.4 Tax Management
The Tax module handles VAT (Value Added Tax) and any other applicable taxes in your jurisdiction. In the UAE, for example, businesses registered for VAT must file quarterly VAT returns with the Federal Tax Authority (FTA). BEXO automates the tax calculation on every transaction and generates the VAT return report.
Navigate to Finance > Tax to access the tax management area. Here you can see the current VAT configuration: the applicable tax rates (e.g., 5% standard, 0% for exempt supplies), the tax registration number, and the filing periods. BEXO tracks input tax (VAT you paid on purchases) and output tax (VAT you charged on sales) separately, calculating the net payable or refundable amount for each period.
The VAT Return report shows a breakdown of taxable supplies by rate, total output VAT, total input VAT, and the net amount owed to or from the tax authority. This report is formatted to align with official VAT return boxes, making filing straightforward.
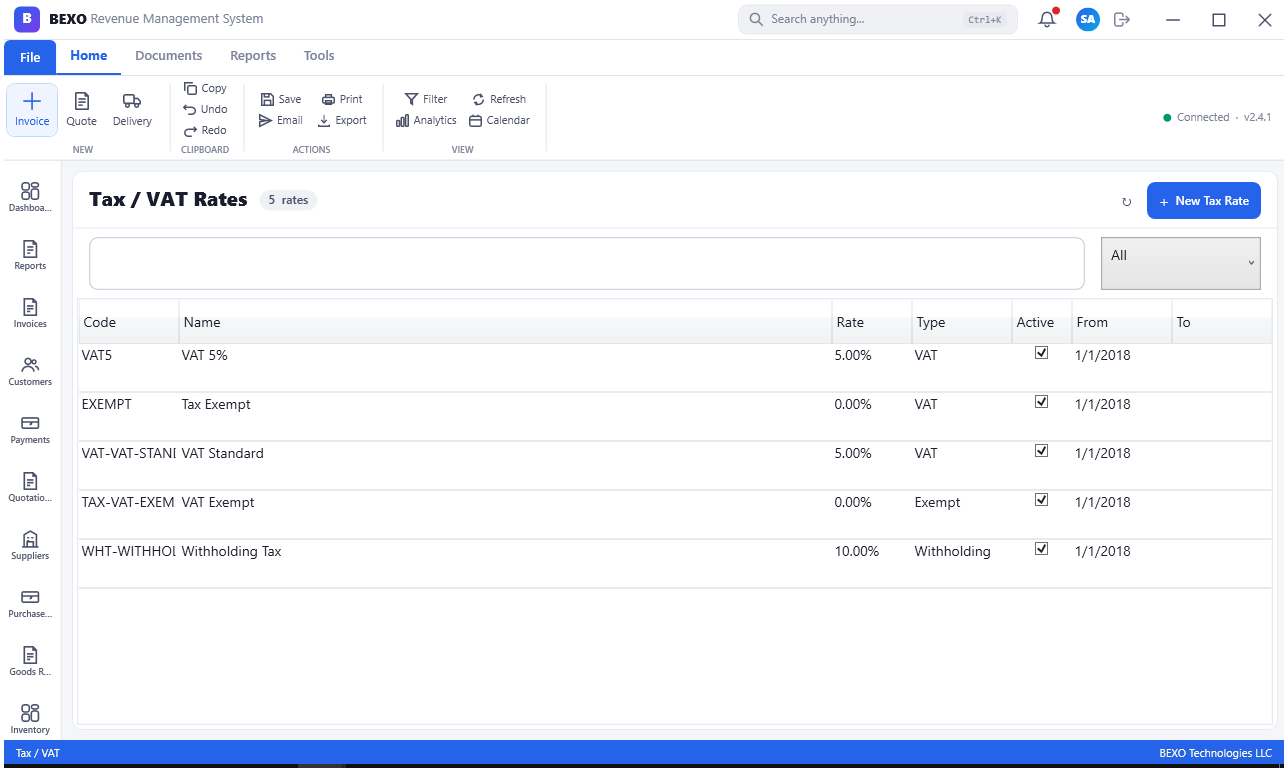
Warning: Never skip posting the VAT journal entry at period end. BEXO can generate this entry automatically — it moves the net VAT balance from the VAT liability account to a "VAT Payable to Authority" account, keeping your records accurate. Filing a VAT return without the corresponding book entry will cause your balance sheet to misstate your liabilities.
Tip: Reconcile your BEXO VAT return figures against your bank statements and invoice registers before submitting to the tax authority. Even a small discrepancy can trigger an inquiry. Build this reconciliation step into your monthly closing checklist.
6.5 Bank Reconciliation
Bank Reconciliation is the process of matching the transactions in your BEXO bank account ledger against your actual bank statement. Discrepancies reveal unrecorded payments, timing differences, or errors. Regular reconciliation (ideally monthly) is one of the most important financial controls.
Navigate to Finance > Bank Reconciliation. Select the bank account you want to reconcile and enter the bank statement ending date and balance. BEXO displays two columns: BEXO transactions (all payments and receipts recorded in the system for that account) and Bank Statement (which you import or manually match). Check off each transaction that appears on both sides. Unmatched items on the BEXO side may represent cheques in transit; unmatched items on the bank side may represent bank charges not yet recorded in BEXO.
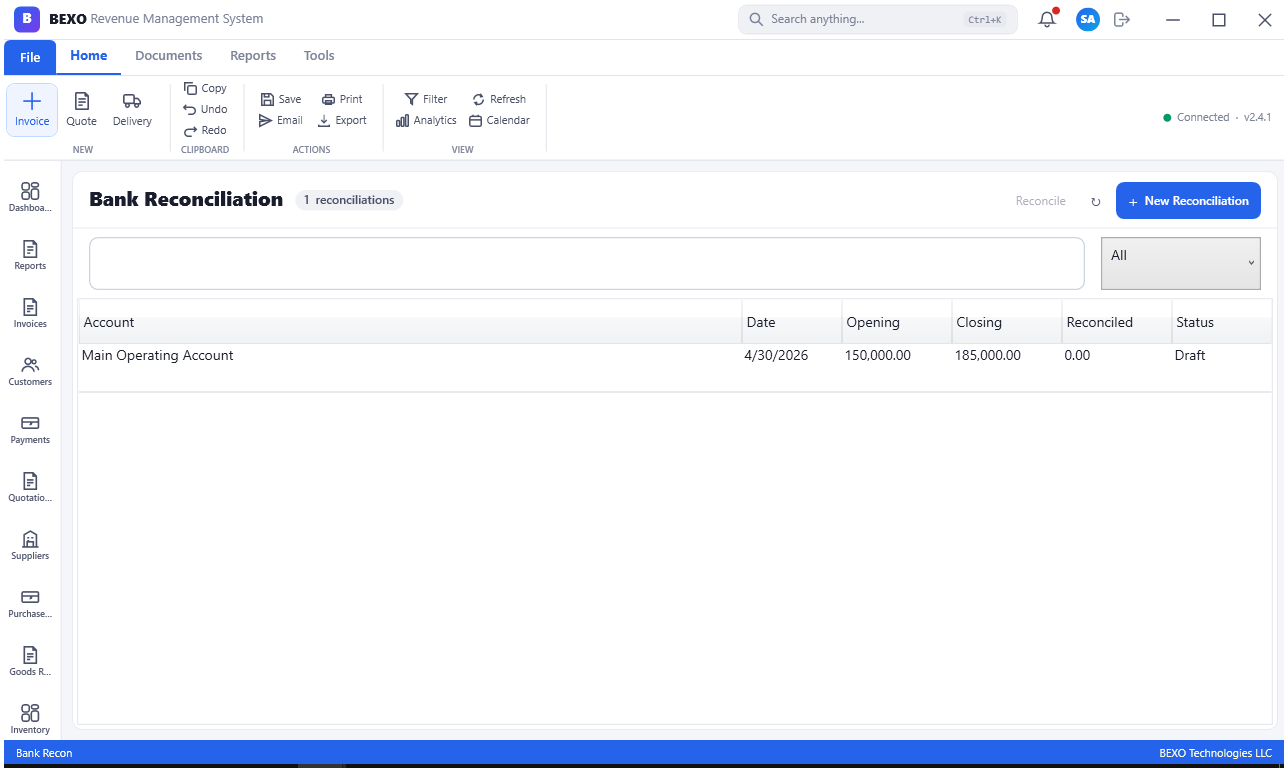
Tip: Import your bank statement electronically (many banks offer CSV or OFX exports) rather than entering transactions manually. BEXO's auto-matching algorithm will match the majority of transactions automatically, leaving only the ambiguous ones for manual review. This can reduce reconciliation time from hours to minutes.
Warning: Do not skip months of bank reconciliation and try to catch up in one session. The more time that passes, the harder it is to trace discrepancies. Establish a discipline of reconciling within a week of receiving each bank statement.
6.6 Budgets
The Budgets module allows you to define planned expenditure and revenue targets for each account, then compare actual performance against the budget throughout the year. Budget vs. actual analysis is one of the most powerful management tools available in BEXO.
Navigate to Finance > Budgets to view existing budget records. Each budget is linked to a financial year and contains monthly or quarterly targets for selected accounts. You can create multiple budget versions (e.g., Original Budget, Revised Budget, Stretch Target) and compare each against actuals.
To create a new budget, click New Budget, name it (e.g., "FY2026 Operating Budget"), select the year, and then enter values for each account by month. BEXO provides an import from Excel template to make this process efficient — you can build the budget in Excel and upload it rather than entering figures line by line.
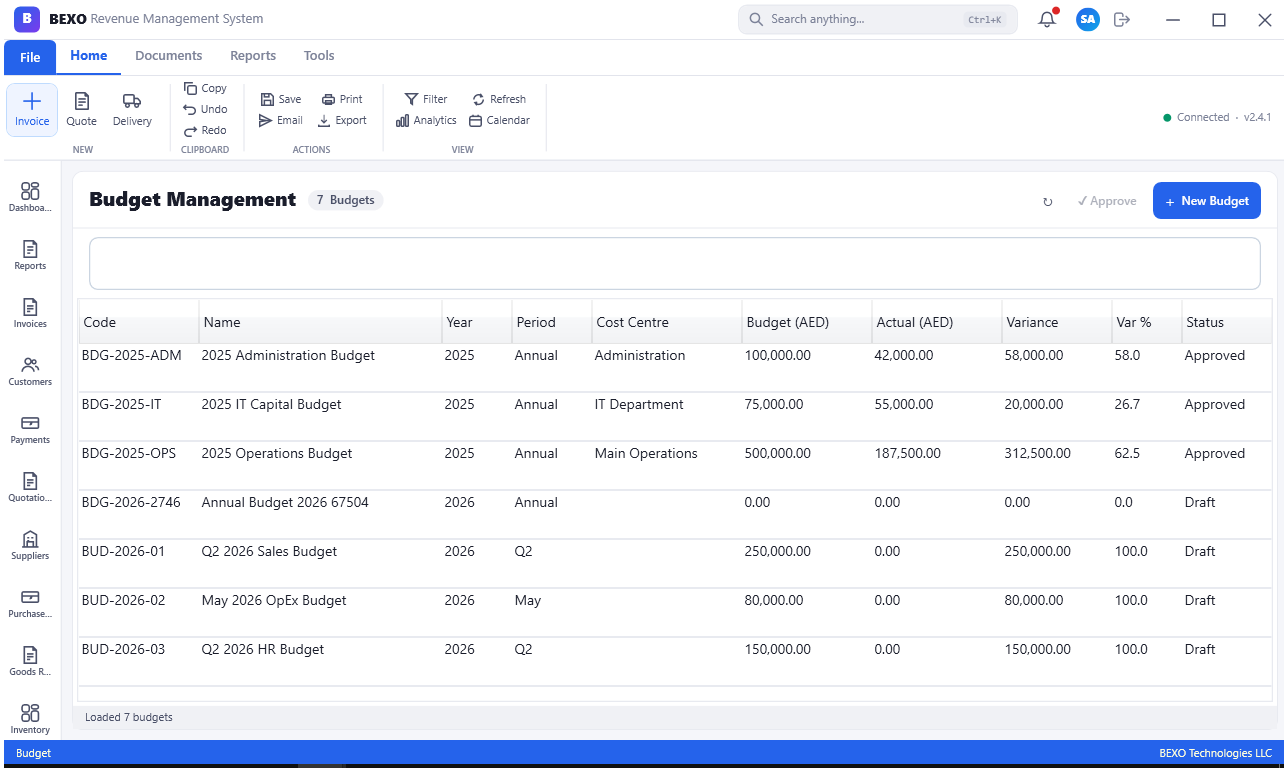
Tip: Link your budget to cost centers if your organization tracks departmental spending separately. This gives each department head a budget-vs-actual view limited to their own cost center, without exposing company-wide financials.
Note: Budget figures in BEXO are for management reporting only — they do not affect accounting entries. You can revise a budget at any time without impacting the accuracy of your financial records.
6.7 Cost Centers
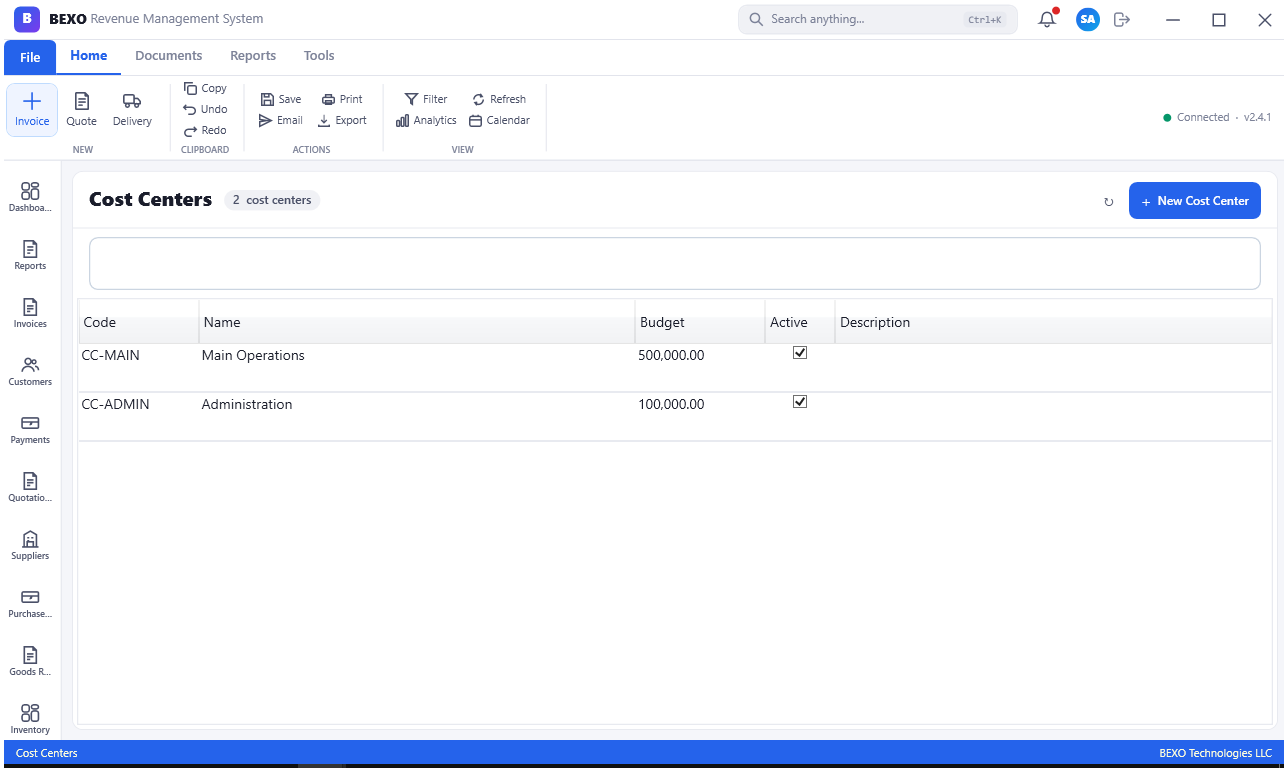
Cost Centers allow you to tag income and expense transactions to organizational units — such as departments, projects, branches, or business divisions — so that you can produce segment-level profit and loss reports. Without cost centers, all revenue and costs are blended at the company level.
Navigate to Finance > Cost Centers to view and manage your cost center hierarchy. Cost centers can be organized in a parent-child tree (e.g., Operations > Warehouse > Receiving Dock). Each cost center has a code, name, responsible manager, and optional budget linkage.
Once cost centers are defined, users can tag transactions to a cost center when entering invoices, bills, journal entries, or payroll runs. BEXO then filters all financial reports by cost center, enabling detailed departmental analysis.
Tip: Keep your cost center structure simple, especially at first. Start with top-level departments (Sales, Operations, Finance, HR, IT) and only add sub-centers when there is a clear reporting need. Over-complicated cost center structures lead to data entry errors and inconsistent tagging.
Warning: Cost center tagging is only as reliable as the discipline of the team entering transactions. If expense invoices are regularly posted without a cost center tag, your departmental reports will be meaningless. Consider making the cost center field mandatory for expense transactions in the system settings.
6.8 Fixed Assets
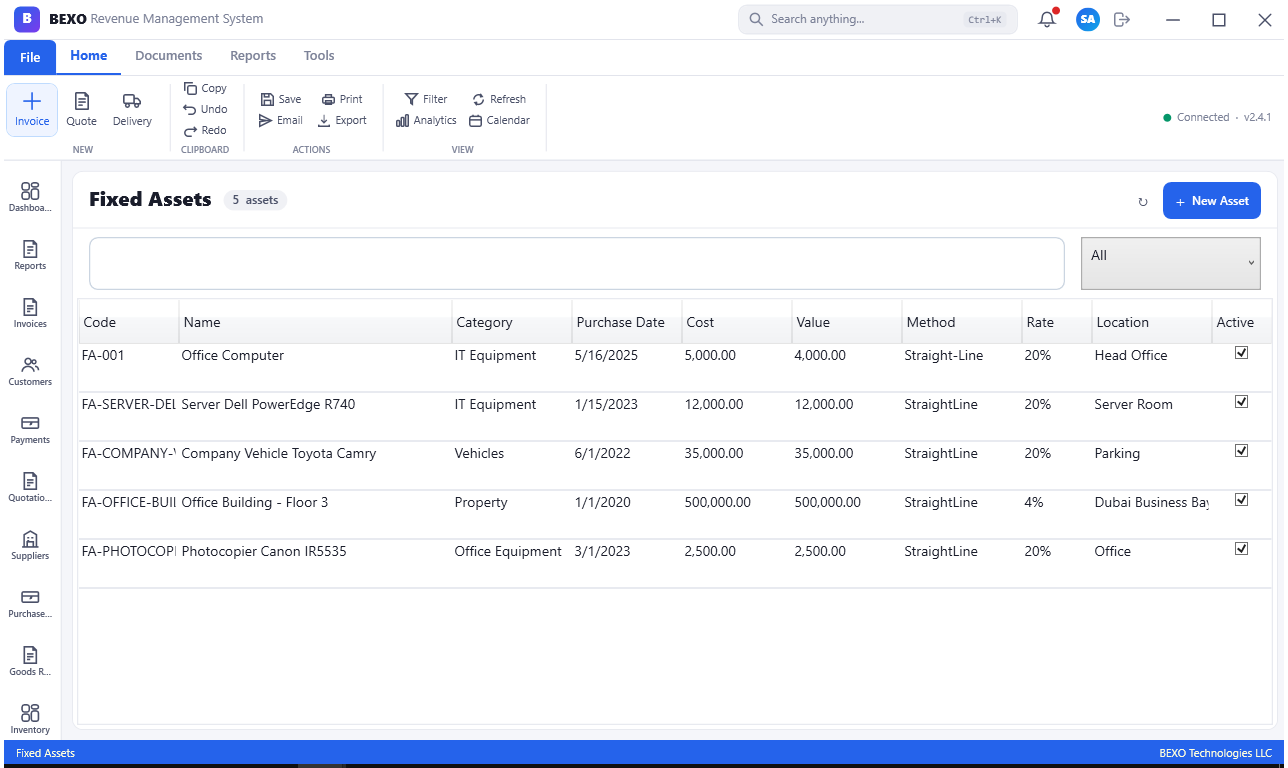
The Fixed Assets module tracks all long-term tangible assets (machinery, vehicles, computers, furniture, property improvements) from acquisition through depreciation to eventual disposal. BEXO automates the depreciation calculation and posts the monthly depreciation journal entries on your behalf.
Navigate to Finance > Fixed Assets to view the asset register. Each asset record shows the asset code, name, category (Plant & Machinery, Vehicles, IT Equipment, etc.), acquisition date, purchase cost, accumulated depreciation, net book value (NBV), and depreciation method (Straight Line, Declining Balance, or Units of Production).
To register a new asset, click New Asset, fill in the description and category, enter the purchase cost and date, select the depreciation method, and define the useful life (in years or units) and the residual value. BEXO will calculate the annual and monthly depreciation rate. When you post the depreciation run for the month, BEXO creates the journal entries automatically for all active assets.
Tip: Link fixed asset acquisitions to the corresponding supplier bill or purchase order. This creates a clear audit trail from the purchase decision through payment to the asset ledger entry, which simplifies asset audits significantly.
Note: When an asset is sold or scrapped, use the Dispose function on the asset record. BEXO will calculate any gain or loss on disposal, post the appropriate journal entry, and mark the asset as retired. Never just stop depreciating an asset without formally recording its disposal — doing so leaves the asset on the balance sheet indefinitely.
Part 7: Human Resources & Payroll
7.1 Employee Records
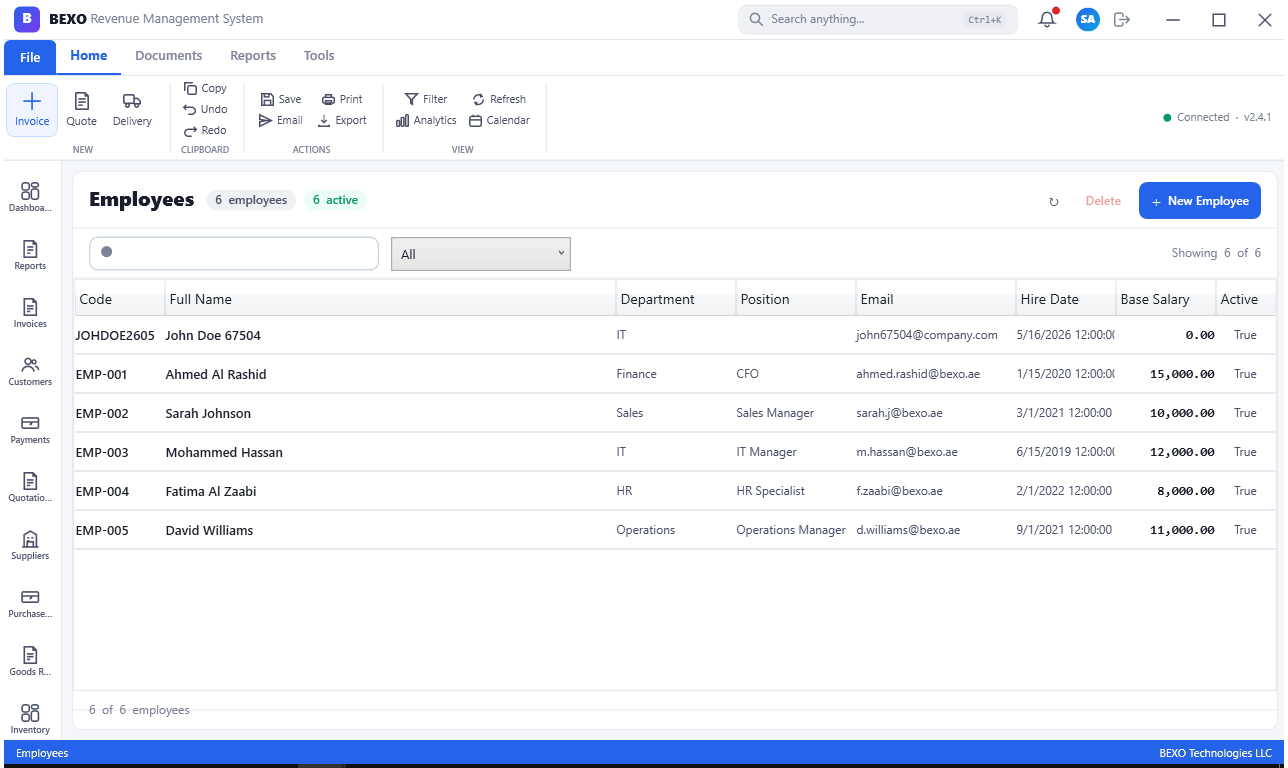
The Employees module is the master file for your workforce. Every HR and payroll transaction in BEXO — from attendance and leave to payroll and gratuity — flows through employee records, making accurate and complete employee data essential.
Navigate to HR > Employees to view the employee list. The grid shows employee number, full name, department, job title, employment type (Full-Time, Part-Time, Contract), start date, and employment status (Active, On Leave, Resigned, Terminated). Click New Employee to onboard a new hire.
The employee form has multiple tabs: Personal (name, nationality, date of birth, contact details, emergency contact), Employment (department, job title, contract type, start date, probation end date, line manager), Payroll (basic salary, allowances, payment method, bank account), Documents (passport, visa, labour card, Emirates ID — with expiry date alerts), and Notes. Complete as many fields as possible at onboarding — especially the Documents tab, as BEXO can alert you when work permits or visas are approaching expiry.
Tip: Upload digital copies of employee documents (passport, visa, Emirates ID) directly into BEXO's Documents tab. This gives HR instant access without maintaining a paper filing cabinet, and BEXO's expiry date alerts ensure you never miss a renewal deadline.
Warning: Employee salary and banking details are sensitive data. BEXO's role-based access control allows you to restrict the Payroll tab visibility to authorized HR and finance staff only. Ensure these permissions are configured correctly before onboarding employees.
7.2 Attendance Tracking
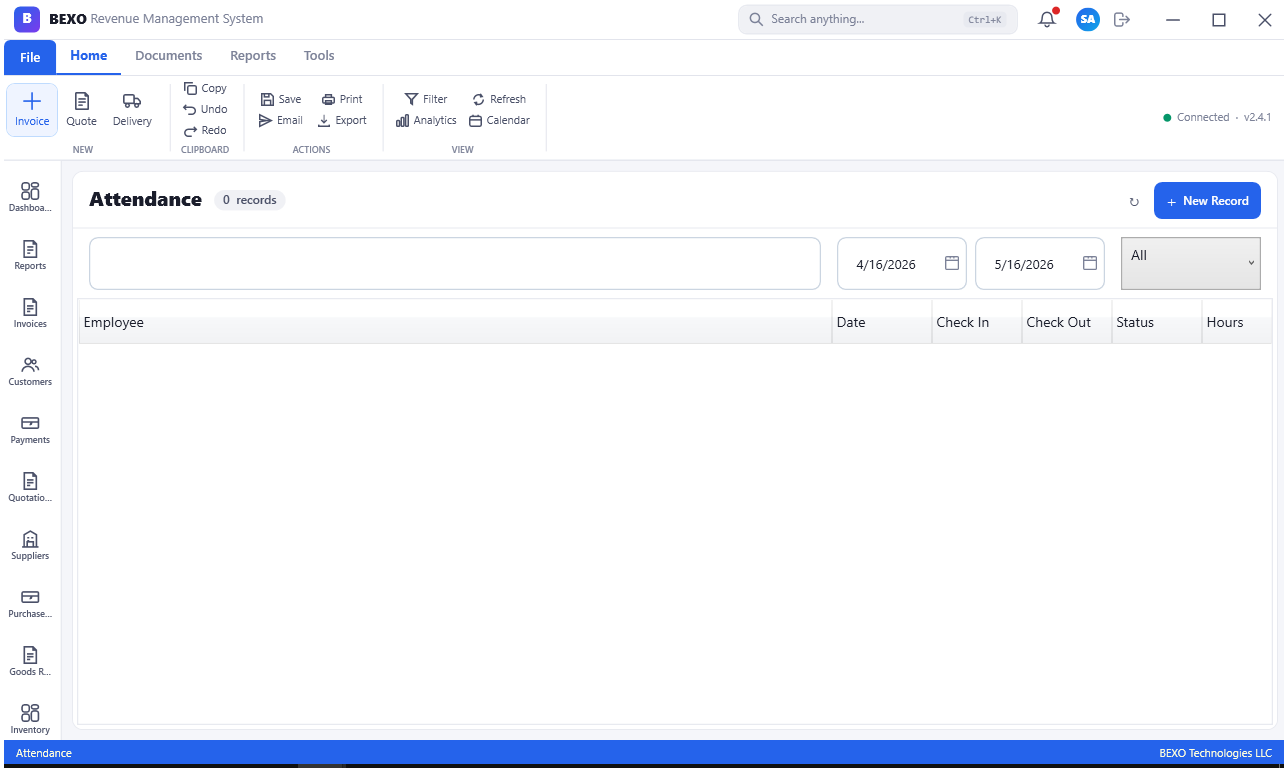
The Attendance module records daily attendance for all employees — clock-in and clock-out times, late arrivals, early departures, and absences. This data feeds directly into payroll calculations for overtime, deductions, and WPS compliance reports.
Navigate to HR > Attendance to view attendance records. The screen shows a calendar-style or grid view of attendance entries, with each employee's clock-in and clock-out times per day. You can filter by employee, department, or date range. Records can be entered manually, imported from a time-attendance device, or captured via BEXO's self-service module if employees clock in through the system.
To add a manual attendance record, click New Attendance, select the employee, date, and enter the check-in and check-out times. You can add a note if the attendance pattern was unusual (e.g., client site visit, business travel). BEXO calculates total hours worked for each record and flags overtime hours based on the employee's contracted working hours.
Tip: If your organization uses biometric terminals or RFID card readers, ask your BEXO administrator about the attendance device integration. Automated imports from hardware clocking systems eliminate manual entry entirely and dramatically improve accuracy.
Note: Attendance records form the input for overtime payroll calculations. Ensure that overtime rates (1.25x for regular overtime, 1.5x for Friday work under UAE Labour Law) are correctly configured in the system settings before running payroll.
7.3 Leave Management
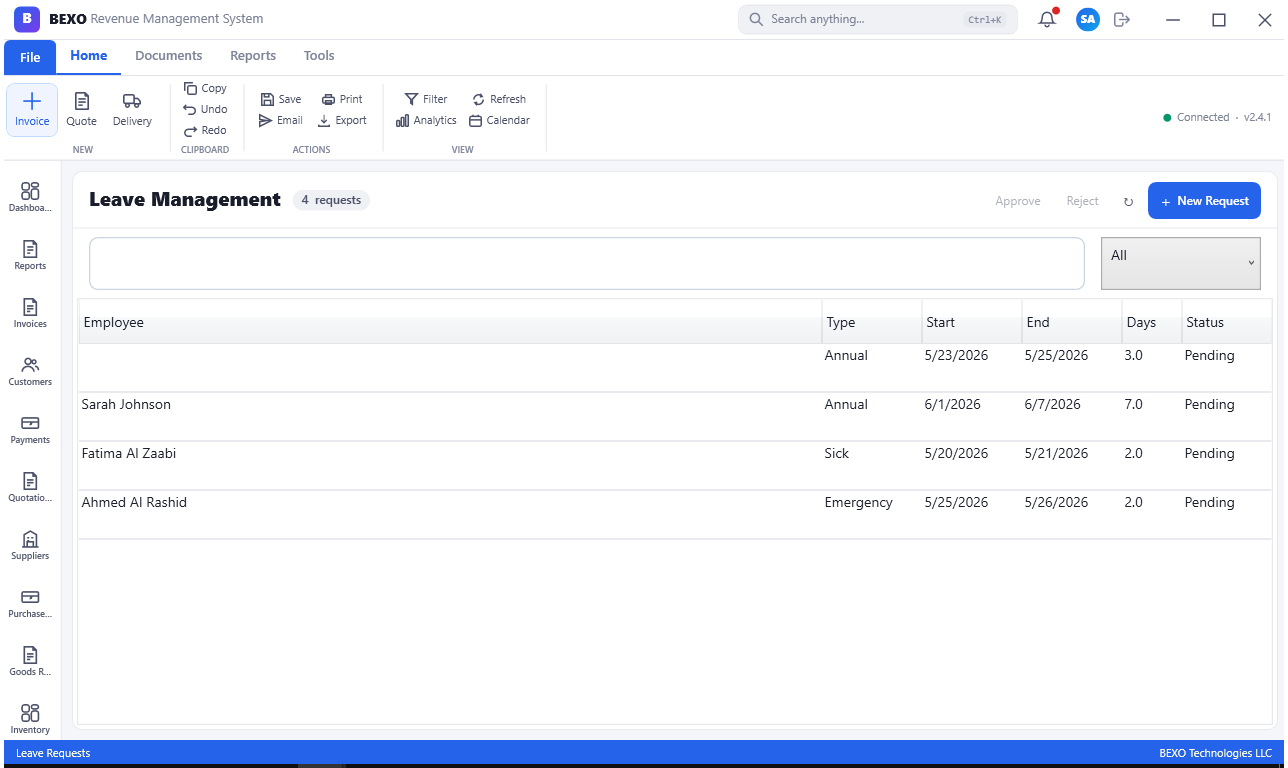
The Leave module handles all employee time-off requests — annual leave, sick leave, emergency leave, maternity/paternity leave, and any custom leave types defined by your HR policy. Employees can request leave through BEXO and managers can approve or reject requests directly in the system.
Navigate to HR > Leaves to view the leave register. The list shows all leave requests with the employee name, leave type, start date, end date, number of days, status (Pending, Approved, Rejected, Cancelled), and the approving manager. You can filter by period, employee, or status.
To submit a leave request (or enter one on behalf of an employee), click New Leave Request. Select the employee, leave type, start and end dates, and add any supporting notes (e.g., a medical certificate reference for sick leave). BEXO calculates the number of working days based on the employee's shift pattern and public holiday calendar, then routes the request to the employee's line manager for approval.
Tip: Set up leave accrual rules in system settings so BEXO automatically credits annual leave entitlements monthly or at year-start based on each employee's contract. This keeps leave balances accurate without manual HR intervention.
Warning: Under UAE Labour Law, employees are entitled to specific minimum leave durations. Ensure your leave type configurations comply with current legislation. Consult your HR manager before customizing leave accrual rules or introducing new leave type categories.
7.4 Work Shifts
The Shifts module defines the working time patterns for your employees. Different employee groups may work different schedules — office staff on a standard Monday-Friday 9-to-5 shift, warehouse staff on rotating three-shift patterns, security staff on 12-hour shifts. BEXO handles all of these through configurable shift templates.
Navigate to HR > Shifts to view defined shift patterns. Each shift record shows the shift name, start time, end time, total hours, applicable days of the week, and the list of employees assigned to it. You can create as many shift templates as your operation requires.
When an employee is assigned a shift, BEXO uses that shift definition to calculate expected working hours for each day, which in turn drives overtime calculations in attendance tracking and payroll. Shift patterns can be time-bound, allowing you to schedule shift changes in advance (e.g., an employee moving from a day shift to a night shift from a specific date).
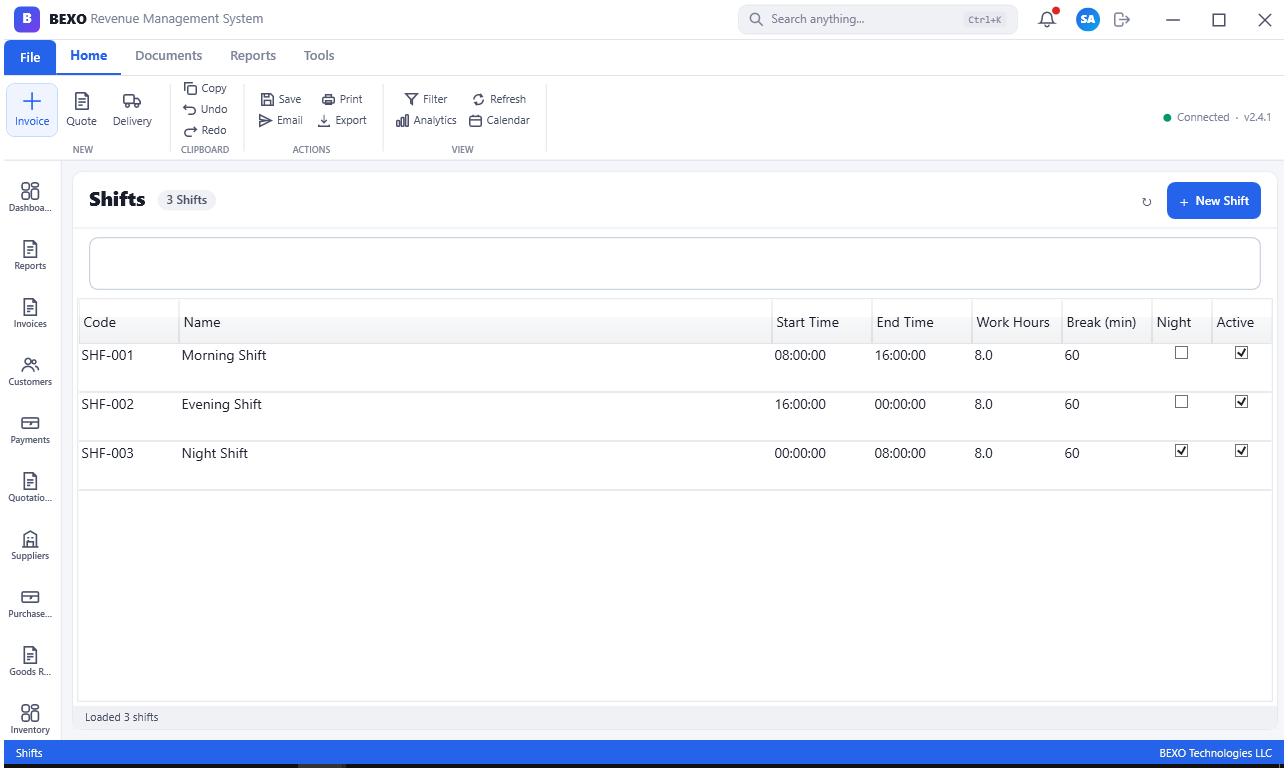
Note: Shift assignments are critical for accurate attendance and payroll processing. An employee without a shift assignment will have their expected hours treated as zero, which may lead to incorrect overtime calculations. Ensure all employees are assigned a shift at onboarding.
Tip: For organizations with complex rotating rosters (e.g., 4-on-4-off patterns), BEXO's shift rotation tool can automatically generate the weekly schedule. Contact your administrator to configure rotation rules rather than assigning shifts manually week by week.
7.5 Payroll Processing
The Payroll module is one of the most critical — and most regulated — areas of BEXO. It calculates gross pay (basic salary plus all allowances) and net pay (after deductions for social insurance, salary advances, loans, leaves without pay, and any other configured deductions) for every employee and prepares the payment file.
Navigate to HR > Payroll to access the payroll area. The main view shows payroll runs by month. To process a new payroll, click New Payroll Run, select the month and year, and optionally select a specific group of employees (if you process payroll in batches). Click Calculate to trigger BEXO's payroll engine.
The calculation engine pulls basic salary and allowances from each employee record, applies attendance-based overtime and deductions, subtracts loan installments and other deductions, and computes the net pay for each employee. The calculated payroll is displayed as a register — one row per employee showing all components.
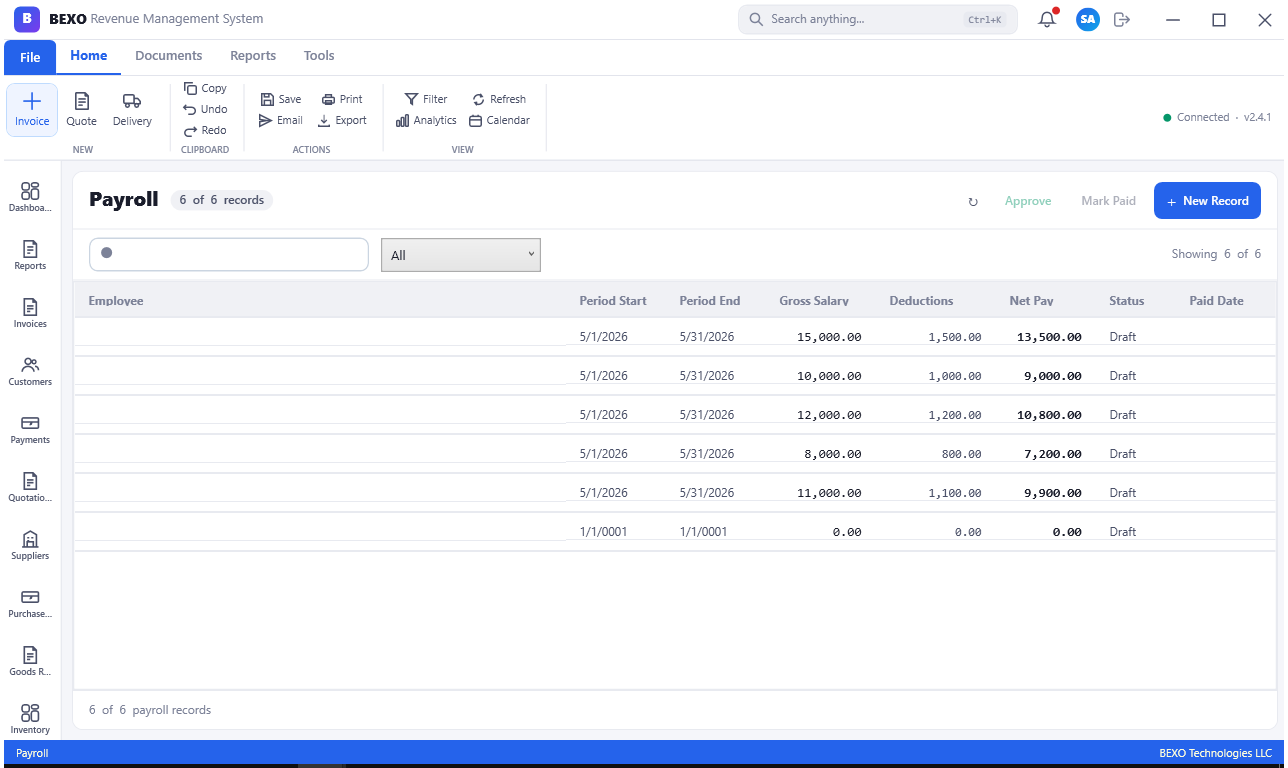
Review the register carefully. You can click any employee row to see the full salary breakdown. If you spot an error, you can make an adjustment (a one-time addition or deduction for this period only) directly in the run before posting. When satisfied, click Post to finalize the payroll. BEXO will create the payroll journal entry, debit the payroll expense accounts, credit the bank/payable accounts, and update each employee's pay history.
Warning: Once a payroll run is posted, individual salary entries cannot be edited. To correct a posted payroll, you must create a payroll adjustment entry in the next period or post a manual journal. This is by design — payroll records are auditable documents. Double-check all figures before posting.
Tip: BEXO can generate a WPS (Wage Protection System) SIF file directly from the payroll run. This is mandatory for UAE businesses with more than one employee. Export the SIF file from the payroll run and upload it to your bank's WPS portal to comply with the Ministry of Human Resources requirement.
7.6 Employee Loans
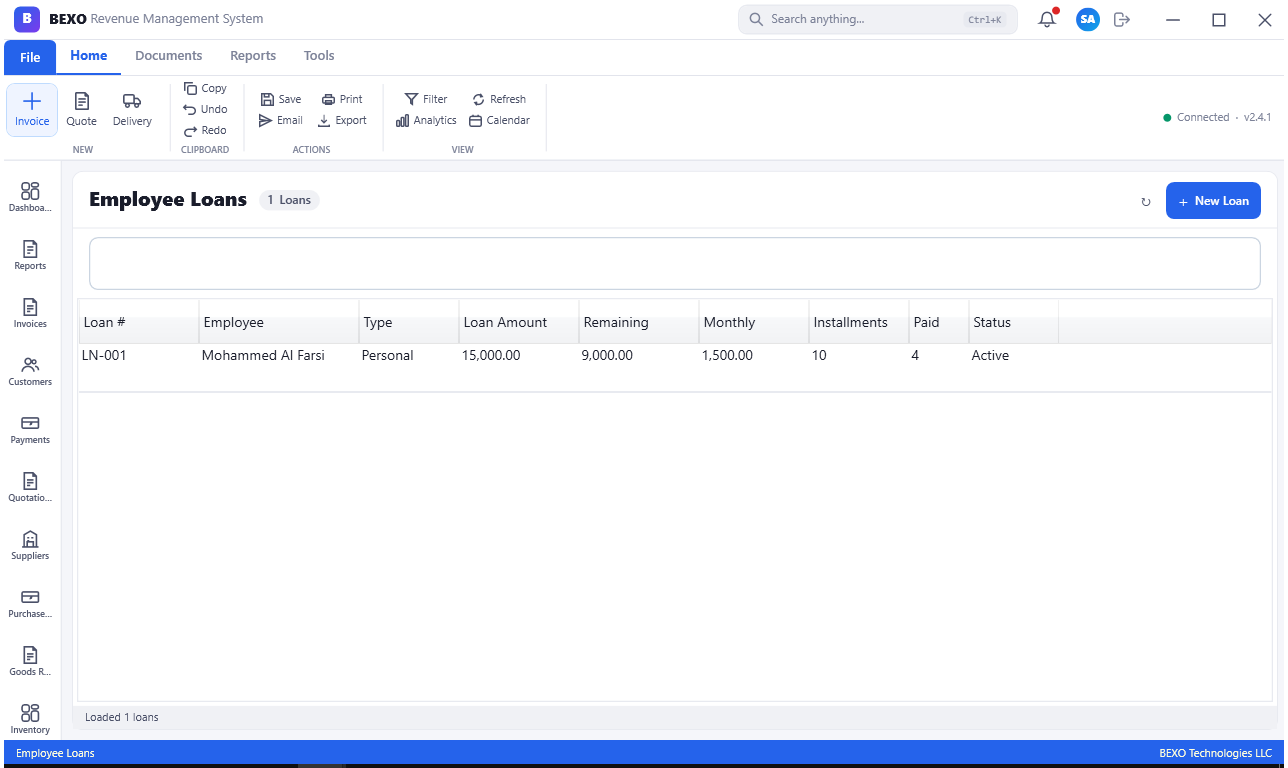
The Employee Loans module tracks personal loans or salary advances granted to employees by the company. When an employee takes a loan, BEXO sets up an amortization schedule and automatically deducts the installment from each monthly payroll run until the balance is cleared.
Navigate to HR > Employee Loans to view all active and historical loans. The list shows the employee, loan date, principal amount, installment amount, outstanding balance, and status (Active, Fully Paid, Written Off). To record a new loan, click New Loan and enter the employee, principal amount, number of installments, start date, and the deduction account.
BEXO generates a repayment schedule automatically. Each time payroll is run, the current installment is deducted from the employee's net pay and the outstanding balance is reduced. If an employee leaves before the loan is fully repaid, the outstanding balance can be recovered from their final settlement or written off with appropriate authorization.
Tip: Loan issuance may require a manual journal entry to move funds from the bank to an employee loan account (a current asset on the balance sheet). Ensure this entry is recorded at the time of disbursement — it is separate from the payroll deduction entries that reduce the balance over time.
Note: Some organizations restrict the maximum loan amount to a multiple of monthly salary, or require HR director approval above a certain threshold. Use BEXO's Approvals workflow (covered in Part 11) to enforce these authorization controls.
7.7 Gratuity Calculations
In the UAE and several other Gulf countries, end-of-service gratuity (an end-of-employment payment) is a legal entitlement under labour law. The amount depends on the employee's length of service and the reason for termination. BEXO automates the calculation to ensure compliance.
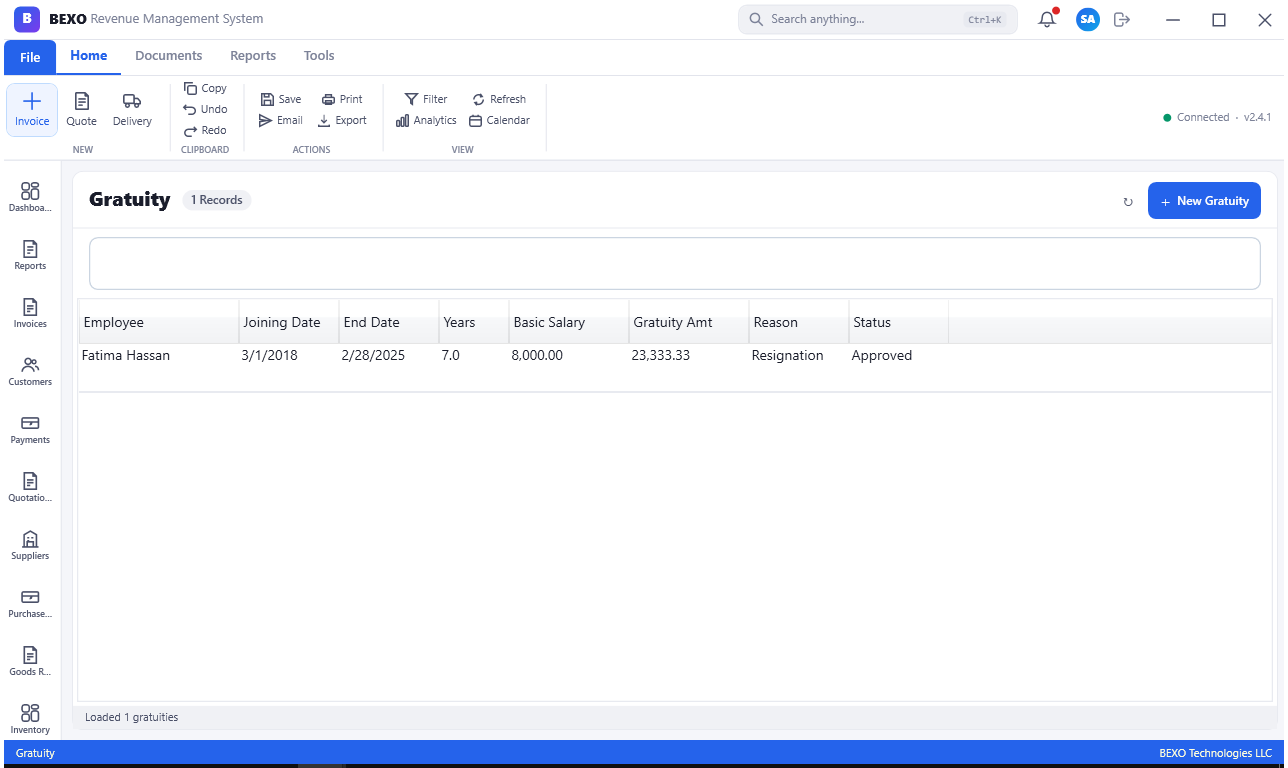
Navigate to HR > Gratuities to view gratuity calculations for your employees. For each employee, BEXO displays the accrued gratuity liability based on their current tenure, basic salary, and the applicable law (UAE Labour Law, for example). The calculation follows the prescribed formula: 21 days of basic salary per year for the first five years, and 30 days per year thereafter, subject to the maximum cap.
When an employee leaves, you can generate their End of Service calculation from this screen. Enter the termination date and reason. BEXO will compute the final gratuity entitlement, factor in any leave balance payout, and produce a final settlement figure.
Warning: Gratuity calculations are legally mandated. Using incorrect formula parameters or missing the tenure threshold at five years will result in underpayment, which exposes your organization to legal liability. If you are unsure about the applicable law, consult your HR legal advisor before customizing BEXO's gratuity configuration.
Tip: The gratuity accrual displayed in BEXO is a useful input for your balance sheet — it represents a long-term liability that should be provisioned monthly. Work with your accountant to set up a monthly journal entry that charges Gratuity Expense and credits the Gratuity Provision liability account.
7.8 Appraisals
The Appraisals module provides a structured framework for employee performance reviews. HR managers and line managers can create appraisal cycles, assign reviewers, capture objective ratings, and record development notes — all from within BEXO.
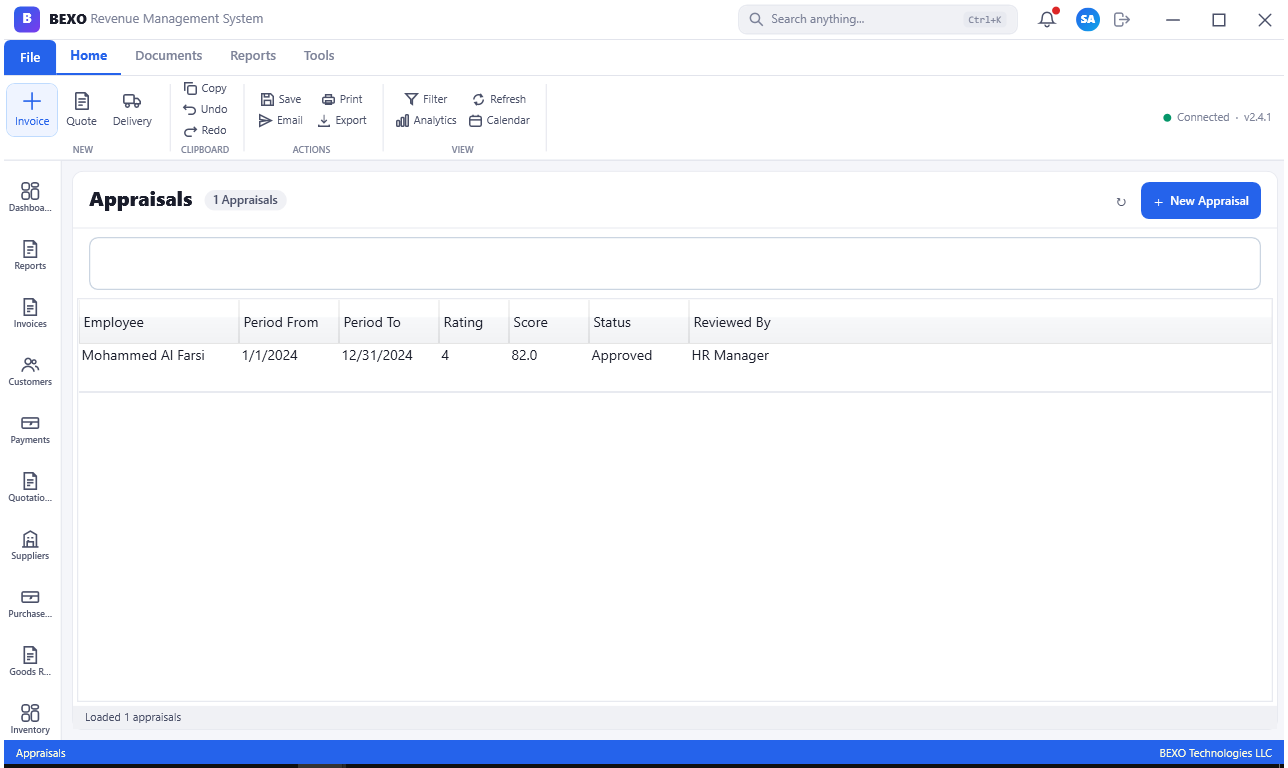
Navigate to HR > Appraisals to view the appraisal register. Entries show the employee, appraisal period, reviewer, submission date, and overall score or rating. To initiate a new appraisal cycle, click New Appraisal and select the employee, the appraisal template (if templates are configured), the review period, and the assigned reviewer.
The appraisal form includes scoring criteria (configured by HR), a comments section for both the reviewer and the employee, and a development plan section for capturing agreed training or growth objectives. Once both parties have completed their sections, the appraisal can be submitted and locked.
Tip: Link appraisal outcomes to salary reviews in BEXO. When an employee receives a merit increase based on a performance appraisal, update their basic salary on the employee record and reference the appraisal in the notes. This creates a clean record connecting performance results to compensation decisions.
Note: BEXO's appraisal module is designed to complement — not replace — a thorough HR performance management process. The face-to-face conversation between a manager and their report remains the most important part of any appraisal cycle. BEXO provides the record-keeping and workflow structure around that conversation.
Part 8: CRM & Sales Pipeline
8.1 Contacts
The CRM Contacts module is the central address book for all external business relationships — individuals at prospect companies, existing customers, suppliers, partners, and any other external stakeholders you interact with. Unlike the Customers module (which tracks billing entities), Contacts tracks the specific people you deal with.
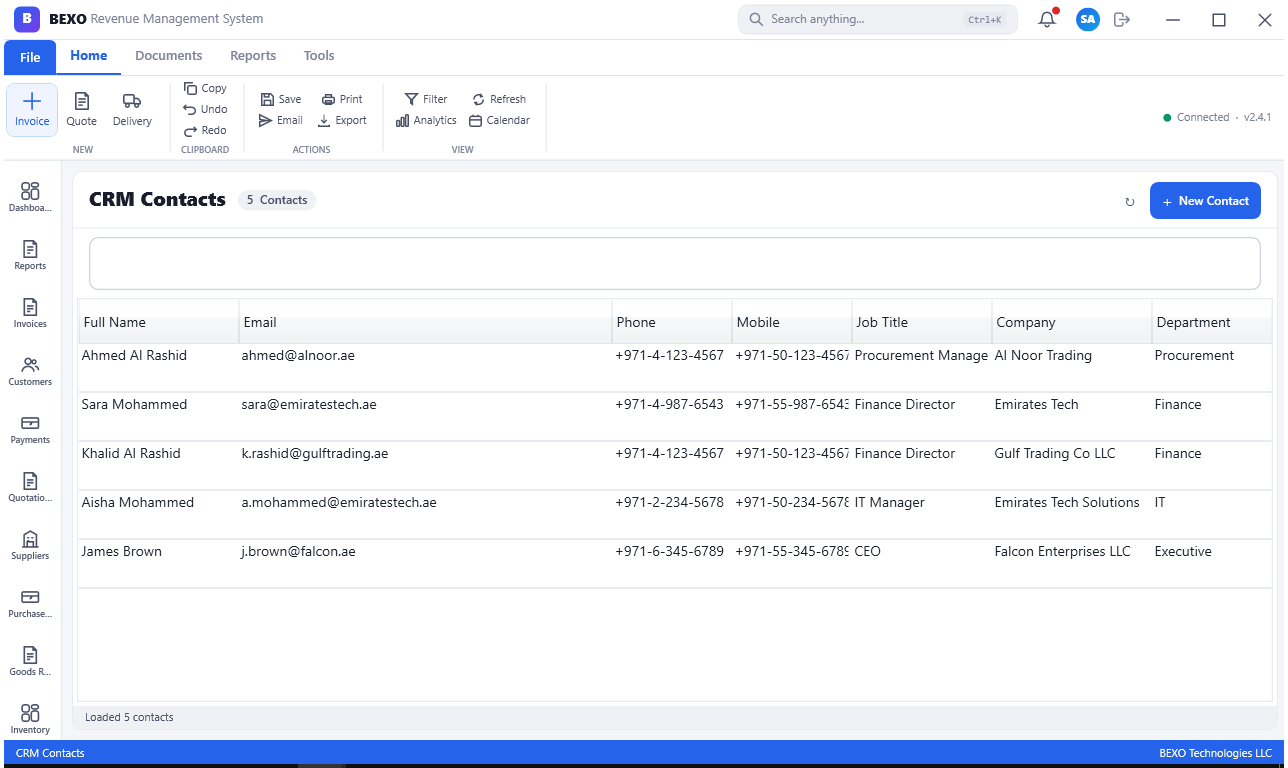
Navigate to CRM > Contacts to view all contacts. The grid shows full name, job title, company, email, phone, and the date of the last interaction. You can search by any field and filter by company, source, or contact type. Click New Contact to add a new individual.
The contact form captures personal details (name, title, photo), business details (company name, department, job title), contact channels (phone, email, LinkedIn, WhatsApp), and relationship notes. Contacts can be linked to companies in the business directory and to Leads, Opportunities, or Cases in the CRM pipeline.
Tip: Keep your contacts enriched and up to date. Stale contacts (people who have changed jobs, companies that have moved) reduce the effectiveness of your CRM campaigns and mailing lists. Consider a quarterly review process where your sales team validates key contacts.
Note: BEXO's CRM contacts are separate from customer and supplier records in the financial modules. This is intentional — a contact is a person, while a customer or supplier is a business entity used for billing. One business entity can have many contacts.
8.2 Leads
Leads are unqualified potential customers — people or companies that have shown some interest in your products or services but have not yet been qualified as genuine sales opportunities. The Leads module is the entry point of the CRM sales funnel.
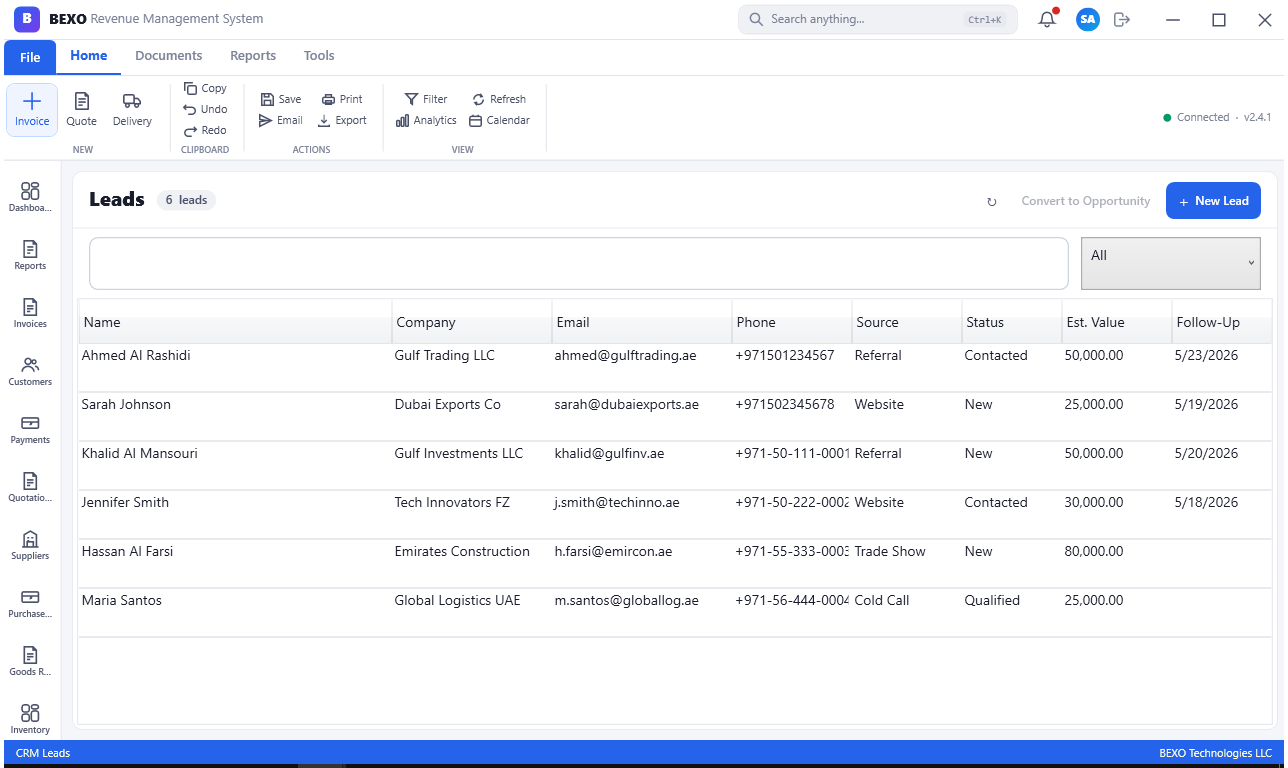
Navigate to CRM > Leads to view all leads. The grid shows the lead name, company, source (how the lead was generated — Website, Referral, Exhibition, Cold Call, etc.), assigned sales representative, date created, and status (New, Contacted, Qualified, Disqualified). New leads can be entered manually or may be auto-created by integrations (such as a web form or API connector).
To create a new lead, click New Lead. Enter the contact name, company, source, estimated value, and assign it to a sales rep. Record initial notes about the lead's interest and requirements in the Notes tab. As the sales rep contacts and evaluates the lead, they update the status. When a lead is qualified (confirmed as a real opportunity), click Convert to Opportunity to move it to the next stage.
Tip: Track lead sources rigorously. Over time, the data in the Source field tells you which marketing channels and activities generate the most valuable leads. This information drives budget allocation decisions for your marketing team. An unmaintained source field is a missed insight.
Note: Disqualified leads are retained in BEXO and are not deleted. Circumstances change — a lead that was not ready today may become a genuine opportunity in six months. The disqualification note and history remain available if the lead is re-engaged later.
8.3 Opportunities
Opportunities are qualified leads — sales situations where you have confirmed that the prospect has a genuine need, a budget, and a timeline. The Opportunities module tracks each opportunity through your sales pipeline stages from initial qualification to closed-won or closed-lost.
Navigate to CRM > Opportunities to view your pipeline. The list can be viewed as a grid or as a Kanban board organized by pipeline stage. Each opportunity shows the name, linked contact, expected close date, estimated value, probability percentage, and current stage (e.g., Qualification, Proposal, Negotiation, Closed Won, Closed Lost).
To create a new opportunity, click New Opportunity. Link it to the qualifying contact and/or company. Set the pipeline stage, estimated value, expected close date, and probability. Add detailed notes about the customer's requirements, decision timeline, and competitor situation. You can also attach quotations directly to the opportunity — when the prospect accepts a quotation, BEXO can convert it to an invoice and mark the opportunity as Closed Won automatically.
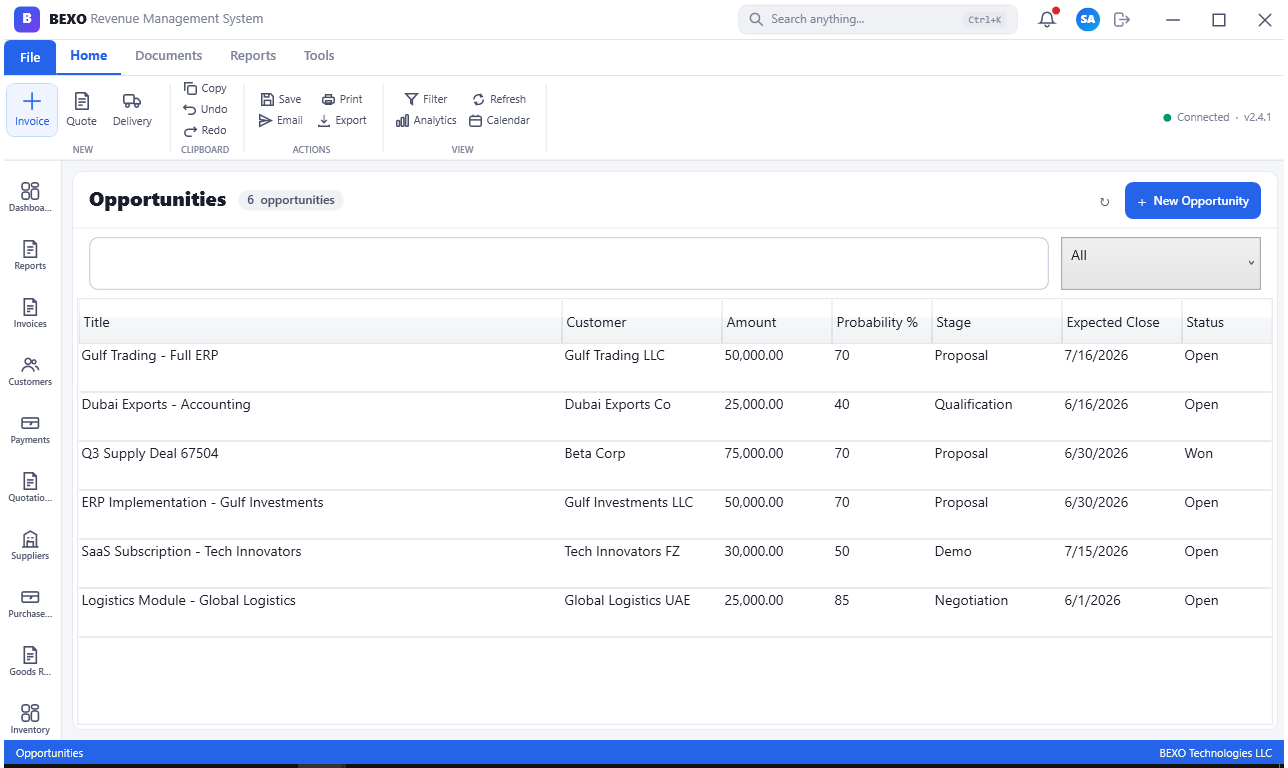
Tip: Update opportunity stages and probabilities after every customer interaction. Your sales manager will use the pipeline view to forecast revenue — a pipeline with stale opportunities and unrealistic close dates leads to poor forecasting. Make opportunity maintenance a part of the weekly sales routine.
Warning: When closing an opportunity as Lost, always record a loss reason (e.g., Price, Competitor, No Budget, Timing). This data aggregates into win/loss analysis reports that help you identify systematic weaknesses in your sales approach or pricing strategy.
8.4 Campaigns
The Campaigns module allows you to plan, execute, and track marketing campaigns — email blasts, events, promotions, LinkedIn outreach, or any other structured marketing activity. Each campaign can be linked to the leads and opportunities it generates, providing ROI measurement.
Navigate to CRM > Campaigns to view all campaigns. The list shows the campaign name, type, start date, end date, budget, actual spend, number of leads generated, and conversion rate (leads to opportunities). Click New Campaign to set up a new one.
The campaign form captures the name, type (Email, Event, Social Media, Trade Show, Advertisement), target audience description, planned budget, start and end dates, and campaign goals. As leads are generated through the campaign, they can be tagged with the campaign source. The campaign record then aggregates all associated leads and opportunities, giving you a clear picture of how much revenue each campaign is contributing.
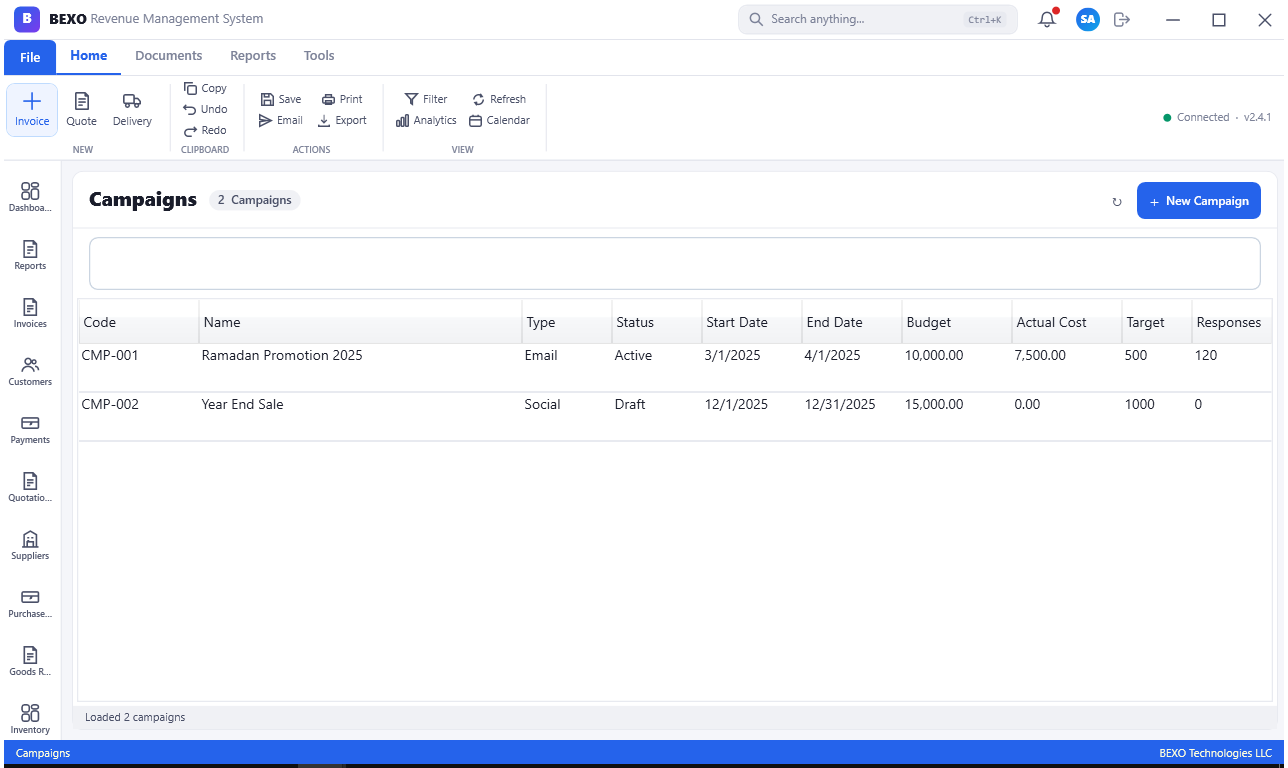
Tip: Always set a budget on your campaigns and track actual spend. Without cost tracking, you cannot calculate true marketing ROI. The ratio of pipeline value generated to campaign cost is one of the most important metrics for a marketing-led growth business.
8.5 Support Cases
The Cases module provides a customer support ticketing system integrated directly within BEXO. When customers report issues, requests, or complaints, you can log them as cases, assign them to support staff, track resolution progress, and communicate with the customer — all from within the system.
Navigate to CRM > Cases to view the support queue. Each case shows the case number, customer, subject, priority (Low, Normal, High, Critical), assigned agent, creation date, last update, and status (Open, In Progress, Pending Customer, Resolved, Closed). You can filter by status, priority, or assigned agent.
To open a new case, click New Case, select the customer (or contact), enter the subject and a detailed description of the issue, set the priority, and assign it to a support agent or team. The case can be linked to a specific product, service contract, or invoice for context. As the agent works through the issue, they add notes and update the status. When resolved, the case is marked Resolved and the customer notified.
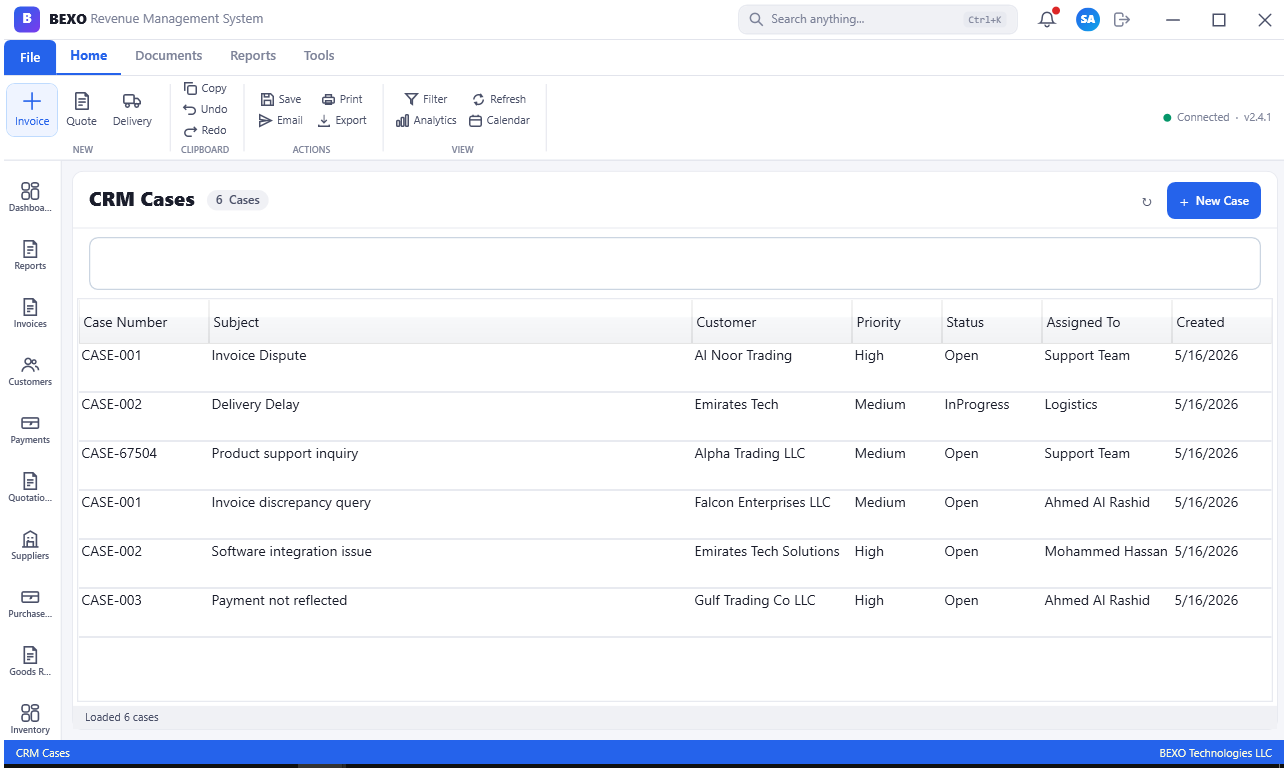
Tip: Use case priorities consistently. If everything is marked Critical, the priority system loses its value. Define clear criteria for each priority level (e.g., Critical = system down/business stopped, High = major impact/workaround exists, Normal = inconvenience, Low = cosmetic or enhancement) and communicate these criteria to your support team.
Note: Resolved cases feed into a customer satisfaction reporting view. Tracking average resolution time and case volume per customer helps you identify customers who may be struggling and need proactive attention or additional training.
8.6 Service Contracts
Service Contracts track ongoing support or maintenance agreements with customers. Where a case is a one-off incident, a service contract is the overarching agreement that governs the scope of support, response times, and billing terms for an extended period.
Navigate to CRM > Service Contracts to view all contracts. Each record shows the customer name, contract type (Support, Maintenance, Managed Service), start date, end date, contract value, and renewal status (Active, Expiring Soon, Expired, Renewed).
To create a new service contract, click New Contract, select the customer, define the contract type and scope in the description field, set start and end dates, and enter the financial terms (monthly fee, annual fee, or pay-per-incident). BEXO will alert you when a contract is approaching its renewal date, allowing your account managers to engage customers before the contract lapses.
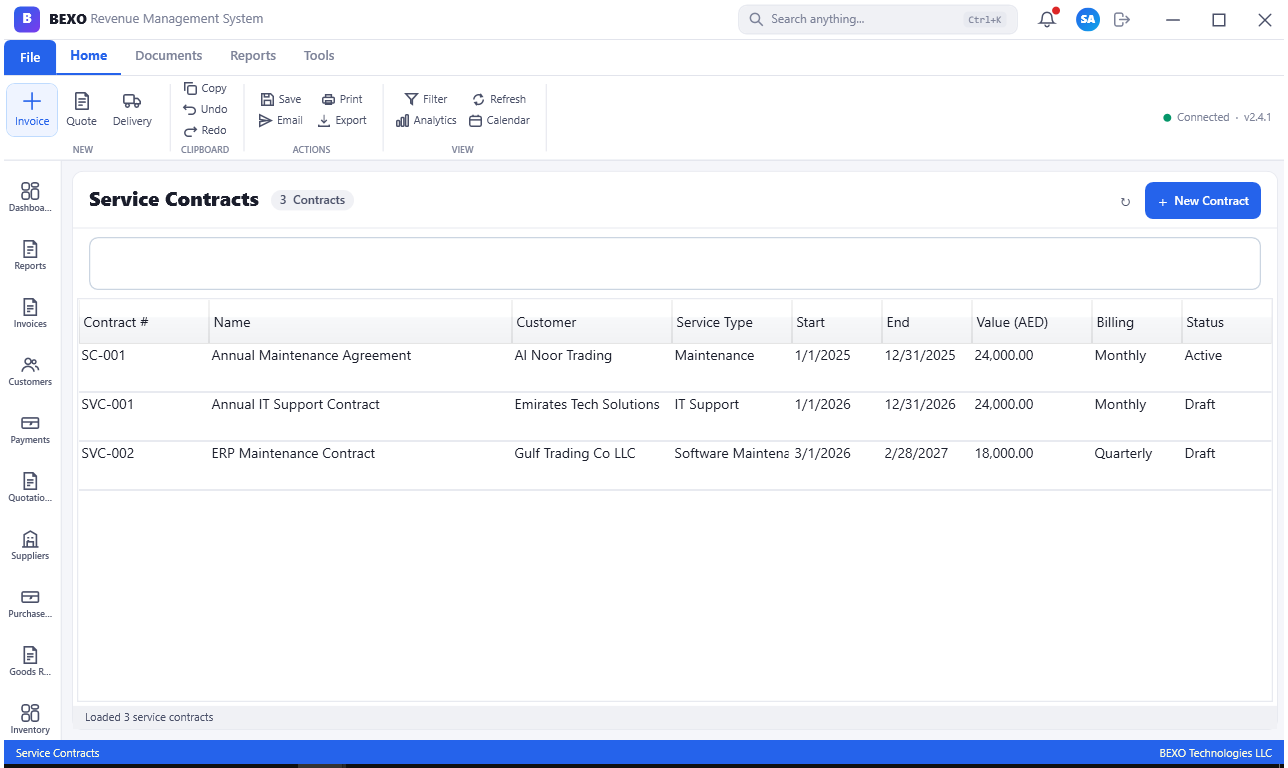
Tip: Link service contracts to the customer's financial profile so that contract billing generates invoices automatically each period. Manual contract billing is error-prone and often delayed — automated billing ensures your support revenue is recognized on time every month.
Part 9: Property & Rental Management
9.1 Rental Properties
The Property Management module makes BEXO suitable for businesses that own and rent out real estate — from single office buildings to large residential or commercial portfolios. The Rental Properties screen is the master register of all properties under management.
Navigate to Property > Rental Properties to view the property register. Each property record shows the property name, type (Residential, Commercial, Industrial, Mixed Use), location (building, area, city), number of units, occupancy status, and the property manager. Click New Property to add a new property to the register.
The property form includes tabs for Details (name, type, address, ownership details), Units (list of individual rental units within the property), Financials (market value, purchase price, mortgage details, target rental yield), Documents (title deed, NOC, insurance certificates), and Maintenance (service providers, maintenance history). A well-populated property record gives your team everything they need to manage the asset without searching through separate files or spreadsheets.
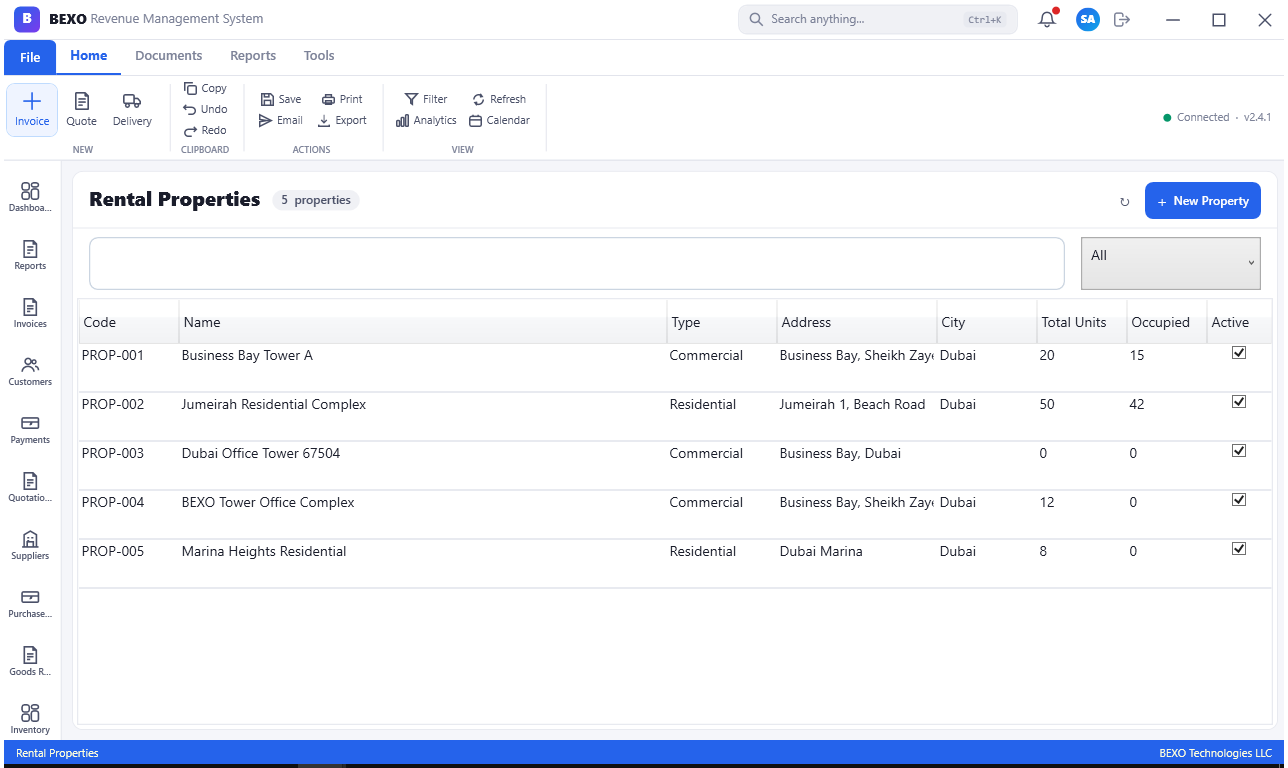
Tip: Upload the title deed and key property documents in the Documents tab. This makes them instantly accessible to your legal team and property managers and reduces the risk of losing critical documentation. BEXO stores documents against the property record permanently.
9.2 Rental Units
Each property in BEXO can contain multiple rental units — individual apartments, offices, retail spaces, or parking bays. The Rental Units module manages these at the unit level, tracking availability, rental value, and occupancy status independently for each unit.
Navigate to Property > Rental Units to view all units across all properties. The grid shows unit reference, property name, unit type, size (sqm), floor, current rental rate, and status (Vacant, Occupied, Under Maintenance, Reserved). You can filter by property, status, or unit type.
To add a new unit, click New Unit and link it to a property. Fill in the unit reference (e.g., Apartment 304), type, size, floor number, number of bedrooms/bathrooms (for residential), and the target monthly rental rate. Each unit can have its own set of documents (e.g., a unit-specific floor plan or condition report).
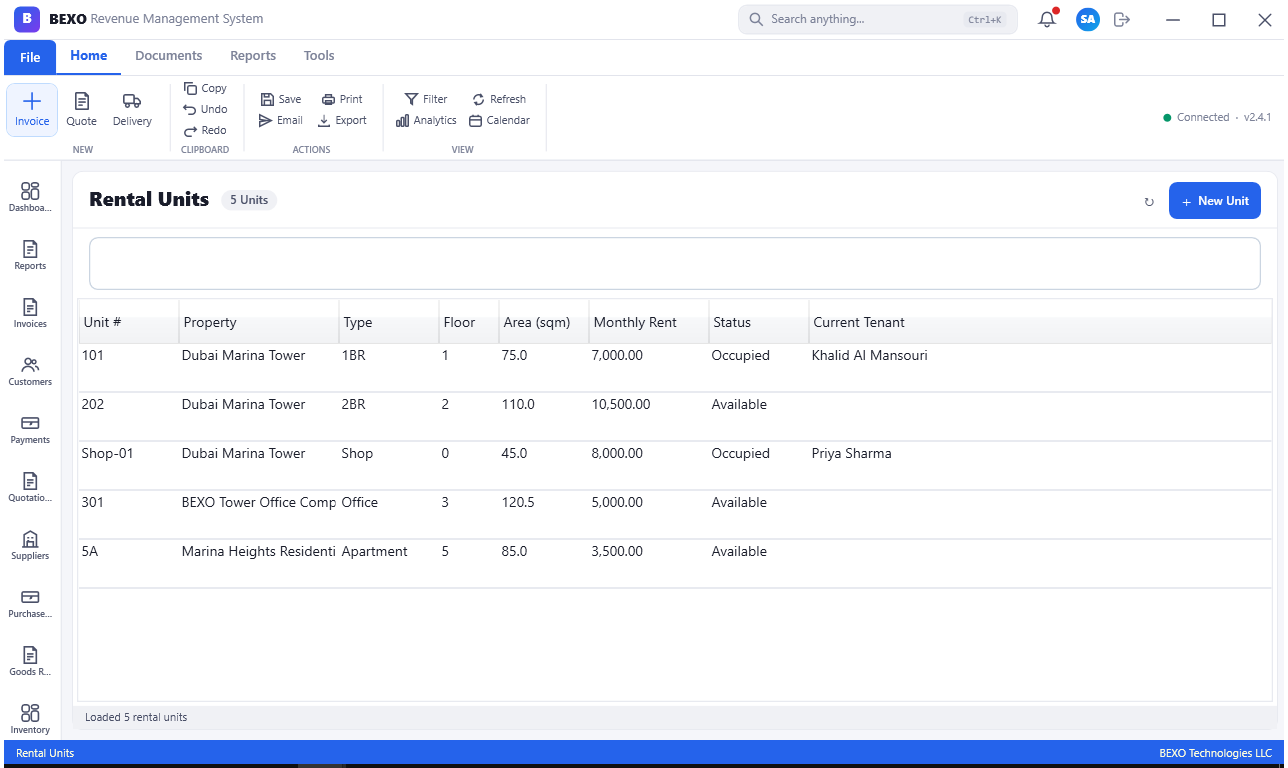
Tip: Use a consistent unit reference format across all your properties. A format like "[Property Code]-[Floor]-[Unit Number]" (e.g., BLD1-03-04 for Building 1, Floor 3, Unit 4) makes it easy to identify units from any report or document without needing to look them up.
9.3 Rental Contracts
A Rental Contract formally records the agreement between your organization (as landlord) and a tenant. It captures the unit, tenant, rental amount, payment schedule, start date, end date, and any special terms. BEXO uses the contract to auto-generate rental invoices on schedule.
Navigate to Property > Rental Contracts to view all contracts. Each record shows the contract number, tenant name, unit reference, monthly rent, start date, end date, and status (Active, Expiring Soon, Expired, Terminated). BEXO flags contracts expiring within 60 days (configurable) so your property managers can engage tenants about renewal.
To create a new rental contract, click New Contract. Select the tenant (from the Tenants register), the unit, and enter the rental terms: start and end date, monthly or annual rent amount, payment frequency (monthly, quarterly, bi-annual, annual), security deposit amount, and escalation clause (if applicable). Save the contract — BEXO will then auto-generate invoices at each due date based on the payment frequency configured.
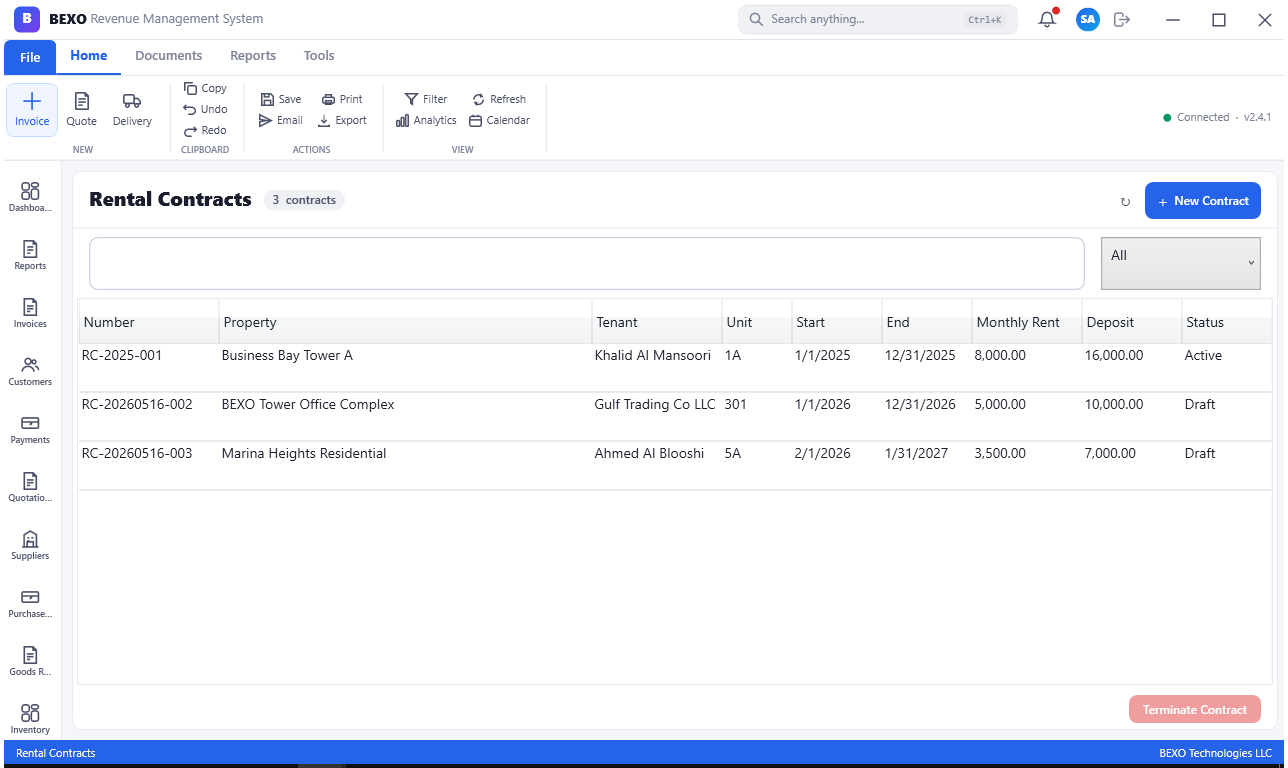
Warning: Ensure that contracts are created in BEXO at the same time as they are signed, not retrospectively. Backdated contract creation can cause invoices to be generated for past periods that have already been paid via another method, creating reconciliation confusion.
Tip: Use the Escalation Clause feature to automatically increment the rent at each renewal cycle. Instead of manually editing the contract each year, BEXO can apply a percentage increase (e.g., 5% annually) and issue the new contract automatically, subject to your approval.
9.4 Tenants
The Tenants register stores the profile of every individual or business that rents a unit from you. This is the property management equivalent of the Customers module — every rental contract, payment, and correspondence links to a tenant record.
Navigate to Property > Tenants to view all tenants. The list shows the tenant name (individual or company), contact details, nationality, Emirates ID or trade license number, number of active leases, and outstanding balance. Click New Tenant to register a new tenant.
The tenant form captures personal/company details, identification documents (Emirates ID, passport, visa copy, or trade license for corporate tenants), emergency contact, and payment preferences. The Contracts tab lists all rental contracts (current and historical) associated with this tenant, while the Payments tab shows all rental payments received.
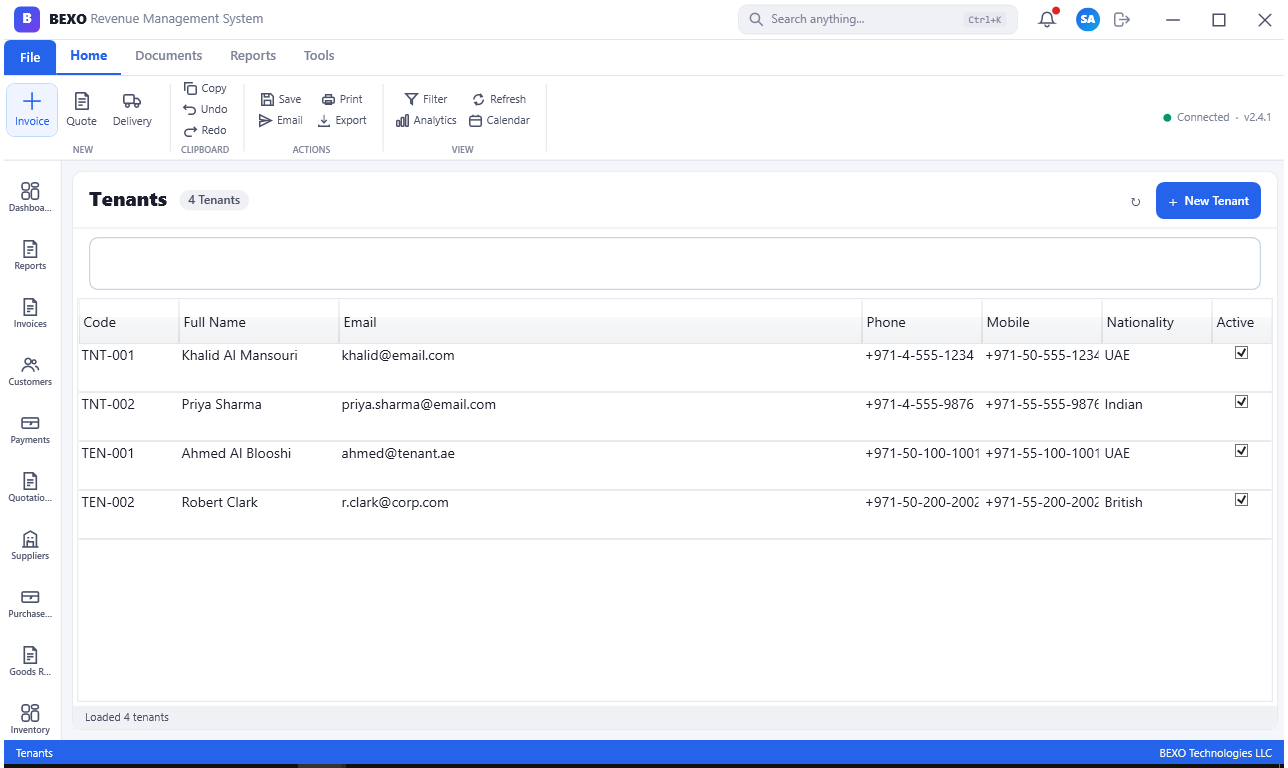
Tip: Collect and upload all tenant identification documents at the time of registration. In the UAE, retaining copies of tenant Emirates ID and visa is a legal requirement for residential leases registered with EJARI. Having them in BEXO ensures they are always accessible for regulatory purposes.
9.5 Insurance
The Insurance module tracks all insurance policies related to your properties, assets, and operations. Knowing when policies renew and what they cover is critical for risk management and ensures that you are never unexpectedly uninsured.
Navigate to Property > Insurance (or Settings > Insurance, depending on your BEXO configuration). The list shows each policy record with the insurance provider, policy number, type (Property, Liability, Employees, Motor, Medical), coverage period, premium amount, and renewal date. BEXO alerts you when policies are approaching renewal.
To add a new policy, click New Policy, enter the insurer name, policy number, coverage type, insured amount, start and end dates, and annual premium. Upload the policy certificate in the Documents tab. Link the policy to the relevant property or asset if it is a property-specific policy.
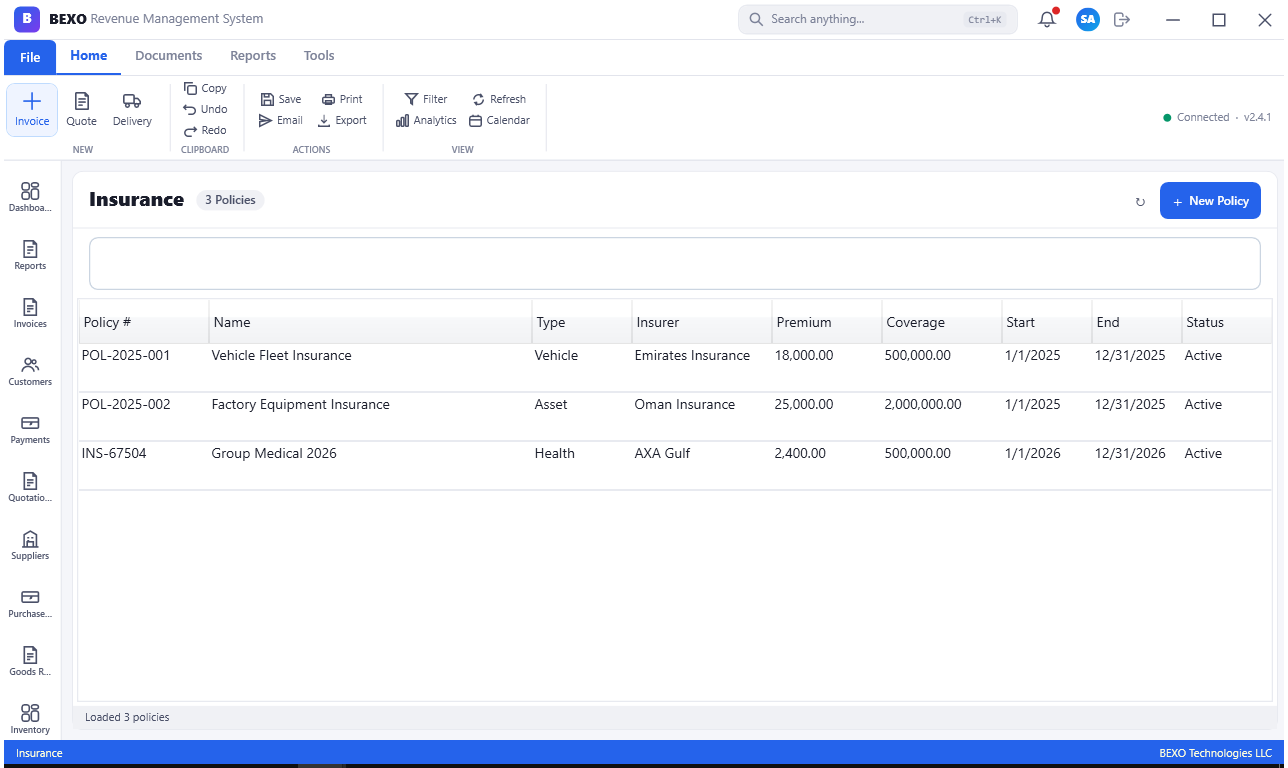
Warning: Never allow an insurance policy to lapse without a replacement in force. Set renewal reminders in BEXO at least 60 days before the policy expiry date to allow sufficient time for renewal negotiations. In the property sector, being uninsured — even for a day — exposes you to potentially catastrophic uninsured losses.
9.6 Maintenance
The Maintenance module schedules and tracks all preventive and corrective maintenance activities across your properties and equipment. Proactive maintenance prevents costly breakdowns, protects property value, and ensures tenant satisfaction.
Navigate to Property > Maintenance (or Manufacturing > Maintenance for equipment maintenance). The maintenance register shows all maintenance jobs with the property or asset, type (Preventive, Corrective, Emergency), scheduled date, assigned contractor or staff member, status (Scheduled, In Progress, Completed, Overdue), and estimated cost.
To schedule a new maintenance task, click New Maintenance, select the property/unit or machine, choose the maintenance type, describe the work required, set the scheduled date, assign the responsible party, and enter the estimated cost. For recurring maintenance (e.g., monthly AC servicing, quarterly pest control), you can configure BEXO to auto-generate the next maintenance task when the current one is marked complete.
Tip: Preventive maintenance is almost always cheaper than corrective maintenance. Use BEXO's recurring maintenance feature to set up annual, semi-annual, and quarterly service cycles for all critical building systems (HVAC, lifts, fire suppression, generators). Track completion rates to ensure nothing slips through the cracks.
Part 10: Reports & Analytics
10.1 Reports Dashboard
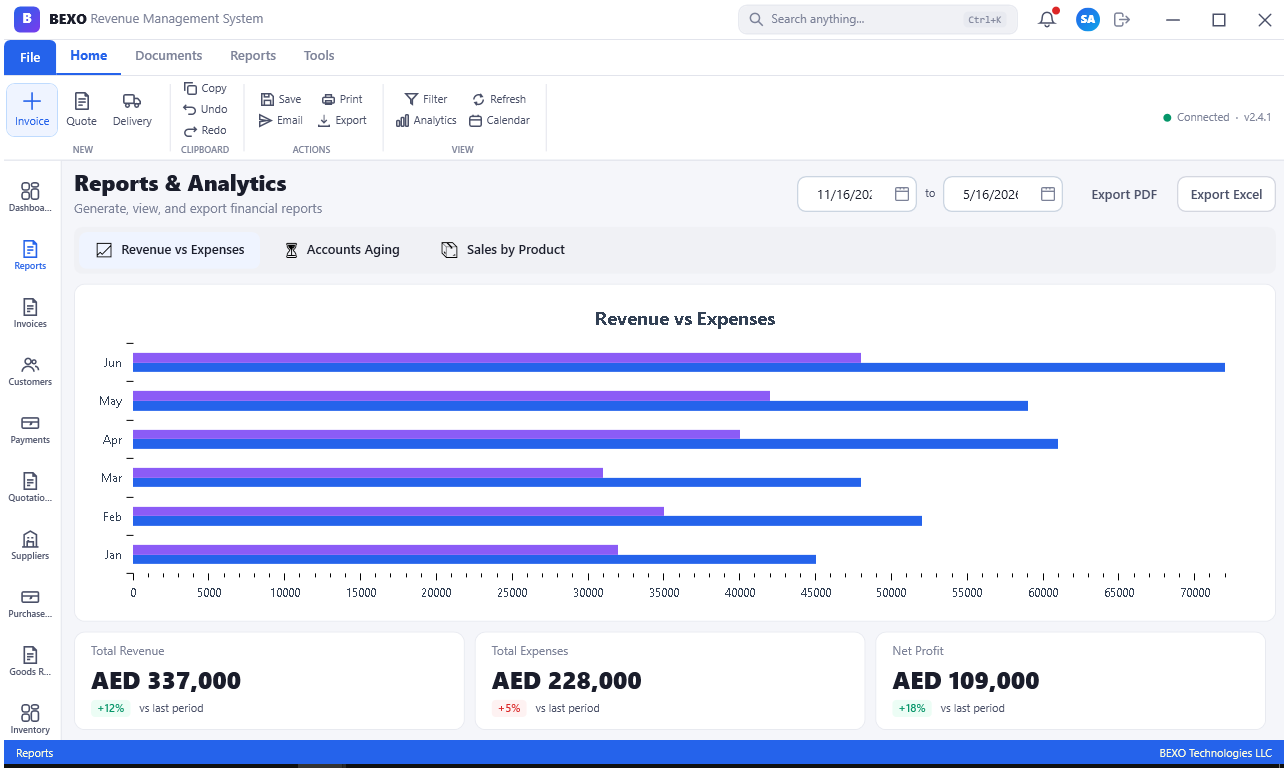
The Reports module is your analytical control tower — a single destination that surfaces data from every other BEXO module in the form of pre-built and configurable reports. Whether you need a sales summary, a trial balance, an aged receivables analysis, or a headcount report, this is where you find it.
Navigate to Reports in the left sidebar to open the reports hub. The reports are organized by category: Sales Reports (revenue by customer, by product, by sales rep, invoice aging), Purchasing Reports (spend by supplier, purchase history), Inventory Reports (stock levels, turnover, slow-moving items), Financial Reports (trial balance, P&L, balance sheet, cash flow), HR Reports (headcount, payroll summary, leave analysis, attendance), CRM Reports (pipeline summary, campaign ROI, case resolution), and Property Reports (occupancy rate, rental income, lease expiry summary).
Click any report category to expand it and see the available reports. Click a report name to open the configuration panel, where you set the date range, filters (e.g., specific customer, department, or warehouse), grouping options, and output format. Click Run or Generate to produce the report.
Tip: Use the Schedule feature on frequently used reports. For example, you can schedule the weekly Sales Summary to be generated and emailed to your management team every Monday morning at 7 AM, eliminating the need for manual extraction. Ask your BEXO administrator to configure scheduled report delivery.
Note: Some reports in BEXO are real-time (they reflect the current moment's data), while others are designed for period-end analysis (they expect a closed accounting period to produce accurate results). The report description will indicate which type it is. For period-end reports, always ensure the relevant accounting period is closed before including the figures in official presentations.
BEXO also supports custom report building for organizations with specialized reporting needs. Your system administrator or BEXO implementation partner can create custom report templates that combine data from multiple modules, apply custom formulas, and present results in organization-specific layouts.
Tip: Export critical management reports to Excel before distributing them. Excel gives recipients the ability to drill down into specific figures without needing BEXO access. For presentations or board packs, export to PDF for a clean, non-editable format.
Part 11: Administration
11.1 Approvals Workflow
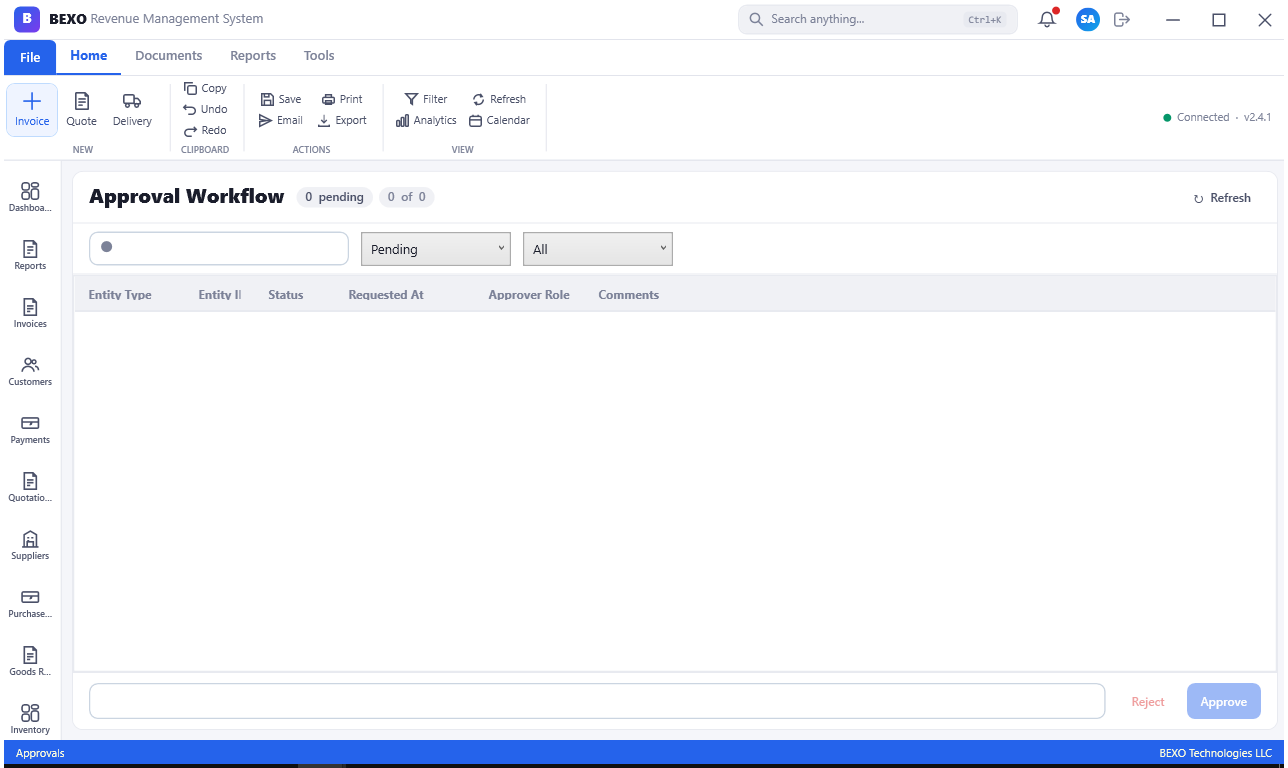
The Approvals module enables multi-level authorization for sensitive transactions — purchase orders above a threshold, large expense claims, new customer credit limits, payroll adjustments, and more. A well-configured approvals workflow enforces financial controls without slowing down routine operations.
Navigate to Admin > Approvals to view pending approval requests. The list shows the transaction type, reference number, requestor, amount or details, submission date, and current approval step. As an approver, you can see all items awaiting your review. Click any item to open the full transaction details, add a comment, and click Approve or Reject.
Your BEXO administrator configures approval rules in system settings: which transaction types require approval, approval thresholds by amount or risk level, and the chain of approvers (sequential or parallel). Rejected items are returned to the requestor with the approver's comment, allowing revision and resubmission.
Tip: Configure email or push notification alerts for pending approvals. Without notifications, approvers may not realize they have items awaiting review, causing delays in purchase orders and payments. The approval queue should be checked at least daily.
Warning: Bypass approvals only in genuine emergencies, and always document the reason. Approval bypasses are logged in the Audit Logs. Patterns of bypassing controls will appear in security reviews and may indicate a breakdown in financial discipline.
11.2 Audit Logs
The Audit Logs module provides a tamper-proof record of every significant action performed in BEXO — every record created, edited, deleted, or posted; every login; every settings change; and every approval decision. Audit logs are your primary tool for investigating discrepancies, meeting compliance requirements, and deterring fraud.
Navigate to Admin > Audit Logs to view the log. The grid shows the timestamp, user who performed the action, action type (Create, Update, Delete, Post, Login, Logout, Export), module and record affected, and a before/after snapshot of changed fields. You can filter by date range, user, module, or action type.
The Audit Logs are read-only — they cannot be edited or deleted by any user, including administrators. This ensures the integrity of the audit trail. Most regulatory frameworks (including UAE VAT regulations and IFRS) require that financial systems maintain an unalterable audit log, and BEXO's implementation satisfies this requirement.
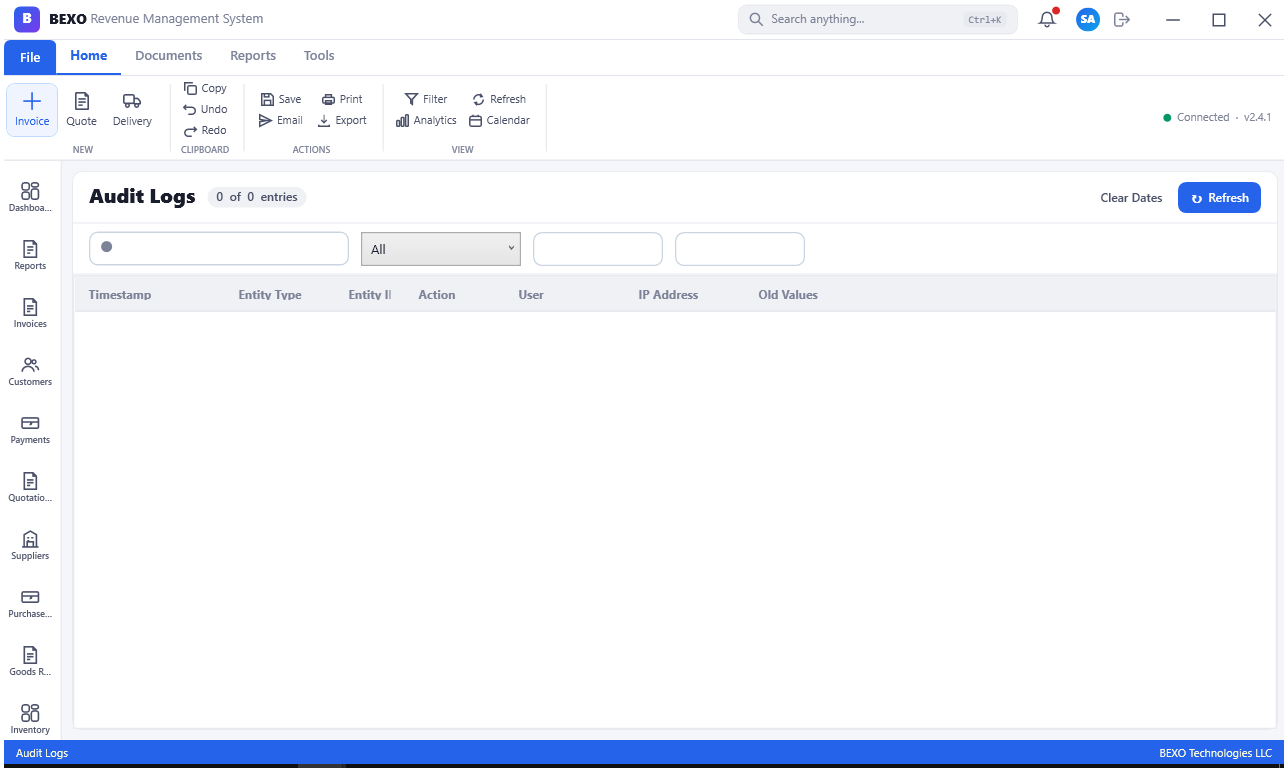
Tip: Review audit logs regularly, not just when an incident occurs. Look for patterns such as a high volume of deletions by a specific user, edits to posted transactions, or exports of large data sets outside business hours. Anomalies in the audit log often surface issues before they become serious problems.
Note: For compliance audits (external audit, VAT audit, labour inspection), your BEXO administrator can export the relevant audit log sections in PDF or CSV format and provide them to auditors directly. Never attempt to prepare selective audit evidence — auditors are trained to detect gaps.
11.3 Companies
If your BEXO installation supports multiple legal entities (common in holding groups, franchise operations, or multi-geography businesses), the Companies module is where each entity is registered and configured. Each company maintains its own separate accounting, payroll, and inventory — but can share a common product catalog and supplier base if configured to do so.
Navigate to Admin > Companies to view all registered companies. Each record shows the company name, trade license number, tax registration number (TRN for VAT), country, base currency, and financial year start month. Click Edit on any company to update its details.
The Companies screen is also where you configure company-level defaults: default payment terms, default invoice currency, company logo (used on printed invoices and reports), bank account details (printed on invoices), and the company address for document headers.
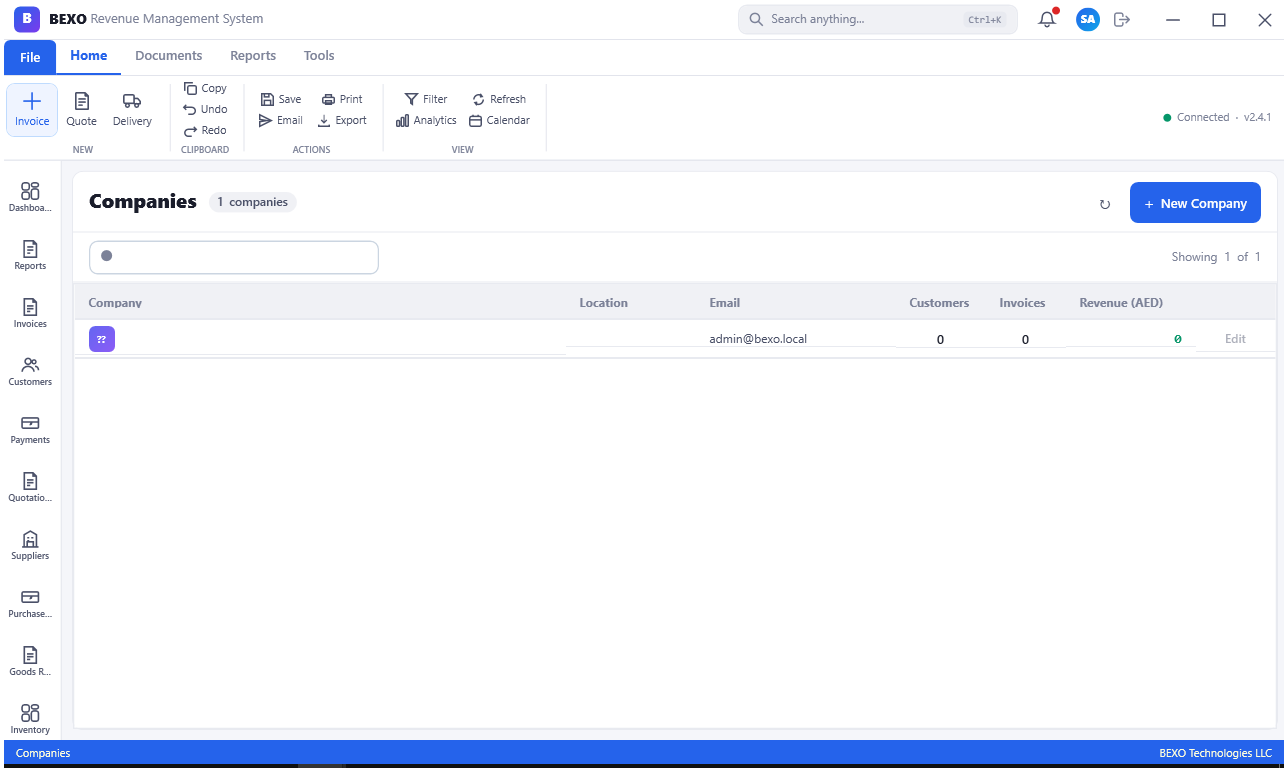
Warning: Changes to the company base currency or financial year start date after transactions have been recorded can have wide-ranging impacts on historical reports. These settings should be locked in before going live. If you need to change them post-go-live, consult your BEXO implementation partner first.
Tip: Upload your company logo (high-resolution, preferably PNG with transparent background) in the Companies settings. This logo will appear on all printed invoices, purchase orders, statements, and reports — a professional-looking document makes a strong impression on customers and suppliers.
11.4 System Settings
System Settings is the master configuration panel for BEXO. It governs everything from accounting defaults and currency settings to email server configuration, approval thresholds, and feature toggles. Most settings are configured once during implementation and rarely need to change thereafter.
Navigate to Admin > Settings to open the settings panel. Settings are organized into tabs or categories: General (company defaults, date/number formats, timezone), Accounting (default accounts, fiscal year, VAT settings), Sales (invoice numbering, payment terms, overdue alerts), Purchasing (PO approval thresholds, default lead times), Inventory (costing method — FIFO/LIFO/Average Cost, negative stock rules), HR (working days, overtime rules, payroll calendar), Email (SMTP server configuration for sending automated emails), and Security (password policy, session timeout, login attempt limits).
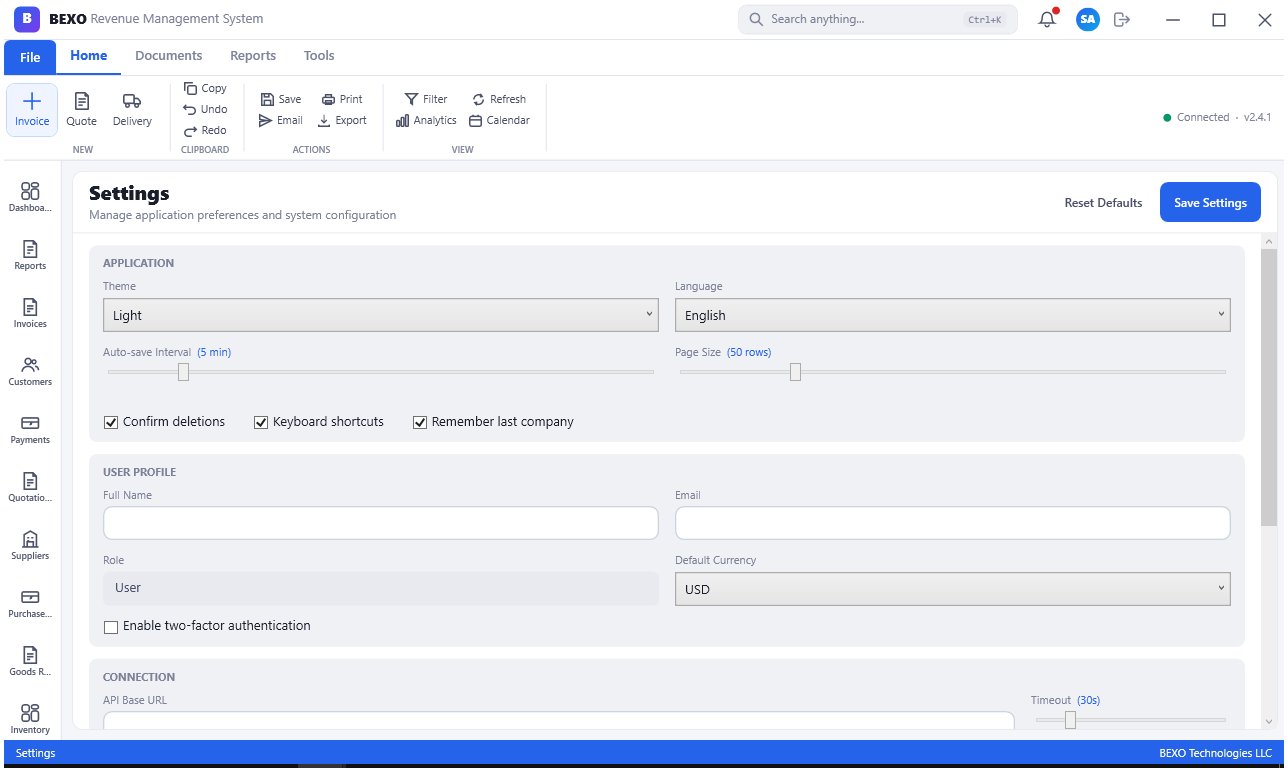
Warning: System settings changes can affect the entire organization immediately. Never make changes in a production BEXO environment without first understanding the downstream impact. Always document what you changed and why, and test in a non-production environment if one is available.
Tip: Review and document all system settings during implementation, before go-live. This documentation serves as your baseline configuration reference. If something goes wrong after a settings change, having the original values recorded makes rollback straightforward.
11.5 Security & Users
The Security module is where BEXO administrators manage user accounts, assign roles, define permissions, and configure security policies. Proper access control is one of the most important safeguards against both accidental data corruption and intentional misuse.
Navigate to Admin > Security (or Users) to view all user accounts. The list shows the username, full name, email, assigned role, last login date, and account status (Active, Locked, Disabled). From here, administrators can create new user accounts, reset passwords, assign or change roles, and lock or unlock accounts.
BEXO uses role-based access control (RBAC). Roles define what a user can see and do. Standard roles typically include SuperAdmin (full access), Admin (configuration access, no financial posting), Manager (approval rights, reporting), Accountant (full finance module access), HR Manager (full HR module access), Sales Executive (CRM, invoicing, quotations, payments), Purchaser (purchasing, GRN), Warehouse Operator (inventory, stock movements), and Read Only (view-only access to all modules). Custom roles can be defined to match your exact organizational structure.
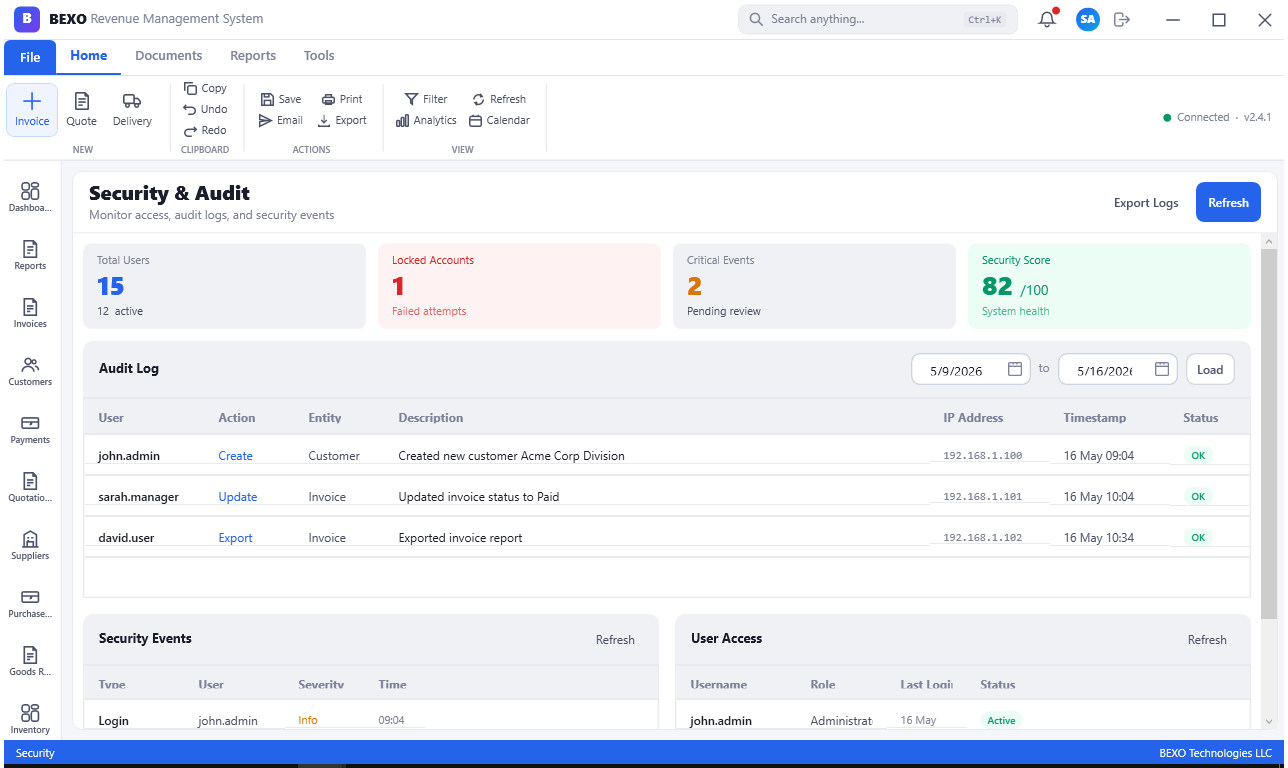
Warning: Apply the Principle of Least Privilege — each user should have only the minimum access they need to perform their job. Granting everyone SuperAdmin access "for convenience" is one of the most common and most dangerous mistakes in ERP implementations. It makes fraud much easier and audit trails harder to interpret.
Tip: Conduct a user access review every six months. Employees change roles, departments, and sometimes leave the organization entirely. Former employees whose accounts are not disabled promptly represent a security risk. A bi-annual access review ensures the user list stays current and access rights remain appropriate.
Note: BEXO logs every security-related action in the Audit Logs. Password resets, role changes, account lockouts, and login failures are all recorded. Review these logs periodically to detect unauthorized access attempts or suspicious account activity.
Quick Reference: Module Navigation Map
| Module | Sidebar Path |
|---|---|
| Customers | Sales > Customers |
| Quotations | Sales > Quotations |
| Invoices | Sales > Invoices |
| Payments (Received) | Sales > Payments |
| Suppliers | Purchasing > Suppliers |
| Purchase Orders | Purchasing > Purchase Orders |
| Goods Received Notes | Purchasing > GRN |
| Products | Inventory > Products |
| Stock Overview | Inventory > Inventory |
| Stock Movements | Inventory > Stock Movements |
| Bill of Materials | Manufacturing > BOM |
| Manufacturing Orders | Manufacturing > Manufacturing Orders |
| Work Orders | Manufacturing > Work Orders |
| Machines | Manufacturing > Machines |
| Chart of Accounts | Finance > Accounts |
| Journal Entries | Finance > Journals |
| Financial Statements | Finance > Financials |
| Tax / VAT | Finance > Tax |
| Bank Reconciliation | Finance > Bank Reconciliation |
| Budgets | Finance > Budgets |
| Cost Centers | Finance > Cost Centers |
| Fixed Assets | Finance > Fixed Assets |
| Employees | HR > Employees |
| Attendance | HR > Attendance |
| Leaves | HR > Leaves |
| Shifts | HR > Shifts |
| Payroll | HR > Payroll |
| Employee Loans | HR > Employee Loans |
| Gratuities | HR > Gratuities |
| Appraisals | HR > Appraisals |
| CRM Contacts | CRM > Contacts |
| Leads | CRM > Leads |
| Opportunities | CRM > Opportunities |
| Campaigns | CRM > Campaigns |
| Support Cases | CRM > Cases |
| Service Contracts | CRM > Service Contracts |
| Rental Properties | Property > Rental Properties |
| Rental Units | Property > Rental Units |
| Rental Contracts | Property > Rental Contracts |
| Tenants | Property > Tenants |
| Insurance | Property > Insurance |
| Maintenance | Property > Maintenance |
| Reports | Reports |
| Approvals | Admin > Approvals |
| Audit Logs | Admin > Audit Logs |
| Companies | Admin > Companies |
| System Settings | Admin > Settings |
| Security / Users | Admin > Security |
Glossary
COA — Chart of Accounts. The master list of all financial accounts used in double-entry bookkeeping.
GRN — Goods Received Note. A document confirming the physical receipt of goods from a supplier.
IFRS — International Financial Reporting Standards. The accounting framework BEXO is designed to support.
MO — Manufacturing Order. An instruction to produce a specified quantity of a finished good.
P&L — Profit and Loss Statement (Income Statement). A financial report showing revenues, costs, and net profit for a period.
PO — Purchase Order. A formal document sent to a supplier authorizing the delivery of goods or services.
RBAC — Role-Based Access Control. A security model where user permissions are assigned through roles rather than individually.
SIF — Salary Information File. The standardized file format required by the UAE Wage Protection System (WPS).
TRN — Tax Registration Number. The unique identifier issued to VAT-registered businesses by the tax authority.
UOM — Unit of Measure. The unit in which a product is counted, weighed, or measured (e.g., Each, Kg, Litre, Box).
VAT — Value Added Tax. A consumption tax applied at each stage of the supply chain. In the UAE, the standard rate is 5%.
WPS — Wage Protection System. The UAE Ministry of Human Resources system that mandates electronic salary payment and reporting for employers.
End of BEXO ERP Illustrated User Tutorial
For technical support, contact your BEXO administrator or refer to the deployment handoff documentation.